Off Camera Flash for Your Travel Photography
A Post By: Brook Mitchell
The creative use of artificial light in travel photography is a powerful tool that can take your images to the next level. While there’s a myriad of information available on getting started with off camera flash, the tutorial here is tailored for you. It will give you a start using these techniques with relatively cheap and portable equipment while on the road. The tutorial will cover the basics of gear you will need, along with real world examples of different techniques you can use to make your images pop.

It is assumed here that you have a full understanding of how to use your camera in manual mode , and some experience with the basics of flash photography . The techniques covered here are not overly difficult, and with some practice at home you will be able to approach your next trip with a new set of options to inspire your photography.
You may know, that images shot with on camera flash do not usually produce flattering results for your subjects. Moving your flash off camera often means an investment in more gear, though it doesn’t have to be super expensive or add too much bulk to your travel kit. The resulting images you get from this investment will be well worthwhile.
For this tutorial I’ll be covering some different options for putting together a basic one light setup that can be fired off camera remotely and modified through a small softbox or umbrella. This sort of setup is a practical way to travel, especially if you are on the road for an extended period, and don’t have help lugging around more elaborate studio style setups.
There are potentially many elements to your setup, each with wide ranging options in price, bulk and results. These bits of gear can be added to virtually any DSLR with manual functions and used with any lens that suits the type of images you want to produce.
- Gear for Off Camera Flash Travel Photography
- 1. Flash gun or speedlight
There has never been a wider amount of choice when it comes to speedlites, or flash guns on the market. From the top of the range Canon and Nikon speedlights that cost upwards of $500.00, to excellent third party options, it can be a difficult choice to make.
Using off camera flash is best practiced via manual control of both the flash and camera, so higher end options like TTL (Through the Lens) flash metering are not essential, though this is increasingly an option with even cheaper third party flashes.
For a long time I’ve used a Canon 430 EX II, the mid-range option in the Canon Flash line-up, and a relatively affordable bit of gear. When starting out almost any flash will do, as even the cheapest can be fired off camera, and be modified to give you great quality light.
- 2. Flash Triggers
Once you have decided on which flash or speedlight fits your budget, then comes the maddeningly wide array of choices available to fire your flash remotely.
Radio triggers, which can be set to fire the flash from a small unit that slides into your camera’s hot shoe, and another attached to the flash itself, are amongst the easiest and cheapest way to get started.
You might hear many professionals touting the ownership of expensive ‘Pocket Wizards’ as something of an exclusive way into the mysterious world of off camera flash. They are great products but the market has changed. Cheaper options from Yongnuo or Photix cost a fraction of the price, and will work just as well.
I’m currently using a set of Yongnuo YN-622C Triggers , which have worked perfectly through some very tough travel. These also have the option on my Canon 5D3 of adjusting the flash power through the camera menu, which is really useful, though not essential.
- 3. Modifier
While bare flash can produce interesting results, this ‘hard light’ is not always desirable for the type of portraits most people will be looking to produce in their travel photography.
A ‘soft light’, produced by using a flash modifier, is the more common way to shoot, as it produces more flattering results for your subjects. Again, there is an endless array of options here. A small softbox or umbrella are the easiest and most versatile ways to get shooting.
A plain white shoot through umbrella is a cheap and compact option, and throws a fairly wide soft light that can be used for a range of portrait shots. The limitation with these umbrellas is that, as a travel photographer, you will more often than not be shooting outdoors. Any kind of wind while shooting with these might have you uttering expletives at the sight of your gear tipping over or the umbrella folding itself inside out.
A more easily managed item is a small softbox. While not as compact to transport or as simple to set up, these stay sturdy and produce a great, soft light that is useful in most portrait situations. I currently use the small Photoflex Light Dome XS, which has lasted a few years now without any damage. There are many similar options, and even DIY projects that you can find online.
- 4. Light Stand
This is an optional piece of gear that has the potential to be a lifesaver, or just a heavy metal rod in your bag. In most situations you will be able to get somebody to hold the flash or softbox, and roping in friends and family of your subjects to help can be a great way to help people relax.
If you do decide to bring a stand with you, it’s worth spending more over the cheap generic Ebay numbers, which from experience don’t last much past being taken out of the box. The Avenger range of stands are compact and sturdy.
- 5. Flash Gels
CTO (Colour Temperature Orange) gels are simply bits of plastic that you can place over your flash to vary the color temperature of light that reaches your subject. Use of these, or not, is according to personal taste. Strips of this plastic are cheap and easy to purchase online, with the sample packs offered by many companies a great way to experiment. Attaching a bit of velcro to the sides of the plastic and the flash to keep the gel in place is one way to keep things simple.
- 6. ND filter
Another optional piece of gear. The use of ND (Neutral Density) filters with off camera flash adds another tool to your creative arsenal. Using ND filters makes it possible to add more drama to your images with underexposed backgrounds and/or shallower depths of field during the day.
I use a range of ND filters, with the Lee 3 stop Solid ND filter , mounted with the Cokin Z Pro Holder the most common choice. Again, this is not an essential part of a flash setup, and something that can be added once you are more comfortable with the basics.
- Shooting Off Camera Flash Travel Photography
Once you have your setup sorted it’s worthwhile practicing to get it all working in the quickest time possible. Without treating it like a frantic pit stop, it’s really handy to be able to get everything in order as fast as you can. On the road you don’t want to monopolize somebody’s precious time more than necessary. Being confident with your gear and shooting style, helps put your subjects at ease as well.
The following examples from recent shoots are broken into two rough styles of shooting with off camera flash. The first is the technique of balancing flash with ambient (available light), producing images where the light from your flash is subtle, and blends with the background of your subject. The second is the technique of underexposing the ambient or background light, and using shallow depth of field to add more drama to your images.
The golden rule to remember with flash photography is that your aperture setting, combined with your flash power, controls the amount of artificial or flash in your photos. Your shutter speed will control the ambient, or background, light.
- Technique #1 – balancing flash with ambient

Natarajan, Little Andaman Island, India
I had met this elderly gentleman a few days prior to the shot taken here. At the time of our meeting he was the oldest living man in a remote part of the Andaman Islands Chain which was devastated by the 2004 Tsunami. I wanted to take his picture for a magazine feature I was putting together. By the time I got to his place to take a few shots one evening, it was right on dark, with only dim ambient light left to work with. This was a great time to break out the flash for a simple portrait.
After setting up a small softbox and attaching the radio flash triggers to fire the flash, I first exposed for the ambient light, setting my shutter speed and ISO to ensure a sharp image. I then chose an aperture of f/4, which combined with a telephoto lens, helped throw the background out of focus .
At these settings, without the use of flash, Natarajan’s features were dark and flat. Adding in the flash, fired remotely, allowed for a better portrait by emphasizing his strong features and throwing pleasing catch lights into his eyes (the reflection of the flash in your subjects pupils).

I asked my friend Stephan to hold the flash at a downwards 45 degree angle camera left, just out of frame, aimed at the left side of Natarajan’s face (see lighting diagram above). I usually start with the flash in manual mode, set to 1/16 power and work from there. If the flash is too strong you can power down or vice versa.
In this simple portrait, the flash light lends some shape to the subjects face without its use being so obvious.

Laura Dance Festival, Cape York, Queensland, Australia
The picture above was taken of a young boy from the Injanoo tribal group from the far north coast of Queensland, Australia. At the bi-annual Laura Dance Festival, tribal groups gather to dance and celebrate their ancient culture with outsiders.
After shooting the dance action for a few hours I wandered off to find some kids practicing their routines, with light from the setting sun filtering through the eucalyptus trees around the camp lighting up their moves.
With a small army of enthusiastic helpers I broke out the softbox and triggers, working quickly to keep the setting sun as an element to the shot. For this image a fairly heavy CTO gel was used over the flash to give the light the look of the setting sun. It’s not exact but lends a nice warmth to the light that would have otherwise looked more out of place at this time of evening.
I asked the boy to stand with the setting sun positioned behind his head, and then exposed for the background, ambient light. I chose to shoot from a low angle , as this usually works to emphasize strength in your subjects.
The flash was again set to manual and 1/16 power, which was close to the right flash exposure for the subject. This time the flash was held by another young dancer, just over my shoulder camera right (see lighting diagram below).

In the final image the highlights needed some recovery in post, and a slight vignette was added.
Backlighting your subjects this way (with the sun behind the subject) adds some dramatic effect, with the flash exposing a subject that would otherwise have been in near darkness without it.
- Technique 2 – Underexposing with ND Filters for Dramatic Effect

Adrian, The Marrinyama Mob
The image above is from a shoot in a remote part of Queensland, Australia. For part of the year the guys live a traditional lifestyle, hunting, dancing and performing tough initiations on younger boys. It was the height of summer, and I was working alone with searing desert temperatures and strong winds whipping up dust from the red earth around the camps which the group called home.
In these situations being comfortable with your gear, and confident with what you are trying to achieve is really important. A flimsy umbrella or larger modifier for the flash shots would have been difficult to manage on my own. I chose to use my ever reliable little softbox setup, mounted on a decent light stand, and worked towards creating images that I had envisaged before the shoot.
For this shot of Adrian, a slightly more advanced setup was used. I wanted a shallow depth of field and for the portrait to look dramatic. This was achieved with the help of a 3 Stop ND filter to underexpose the background while keeping a shallow depth of field a f/2.8.

The flash was set to full power camera left, set just out of the frame (see diagram above). The result is that the flash is more noticeable than usual, with the background underexposed and blurred nicely for effect.
The video below is from a recent shoot in remote Arnhem Land, Northern Australia. The softbox – flash – trigger setup mentioned throughout the article is shown towards the end of the footage. Again, the flash setup was used to help out during less than ideal lighting situations on this trip.
The sun filtering through the smoke of a slow burning bush fire behind Tom helped to add some drama to the image, with the flash providing the correct exposure for his face. The flash was held close to Tom, camera right, and fired at 1/16 power.
Hopefully this tutorial has given you a starting point to work from with off camera flash for your travel photography. There’s many tutorials available for every aspect of what has been mentioned here. Happy shooting.


Table of contents
Travel photography.
- 8 Ideas of What To Do With Your Vacation Photos
- What Skills do You Need to be a Travel Photographer?
- How to Capture the Essence of a Place – Travel Photography Tips
- 7 Tips to Make Travel Photography Interesting Again
- Avoid These 5 Major Mistakes Made By Travel Photographers
- Travel Photography – Do You Ask Permission Before, After Or Not At All?
- Travel Photographers Workflow – At Home and on the Road
- The Photo Critique: Travel Photo Edition
- 6 Reasons Why Your Travel Photos Don’t Look Like the Ones in Magazines
- The Fine Line Between Travel Photography and Having a family Vacation
- 10 Ways to Improve your Vacation Photos
- What is Your Biggest Travel Photography Challenge?
- 7 Travel Photography Hacks to Get You Going Places
- How to Use a Travel Photography Shot List to Come Home with Better Photos
- Why You Need To Be A Guerrilla Travel Photographer – And How To Become One
- How to Get the Most Out of a Travel Photography Location
- Travel Photography, Backpacking and Packing Light
- 6 of the Best Smartphone Apps for Travel and Landscape Photography
- How To Keep Camera Gear Safe While Traveling
- 5 Ways to Find Great Locations for Travel Photography
- 15 Tips for Protecting Your Images While Traveling
- Safety Tips for Travel Photographers (Particularly Women)
- How to Use Natural Light in Travel Photography
- Photo Composition Tips from Bob Holmes – Composition in Travel Photos
- The Importance of People in your Travel Photos
- Create More Unique Travel Photos by Adding a Model
- 5 Lessons Learned Switching from DSLR to Mirrorless for Travel Photography
- How To Keep Your Batteries Charged While Traveling – Remote Location Edition
- 5 Tips For Travel With Only One Lens
- 5 Lessons Learned While Using a Kit Lens for Travel Photography
- 7 Tips for Using a Tripod in Landscape and Travel Photography
- The Best Fujifilm X-Series Kits for Travel Photography
- The First 10 Things You Need to Buy After Your Camera for Travel Photography
- Tiniest Interchangable Lens Micro Four Thirds Cameras for Travel with Amazing Quality
- The Only Three Lenses You Need for Travel Photography
- Must Have Gear for Travel Photography Newbies
- Why Olympus Mirrorless Cameras are Top Notch for Travel Photography
- The Best Travel Photography Lenses: Our Top 12 Picks
- 5 Camera Bags That Every Travel Photographer Needs At Some Point
- A Travel Tripod that can Also Act as a Light Stand
- The iPad as a Photographer’s Travel Helper [a Review]
- 7 Non-Photography Items Which No Travel Photographer Should Leave Home Without
- 7 Reasons Why a Tripod is a Travel Photographer’s Best Friend
- Travel Photography Equipment – What To Pack?
- 10 Ways to Improve Your Travel Photography Portraits
- How to Plan and Take Killer Sunset Photos on Your Next Vacation
- Tips for Photographing Local Parks
- How to Find the Best Kinds of People to Photograph While Traveling
- 4 Ways To Make Better Street Portraits While Traveling
- How to Photograph People When Traveling
- How To Take More Creative Environmental Travel Portraits
- Photographing Signs – Travel Photography Tip
- Tips for Creating Better Documentary Travel Photos
- 6 Tips for How to be a Culturally Sensitive Travel Photographer
- Travel Photography Subjects: Old People
- How to Put the Fine Art into Travel Photography
- Travel Photography without the Travel – Going Local
- How to Tell Better Visual Stories with Travel Photography
- Create a Theme to Step Up Your Travel Photography
- Travel Photography ~ Think Outside The Postcard When Photographing Famous Landmarks
- Photographing Festivals and Events – Tips for Travel Photographers
- Video: Travel Photography Tips – Shoot with a Purpose
- 7 Reasons Why You Should Art Direct Your Travel Photography
- Buy Less Gear: Travel and Experience More
- Editorial Travel Photography – Telling the Story of a Location
- Travel Photography Subjects: Religion
- Travel Photography Subjects: Views
- Travel Photography Tips – Photographing the Coast
- Taking Photos in Busy Tourist Destinations with no People in the Shot
- How to Backup and Manage Your Photos When Traveling Without a Computer
- Tips for Creating a Killer Vacation Photo Book
- Photo Editing Workflow for Travel Photography
- How to Build a Travel Photography Portfolio
- How to Become a Professional Travel Photographer – Two Paths
- 11 Tips for Shooting Travel Stock Photography to Make Money
- How to Sell a Travel Story to a Magazine and Help Fund Your Travels
- 7 Realities That Hit Once You Become a Professional Travel Photographer
- Is a Career in Travel Photography Right for You?
- Travel Inspiration: Bali
- Canadian Travelogue – Introduction
- Travel Photography Inspiration Project: South Africa
- Travel Photography Inspiration Project: Thailand
- Canadian Travelogue – Newfoundland – Gros Morne National Park
- Travel Photography Inspiration Project: India
- Travel Photography Inspiration Project: Japan
- Travel Photography Inspiration Project: Kenya
- Travel Photography Inspiration Project: Morocco
- Travel Photography Inspiration Project: Vietnam
- An Interview With World Traveler Gary Arndt
- Interview: Oded Wagenstein – Author of Snapn Travel Guide and dPS Writer

Read more from our Tips & Tutorials category

is an Australian travel and documentary photographer. His recent work has focused on documenting life in some of Australia’s most remote indigenous communities for Australian Geographic magazine.
- Guaranteed for 2 full months
- Pay by PayPal or Credit Card
- Instant Digital Download

- All our best articles for the week
- Fun photographic challenges
- Special offers and discounts
The leading authority in photography and camera gear.
Become a better photographer.
12.9 Million
Annual Readers
Newsletter Subscribers
Featured Photographers
Photography Guides & Gear Reviews

Flash Photography for Beginners (Ideas, Settings and Tips)
Want to master flash photography? Here's what you need to know to get started! Includes 4 in-depth tips about when and how to use flash.
Learn | By Ana Mireles
For beginners, flash photography might sound complicated.
Most of us start by capturing our subjects with sunlight. However, we quickly find out that natural light can be limiting.
What happens if it’s cloudy , if you want to photograph at night, or if the scene has a lot of contrast?
Having the option to add some flash light expands your possibilities – and it’s not as difficult as you might think.
You can use the flash to compensate for poor light or to create your artistic vision.
Whatever the situation, this article will give you all the information you need to get started, from the types of flashes to some tricks to practice at home.
If you’re ready, let’s get started!
- Which camera flash is best?
Table of Contents
What is Flash Photography?

Credit: Tantray Junaid
Flash photography is any type of photography where you illuminate the scene or the subject with any device that emits a burst of light.
Such a device is a flash unit. This can be anything from the LED light on your camera phone to a studio monolight.
Nowadays, the most commonly used devices are electronic flash units, but this wasn’t always the case.
In fact, the first flash photographers literally risked their lives to get the picture.
Early flash photography was done by burning magnesium to create a bright, daylight-like light. This could be done using flat magnesium ribbon – first created by the Manchester Magnesium Company in 1864 – or with flash powder, a mixture of magnesium powder and potassium chlorate.
Flash powder was ignited by hand, a highly dangerous activity.
Then, in 1889, Joshua Cohen and Paul Boyer invented the flash lamp. It used electrical power to heat a wire fuse and ignite the flash powder to create a burst.
As you can imagine, this method was also quite dangerous. Photographers often got hurt while preparing the flash lamp.
Fortunately, by the end of the 1920s, a new technology came along: flash bulbs.
General Electric (GE) first commercialized these bulbs, which were filled with magnesium filaments and oxygen gas.
Their GE Mazda Type 75 – the largest flashbulb in history – was used for nighttime aerial photography in World War II.
In the 1960s, Kodak introduced the Flashcube, which allowed for four flash bulbs in one device. After each exposure, you only needed to turn the cube to use the remaining bulbs, instead of having to remove it each time.
When GE saw this, they came up with the Flip flash, which allowed the photographer to shoot up to ten images before needing to change it.
Different manufacturers came up with their versions, but the problem remained the same – each bulb was good just for one flash exposure.
That’s where electronic flashes came in.
How Much Do You REALLY Know About Photography?! 🤔
Test your photography knowledge with this quick quiz!
See how much you really know about photography...

Your answer:
Correct answer:
SHARE YOUR RESULTS
Your Answers
In 1931, professor Harold Egerton invented the electronic flash tube. This is the base for all electronic flashes we use today.
The main characteristic is that these devices can store power for later use. Of course, in time, they’ve become faster and cheaper, improved the synchronization capacity, etc.
Thanks to this, we now find different types of flashes that fit all needs and budgets.
The final step in the evolution until today is the LED flash. Despite being used in cameras since the year 2000, they became popular thanks to smartphone photography.
Most camera phones have an LED light that flashes when you take a picture.
- How to Quickly Fix the Flash on Your Phone or Camera
What is Flash Photography Good For?

Credit: Travis Nesbitt
Flash photography is good for any photographic genre. Whether you use it all comes down to the light conditions and your creative style.
These are some of the most common situations when you would want to do flash photography:
- When there isn’t enough light for the camera settings you want to use.
- When you want to freeze a moving subject.
- When you want to illuminate a subject in a dark scene.
- When you want to fill in the shadows created by another light source.
Types of Flash in Photography
I already mentioned that a flash could be anything from the tiny light on your phone to a big studio strobe. So, how many types of camera flashes are there?
- Built-in flash
Many cameras come with some sort of flash incorporated into the body. Whether this is a pop-up flash, LED flash, or another light source depends on the camera type.
For example, DSLRs have a pop-up flash, while camera phones have a LED flash. Even some disposable cameras have a light.
However, not all cameras have a built-in flash. This is commonly the case with mirrorless cameras.
Built-in flashes fire automatically when the camera is in auto mode, and there’s low light. You can also turn the flash on or off manually if the camera allows it.
Some even let you set it to fill mode, slow sync, red-eye mode, etc.
This type of electronic flash has many names. As a general device, it’s often referred to as on-camera flash or hot shoe flash.
There are some proprietary names for it too. The ones from Nikon are called Speedlights, while the Canon flashes are Speedlites.
These devices are light and portable. The flash fires with the shutter release.
They can also be triggered with a transmitter if they’re off-camera.
The more basic ones work manually and only allow you to control the intensity of the flash exposure.
Some more advanced ones have zoom control, high-speed sync, TTL and manual mode, etc.
Before investing in this type of flash, you need to make sure it’s compatible with your camera.
Setting up your camera flash is slightly different for each brand of camera/flash – here’s how to set up a flash for a Sony camera .
This type of electronic flash is shaped like a ring because it sits in front of the lens.
It provides soft flat lighting . This is why it’s commonly used in glamour and beauty photography.
It’s also ideal for macro photography. Because it sits in front of the lens, it won’t cast any shadows on a very close subject.
These are professional lighting devices, also called strobes or monolights.
They’re usually used in the studio. They are larger and heavier than other types of flashes and need an electrical connection to function.
You can also use them if you’re shooting on location. However, because they require electrical power, you’ll either need a power pack or opt for a battery-powered flash head.
- What lighting is best for studio photography?
TTL vs Manual Flash: What’s the Difference?
TTL is the automatic mode of your flash. It stands for Trough-the-Lens because the flash reads the ambient light coming through the lens and adjusts its power accordingly.
The reading happens through a pre-flash light which you’ve probably seen many times. It’s a short burst of light that happens just before the flash goes off.
On the other hand, using the manual flash requires you to adjust the settings for the flash exposure.
Using a manual flash, you need to set it 1/1 for full power flash. To decrease its power, you move in fractions.
To use the flash in manual mode, the camera needs to be in manual too.
You can use an external light meter to determine the flash exposure.
What Are Flash Modifiers?
Flash modifiers are accessories that you can use to change the quality or direction of the light.
Some of the most common are:
- Softbox: it turns hard light into diffused light.
- Reflector: you can use this to bounce light to soften it.
- Grid: it narrows the angle of the light beam.
- Color gels: they add a color tint to the light.
4 Flash Photography Tips & Ideas
If you want to start using flash, here are some tips and ideas to help you out.
1. Get your flash photography settings right

Credit: Lisa Fotios
You don’t need to worry if you’re using your flash in Auto or TTL mode. The flash will measure the available light and adjust the settings automatically.
In manual mode, you need to do this by yourself.
To get the settings right, start by putting the camera in manual mode too.
Set your ISO to 100. One of the advantages of using flash is that you don’t have to raise the ISO.
Then, set the shutter speed. Keep in mind that many cameras have a maximum sync speed of 1/200. So, don’t make it faster than that unless you know you have high-speed sync (HHS).
Remember that a slower shutter speed won’t make the subject brighter. That depends on the flash power.
If you leave the shutter speed open for longer, you’ll let in more ambient light.
Now, you can set the aperture. This determines how much light comes in and the depth of field.
Determine the DOF you want and adjust the flash power accordingly.
If you see that using those settings and the flash at full brightness isn’t enough, you’ll have to compensate. For example, you can raise the ISO or use a wider aperture.
2. How do you practice flash photography?

Credit: Wallace Chuck
To practice flash photography, you don’t need any specific subject. You can do it with a person or a product, or simply try to light a room.
Start by using the flash in manual mode and see how the camera settings change the results.
You can also try to balance the ambient light with the flash.
Finally, try using light modifiers to see how they work – check out our guide to the best softboxes , for example.
If you don’t have a big budget, there are many modifiers that you can DIY. For example, you can build a snoot with a can of Pringles, a grid with cardboard, and a ring light with a cake mold.
3. How can I make my flash pictures look natural?

Credit: Tom Pumford
The natural look of images often has to do with the quality of the light. For example, a direct flash coming from the camera’s built-in flash is very obvious (and unflattering).
What you can do is bounce the light on a reflector or a bounce card.
Many flashguns have a bounce card built-in. You just have to pull it and secure it in place.
Then, find the right angle to light your subject’s face evenly.
Another trick to add a natural look to your images is to slow down the shutter speed . This allows for the ambient light to come through.
This technique isn’t possible with a moving subject. You should also use a tripod to avoid camera shake.
Finally, you need to use the right color temperature.
As you probably know, different lights have different colors expressed in Kelvin degrees.
Most flashes are calibrated to white light (approx. 5500°K), but you might want other settings. For example, if you want your shot to look like you took it at sunset, you need a color temperature of 3000-4000°K.
- Learn more about photography lighting techniques
4. What’s the best lens for flash photography?

Credit: Antony Trivet
Flash photography is a category related to light, not the subject you capture. As such, the best lens you can use depends on what you’re photographing.
For example, a wide-angle lens may be best for interior photography if it’s a small space.
Instead, a short telephoto lens might be the best for a portrait photograph.
Regardless of the lens, they’re both flash photography if you use a flash unit to illuminate them.
However, a couple of tips related to the lens might be useful when doing flash photography.
One tip is to use a lens hood when you position the flash on the side. This will prevent any light from entering the lens, creating unwanted flare.
The next tip regards the pop-up flash. The built-in flash often creates a shadow if the lens is too long or you’re using a lens hood.
You can solve this by changing to an on-camera flash. Because it’s taller, this problem is avoided.
Just note that this might not be enough if the lens is long and you’re focusing on something close to you. In this case, you might want to use a ring flash that fits at the end of the lens.
Otherwise, use off-camera flashes.
If you don’t have any, you’ll need a more drastic solution. For example, zooming beyond the shadow, using the available light, or changing the lens.
Flash Photography FAQs
Should I use flash for indoor photography?
If there isn’t enough ambient light, a flash can be a solution for shooting indoors . However, it’s not a must. Plenty of indoor photography is done with ambient or natural light.
Window lighting is one of the most popular ways to light indoor lifestyle portraits. It’s also common to use it in food photography and still life. Other photographers prefer to use continuous artificial light.
Do you use flash for newborn photography?
Natural light is the best option for newborn photography, but unfortunately, this isn’t always an option. If you need to use artificial light, consider continuous lighting. If you prefer to use flash, avoid using the built-in flash. It’s better to use an external flash device that lights the newborn from the side. Harsh light could wake the baby or even hurt its eyes, so use diffused light and regulate the light intensity.
Do you need a flash for portrait photography?
You don’t need to use flash equipment for portrait photography. That said, it is a very common choice. Usually, it’s used to illuminate the subject’s face when there are low light conditions. It can also be used to create a more complex lighting setup with multiple flashes.
Flash in outdoor portrait photography is useful when there’s bad weather, or you need complete control of the light.
Do you use flash for concert photography?
Usually, you can’t use a flash while taking photographs during a concert. This ban can come from the venue or the artist. Instead, a concert photographer knows how to work with the light on stage.
Since the artists on stage are constantly moving, it’s helpful to have a fast lens and a camera that tolerates high ISO values without rendering much noise. That way, you can still get good shots without the use of a flash.
Do you use flash for wedding photography?
There isn’t a hard and fast rule about using flash in wedding photography. Essentially, if you need it, use it.
The need for flash will depend on the time of the wedding and the event venue. If there isn’t enough ambient light to get a good image, then you should consider using flash lighting.
While flash photography can sometimes be disruptive – for example, during a church ceremony – it’s better than ending up with blurry photos due to a long exposure or noisy images due to a high ISO.
Do you need a flash for real estate photography?
You may or may not need flash for real estate photography – it all depends on the available light. However, the correct use of flash can differentiate a photo from a professional photographer from one taken by a realtor.
You can use a flash in real estate photography to even out the lighting. This is often needed between the bright area close to a window and the darker area that’s further away. You might also need a flash to fill the shadows cast by the furniture.
A common technique is using a flashgun to illuminate different room parts, then composing a photo with the perfect exposure using all the images.
What flash is best for macro photography?
The best option for macro photography is a ring flash. This is because an on-camera flash can cast the shadow of your lens on your subject.
Some macro lenses even come with a built-in ring light. The Canon EF-S 35mm f/2.8 is one example.
There are other good solutions for macro shots as well, like using flash tubes on the side. You can buy ring mounts with fixed or detachable flash heads for this type of lighting.
Which flash is best for outdoor photography?
The on-camera flash is the most practical way to work outdoors. This is because they are compact and lightweight and they also have a battery inside, so you don’t need to bring any extra power packs.
You can also use them off-camera using a transmitter and a receptor, which allows you to better position the light. You may also use multiple lights for your shot.
If these flashes don’t provide enough power, you might need a battery-powered flash head.
Final Words
As you can see, flash photography has come a long way since the days of dangerous flash powder. Now, it’s an essential thing for any photographer to learn if you want to know how to control the light to create the images that you want.
Flash power can help you to achieve the desired lighting effect. For example, if you want to simulate daylight during the evening.
You won’t depend on the weather, the time of day, or the location.
On top of that, it’s also a great way to expand your creative possibilities and move into different genres.
Even if your preference is for natural light, it’s helpful to at least learn the basics of flash lighting.
Let us know in the comments how you feel about flash photography. What type of flash do you use, and what type of shots do you take?
Feel free to share any flash lighting tips and ideas and any questions you might have. Let’s keep the conversation going!

Check out these 8 essential tools to help you succeed as a professional photographer.
Includes limited-time discounts.
You'll Also Like These:

Ana Mireles is a Mexican researcher that specializes in photography and communications for the arts and culture sector.
Very helpful. Thank you
Leave a Comment Cancel Reply
👋 WELCOME TO SHOTKIT!

🔥 Popular NOW:

Unlock the EXACT blueprint to capture breathtaking iPhone photos!
Shotkit may earn a commission on affiliate links. Learn more.
- Skip to primary navigation
- Skip to main content
- Skip to primary sidebar
- Skip to footer
DIGITAL PHOTO MENTOR
Photography tips, tutorials and guides for Beginner and Intermediate Photographers.

How to Use a Flash – Tips for Total Beginners
by Darlene Hildebrandt | Last Updated: November 11, 2022
In this flash photography tutorial, I’m going to provide some practical tips on how to use a flash for total beginners. Even if you’ve never taken your flash out of the box, you can do this because I will show you how to use it in the simplest way possible.
Now is the time to learn because a flash will come in handy at Christmas parties and holiday gatherings. You got this! I promise it’s not as hard or as scary as it may seem.

I have used a slightly more advanced technique in the image above, called bounce flash. I cover how to bounce your flash in another article but it’s really not that hard either. You literally just turn the flash head to face a wall on your left or right and bounce the light off that.
Buying your first flash
If you haven’t purchased your first flash or speedlight yet there are a few things to consider. These are the most important features to look for:
- Make sure the flash is compatible with your camera brand and model. Most third-party flash manufacturers make units for all kinds of cameras from Sony, Pentax, Canon, Nikon, Fuji, and Olympus. So just check that specs to make sure you get the right one. Branded flashes will most likely be safe (i.e. a Nikon flash on a Nikon camera) but double-check to be safe.
- Buy a flash that has a rotating and tilting head. You will need that in order to do bounce flash.
- The guide number. This just represents the power output of the flash. The higher the number, the more powerful the flash. So if you want a flash for general purpose use don’t get the smallest one, but you likely don’t need the biggest either. The ones I have range from GN (Guide Number) 36-60.

You do not have to spend hundreds of dollars on a flash either. If you opt for a brand name one to match your camera (i.e. Canon, Nikon, etc.) you’ll pay a lot more than if you go for a third-party one.
Companies like Godox, Nissin, and Yongnuo make some great speedlights for every camera brand and model. I personally have two Godox ones and a remote trigger (used to fire them off the camera) and I spent about $250 total for them both!
Here is a quick idea list for flashes and accessories. I recommend checking out the Godox Mini TT350 TTL if you want something small and light (it runs about $85 USD). Or if you want a more powerful model look at the Godox V860II TTL (retails for around $179 USD).
Using the flash on the camera
The simplest way to use your flash is to attach it to the hot shoe on top of your camera. So for the purpose of keeping things simple, that’s all I recommend doing for now.

Once you get the hang of using flash you can expand your knowledge and horizons and start using off-camera flash.
But don’t complicate things and confuse yourself right from the get-go.
Just keep it simple. Master this step first, then you can go to the next level.
I will be doing a series of articles on using flash over the next few months that will take you from here (using our speedlight for the first time) to flash mastery.
So just follow along and you’ll eventually get there. Don’t try to build Rome in a day.
Attaching the flash to the camera

To mount the flash to the camera, use the hot shoe on top of the camera body. Make sure the flash is not in the lock mode and slide it into the hot shoe.
Never force it or you can risk damaging the contacts. If it’s not doing on easily, double-check to ensure the flash’s locking mechanism is set to unlock.
Make sure the flash is pushed all the way on, as far forward as it can go. Then turn the locking dial to secure it. Failure to do so could result in the flash falling off and getting damaged.

Flash Modes
Before you mount your flash to your camera, let’s back up and go through some of the settings on the flash. There are many options and it can be overwhelming to know which ones to use.
I’m going to give you the simplest ones, so use them for now until you graduate to the next level.
First of all, there are three different flash modes on most speedlights. You set the mode usually by pressing the mode button on your flash. It may look something like this. If you aren’t sure where to find it, check the user manual for your speedlight.

Manual Flash Mode
This setting has the most control but it also means you need to measure the light and adjust it as needed.
So that means this is NOT a beginner setting.
If you attempt to use Manual mode on your flash and get inconsistent or unpredictable results, just avoid it until you gain a bit more knowledge around using flash. It’s not easy, and even some pros get it wrong. So don’t feel bad about it.

Multi Flash Mode
This one is also more advanced. Multi Flash Mode is used to create an image where the flash fires multiple times during one camera exposure to create the look of movement.
For now, let’s ignore this one too. You may in fact never use it. I have never had an occasion to do so.

TTL Flash Mode
The meaning of TTL is “Through The Lens”.
What happens in this mode is the flash fires a small pre-flash you don’t even see. Then the camera assesses the subject distance and the amount of light needed to illuminate it and fires the flash at the right power level to produce a good exposure.

This is the mode you want to use, at least for now!
In fact, when your flash it on your camera this is the mode I’d recommend using most of the time anyway. It does a great job and if you choose your camera settings wisely (don’t worry I’ll help you with that too) then they make a great pair, working symbiotically together.
Flash Exposure
Now that you have the flash mode set, and the flash is mounted on the camera, let’s talk about one other setting you need to know about. That is the Flash Exposure Compensation or FEC for short.
Most flashes allow you to increase or decrease the amount of flash exposure applied to your scene. Mine goes from -3 to +3 in 1/3 stop increments. Yours may be similar or have a wider or smaller range.
For the most part, you’ll want to leave it set to zero. You’ll know it’s at zero when you don’t see any other number, like this.

The Flash Exposure Compensation is adjusted by pressing a button (mine is indicated above) and turning the dial on the back of the flash.
Notice the symbol above the button. It has a little lightning bolt symbol and a +/-. Look for something like that on your flash.
Using Flash Exposure Compensation
When you dial the Flash Exposure Compensation to the minus side, the flash will provide less light by that amount as compared to the main overall exposure. Let’s look at how it works with some examples.
This first image is my base exposure, taken without any flash. I left the light on in the hallway on purpose to show ambient versus flash exposure and how they work together.
There is a large window to camera left adding light to my subject, aka Rob, aka my husband. He graciously agreed to be my model for this demonstration.

Next, I’ll add in the flash. It is in TTL mode, set to 0 FEC. So what should happen is the camera will fire the flash to provide a good exposure on the subject.

Notice how well balanced the flash and light in the room are in the image above. It’s lightened the shadows nicely without him look “over-flashed”.
If you didn’t know flash was used here, could you even tell? No, probably not. THAT is the goal of a well-done flash photo. You want it to blend the light in and have it appear natural.
Negative Flash Exposure Compensation
Now let’s see what happens when I dial in negative FEC.
As the FEC is lowered, the flash power is decreased by one stop each time. So it becomes less powerful and has less effect on the image. See how that works in the three images below.

What did you notice about the three images above? Can you see the difference?
HINT: If you want a natural-looking fill flash outdoors or in situations where there is plenty of light you just want to fill in the shadows – set the FEC to -1. That will do a nice job in most situations as a fill flash for you.
Positive Flash Exposure Compensation
Next, I will dial in positive FEC.
As the FEC is raised, the flash power is increased by one stop each time. So it becomes more powerful and has more effect on the overall exposure and the image.

What did you notice this time? The difference is obvious, right?
I did not adjust the exposure on the camera because I wanted the exposure in the room as a constant. As the FEC was increased and the flash fired with more power, it started to overexpose the entire image.
Could I fix this exposure? Yes. I could adjust the main exposure to be less overall, or correct it in processing. But I personally wouldn’t want to do that.

Notice how much darker the hallway is now. Look at the harsh shadows now under his chin and from his hands. There is no nice side lighting from the window anymore. That is all caused by the flash setting.
It is not at all natural looking anymore – this is what over flashed looks like.
Avoid making images that look like this by keeping your Flash Exposure Compensation set to 0 or -1. I almost never use FEC +1 or higher and I honestly cannot think of a scenario when I’d use it.
Camera Settings for Flash
I will address this topic in more depth in another article but I want to give you some basic starting points and things to watch out for here to get you started.
First of all, I do NOT recommend shooting in Manual mode when using TTL flash. Let the camera and flash do the work for you. It will be a lot easier and cause a lot less frustration that way.
You have a few options for the camera shooting mode and I’d recommend each in different situations.
Program Mode
If you are just starting with photography and are still unsure about exposure and which settings to use, just use Program Mode. There is no shame in this and it will usually result in pretty good images.

Aperture Priority Mode
This is the mode I use most often for many situations when I’m shooting handheld (no tripod). But when using flash indoors it can cause some issues.
For example: If you choose a small aperture like f/8 or f/11.
The flash will then have to fire at a much higher power than if you use a larger aperture like f/2.8 or f/4. That can run the battery down quickly or even cause the flash to overheat.
It will likely also cause the background to go really dark and the shutter speed to get really slow (even down to 1/2 of a second or slower if the light is really low) which results in ghostly subjects or blur in your images.
So use this mode cautiously. Make sure to open your aperture as wide as it goes. Use a lens with a wide aperture like a 50mm f/1.8, that will help as well.
Shutter Priority Mode
This is the mode I recommend if you want to venture out of Program. But again be aware of some issues that can arise with the wrong settings.
Have you ever gotten a photo that looks like this, with a big black band across part of your image?

That is caused by the shutter speed going beyond your camera’s Flash Sync Speed. Most cameras sync at 1/200th or 1/250th, this was shot at 1/500th. So what does that mean?
Simply put, when you use a shutter speed faster than the camera’s sync speed – the shutter has already started closing before the flash goes off. That’s what causes the black band, you’re actually seeing the shutter closing.

The image above is even worse at 1/1000th of a second. There is a fix for this in situations where you need a really fast shutter speed. But we’ll talk about that another time.
So all you need to know for now is to keep your shutter speed under your camera’s sync speed. If you aren’t sure what that is, go with 1/200th and you’ll be pretty safe. That information should be in the user manual for your camera or google “flash sync speed MY CAMERA MODEL ” and replace the bold text with your actual camera brand and model.
Also, keep in mind that if you use a slower shutter speed like 1/30th even you can still freeze any motion from your subject. The flash does that for you, it freezes that instant in time.
So in a dark or room with low light try shooting with these settings:
- Shutter Priority
- Flash set on TTL and FEC set to Zero
- Shutter set to 1/30th.
- Set the ISO to Auto (set the maximum to 3200 or 6400) or to at last 800.
Then just fire away, the camera will do all the work for you.
If you get too much motion or blurry images – adjust the shutter speed to 1/60th or 1/100th.
If the background is really dark increase the ISO.

Your turn to practice
That should give you a good head start on using your flash, even if you’re brand new to all this. So get it out of the box, put it in your camera and go take some good photos at your next holiday event.
Once you master these concepts and are ready to move on, go ahead and read the next tutorial called: How to Use Your Flash – What all the Buttons and Settings Mean

About Darlene Hildebrandt
Darlene is an educator who teaches aspiring amateurs and hobbyists how to improve their skills through her articles here on Digital Photo Mentor, her beginner photography course , and private tutoring lessons . To help you at whatever level you're at she has two email mini-courses. Sign up for her free beginner OR portrait photography email mini-course . Or get both, no charge!
Learn Photography Basics
Yes, you can learn to take better photos! It’s my passion to help you learn the photography basics and take better pictures. It’s also the same reason I teach workshops, do photo travel tours, and have online photography courses available.
Enroll in our free photography basics for beginners course, or 12-part portrait photography course , also free.
Recent Photography Articles
- Step-by-Step Guide to Making Stunning Portraits With One Light
- How To Discover and Develop Your Unique Photography Style
- Luminar Neo GenExpand: Game-Changer or Just Hype?
- PRO Tips – How To Create Great Looking Professional Headshots
- How To Find the Best Camera Bag for Your Needs
Useful Links
- Beginner Photography
- Intermediate Photography
- Photography Challenges
- Photography Tips
- Photo Editing
- Recommended Amazon Products
- Course Login
- Write for Us
Home • Photography • Fujifilm X-T100 Setup Guide for Travel Photography
Fujifilm X-T100 Setup Guide for Travel Photography
Posted on Published: February 15, 2020 - Last updated: June 8, 2022
Disclosure: This post may contain affiliate links. I earn a small commission of product sales to keep this website going.

What are the best settings for the Fujifilm X-T100 for travel photographers? Here’s a guide to the settings that I recommend, accompanied by my reasons why.
This X-T100 setup guide is a small part of my larger guide in the Fujifilm Camera Fundamentals Course . This course is packed full of videos, PDFs, tests, and assignments to help you master your mirrorless camera. This entire course is included in the Fujifilm X Course Membership , and I’m offering my blog readers an exclusive 20% off your first 3 months by clicking this link .
Please note that these are simply my recommendations based on my lengthy experience with mirrorless cameras in travel photography. And not all settings are mentioned here, just the ones that are the most relevant.
Press the MENU button to access these settings, then use the selector buttons to navigate.
Table of Contents
Shooting Menu 1
Scene Position: Choose a mode when SP is selected on the mode dial. We won’t be using this in this course.
Advanced Filter: Choose a filter when Adv. is selected on the mode dial. We won’t be using this in this course.
AF/MF Setting: Set up your autofocus and manual focus.
- Focus Area: Move your focus area around. Will vary by situation. We’ll set this using the AF button.
- Focus Mode: Manual, Single Autofocus, or Continuous Autofocus. Will vary by situation.
- Single Spot: Focus on a single, moveable spot.
- Zone: Focus on an object in a larger, moveable zone.
- Wide/Tracking : Focus on object of high contrast or movement throughout the entire frame.
- Release/Focus Priority: Release. This will allow you to take a photo without a focus lock.
- AF+MF: ON. This will help you refine focus if needed, by rotating the focus dial while the shutter is half-pressed.
- Face/Eye Detection Setting: Face Off/Eye Off. Only enable Face On/Eye Auto when taking portraits because sometimes it detects a face when there is none .
- Pre-AF: OFF. Keeps the autofocus running all the time, even when you’re not ready to take a picture. This will waste your battery and doesn’t have much benefit for travel photographers.
- AF Illuminator: OFF. Turn off the beam that assists focusing in the dark. The camera will boost its sensitivity to aid in focus, which works well, and the light is only an annoyance to your subjects and a waste of battery.
ISO: Adjust the sensor sensitivity. See this post about setting up AUTO ISO in Fujifilm cameras .
Image Size: L 3:2, M 3:2, or S 3:2. Recommend selecting Large 3:2 if only recording JPG. Medium or Small are just fine if you’re recording RAW also, or if the JPG photos are only destined for social media or blogs (no printing).
Image Quality: FINE, FINE+RAW, or RAW. If you only want to record JPG, I recommend FINE to get the most detail out of the photo. FINE+RAW will record a FINE quality JPG plus the RAW file, and RAW only records the RAW file.
Dynamic Range: AUTO. See this post for more details on Dynamic Range .
Shooting Menu 2
Film Simulation: See this post for more on Film Simulations . The X-T100 does not have ACROS.
Film Simulation Bracket: See this post for more on Film Simulation Bracketing .
Self-Timer: Use 10 seconds for getting yourself in the frame, use 2 seconds to stabilize the camera after pressing the shutter for a long exposure.
Interval Timer Shooting: For creating time-lapse photos.
Time-Lapse Move Mode: For creating time-lapse movies.
White Balance: AUTO. Start in Auto, we’ll use a custom button to change it as necessary. See this post for more on White Balance.
Color: Controls color saturation.
Shooting Menu 3
Sharpness & Noise Reduction: Negative numbers apply the minimum amount of sharpening and noise reduction. Use sparingly as over-sharpened and over-“noise-reduced” photos can look awful.
Highlight & Shadow Tone: See this post for more on Highlight & Shadow Tones.
Long Exposure NR: OFF. The cost-benefit of this feature is usually not worth it for travel photography. It will double the time it takes for you to make an exposure .
AE BKT Setting: Frames 3, Step 1, Continuous, – 0 +. In tricky exposure situations, select AE BKT for the drive mode and the camera will take three photos of different exposures so you can choose the best.
Touch Screen Mode: AF or AREA. I’ve found the touchscreen to work much better for controlling focus than controlling shutter release.
Shooting Menu 4
Touch Zoom: I do not recommend using digital zoom.
Mount Adapter Setting: Set the focal length of third-party (not Fuji) lenses.
Shoot Without Lens: ON. Enable shutter release without a lens attached.
MF Assist: Focus Peak Highlight RED(HIGH). Highlights areas that are in focus. Learn more about Focus Peaking in this post.
Photometry: MULTI. Measures the brightness of your scene. Multi works for most travel photographers and is best for everyday shooting.
Interlock Spot AE & Focus Area: OFF. This can result in inconsistent exposures in travel photography if On.
Flash Setup: Set up your flash.
- Flash Mode: Suppressed Flash . We’ll learn to control lighting ourselves in this course.
- Flash Compensation: 0 .
- Red Eye Removal: OFF . We’ll learn how to avoid red eyes in this course.
Shooting Menu 5
Movie Setup: Movies are not covered in this course.
IS Mode: 2 – Shooting Only. This helps save your battery with stabilized lenses.
Digital Image Stabilizer: Digital stabilization in movies.
Wireless Communication: Control your camera with your smartphone and transfer photos.
Shutter Type: MS. Only use ES (Electronic Shutter) when you need to be silent, as it can have some undesirable effects .
Electronic Zoom Setting: ON. You can control zoom when the screen is flipped up in selfie-mode.
Date/Time: Set to your home time zone.
Time Difference: Highlight Local and set the time offset for wherever you’re traveling (+1 hours, -3 hours, etc).
Sound & Flash: OFF. Disable all the unnecessary lights & sounds to better blend in.
Sound Set-Up: Operation Vol. & Shutter Volume OFF. Turn off unnecessary sounds.
Screen Set-Up: Set up your displays.
- Image Disp.: OFF. Reviews every photo on the LCD right after you take it. Turning this Off saves the battery and helps you avoid distractions when shooting.
- EVF Autorotate Displays: ON. Be able to read your display when you rotate the camera.
- Preview Exp. In Manual Mode: ON. See the effects of your settings while in Manual.
- EVF Brightness: AUTO. Great compromise for battery life and vibrance.
- LCD Brightness: 0 or less. Anything higher will rapidly deplete the battery.
- Preview Pic. Effect: ON. See what your JPGs will look like.
- Framing Guideline: Grid 9. Simple “Rule of Thirds” grid to aid composition.
- Autorotate PB: OFF. Make vertical photos take up the whole screen (display sideways).
- Focus Check: OFF. Magnifies your display every time you rotate the focus ring in Manual Focus. This will distract from your composition if On. You can press the Rear Dial to get this on-demand instead.
- Disp. Custom Setting: From Defaults, ENABLE: Framing Guideline, Electronic Level, Histogram . REMOVE: Expo. Comp. (Digit), Image Size/Quality.
Button Setting: Set up your buttons.
- Function (Fn) Setting: See bottom of post.
- Edit/Save Quick Menu: Your “Q button” Menu. Defaults are fine, see bottom of post for customization.
Focus Ring Operation: Leave on default.
Touch Screen Setting: Turn your touch screen control on or off and set up which area of the LCD screen is active for control while you’re looking through the EVF.
Power Management
- Auto Power Off: 2 MIN. The camera will turn off after 2 minutes to preserve power. You can wake it up by tapping the shutter button.
- High Performance: OFF. The added performance doesn’t really help for travel photography and just drains your battery.
Sensor Cleaning: When Switched On. Sensor “vibrates” loose dust away when you turn it on. If you want your camera to boot up faster when you switch it on, set this to When Switched Off instead.
Save Data Set-up: Setup how your files are saved.
- Frame No.: CONTINUOUS. Keeps sequential numbering when a new memory card is inserted. This helps with file organization, rather than the image number being reset to 0000 on every memory card.
- Date Stamp: Date & Time. Record when you made the photos, valuable for recordkeeping & organization.
- Save Org Image: ON. If you do use red-eye reduction for any reason, at least save another copy of the photo without reduction applied.
- Color Space: sRGB. This gives you consistent colors across all devices your audience may view them on.
Connection Setting: Setup Bluetooth & WiFi.
- Bluetooth Settings – Bluetooth On/Off: ON. Bluetooth is a very low power draw and there are some smartphone pairing features where this is useful.
- Bluetooth Settings – Auto Image Tagging: OFF. Only tag images for upload that you want to upload.
- Bluetooth Settings – Seamless Transfer: OFF. This will kill your battery and fill up your phone like nothing else. It’s best to do this manually.
- Bluetooth Settings – Smartphone Sync Setting: TIME&LOCATION. As long as your phone is showing the correct time, this is very useful. I do turn off Geotagging manually in the General Settings when I want to protect vulnerable places or populations while traveling.
- Instax Printer Connection Setting: If you travel with an Instax printer – and I love doing that! – this is where you enter your printer’s unique ID for pairing.
- General Settings – Resize Image for Smartphone: ON. Images transferred to your smartphone will be resized to 2048 pixels on the long edge – plenty big for transferring to blogs & social media from your phone. This speeds up the transfer time for multiple photos and dramatically reduces storage needs on your smartphone.
- General Settings – Geotagging: OFF. When you don’t want to record your location. Otherwise, turn it on.
- General Settings – Button Setting: WIRELESS COMMUNICATION . Quickly connect to your phone.
Format: Format before using a new memory card with each camera and before each shoot.
Programming the X-T100 “Q” Quick Menu
The X-T100 allows you to customize your own special menu, so you can access your most commonly used functions by pressing the Q button on the back of the camera.
Why use the Q Menu?
There are some functions that you might want quick access to but don’t have their own dedicated camera button. You can more quickly access these setting instead of having to wade through the menus.

Programming the X-T100 Q Menu
- Press and hold the Q button.
- Use the rear selector pad to select the item you’d like to reprogram and press OK.
- Select the new option you’d like to program and press OK.
- Repeat as necessary.
What to program in the Q Menu
You get 16 items in the Quick Menu. I’m not going to assume to know what you want in your menu, so I can only suggest that you keep mental notes on the settings you access a lot. You won’t know what to program in this menu the day you get your camera. It’ll take quite a few outings before you have it wired down, so just keep working on it.
It will definitely help your workflow once you do!
My recommendations are pretty darn close to the defaults (except the flash) and I rearrange them to what makes sense to me:
- Shooting Mode
- Film Simulation
- White Balance
- Noise Reduction
- Image Quality
- Dynamic Range
- Highlight Tone
- Shadow Tone
- Shutter Type
- Face/Eye Detection
- EVF/LCD Brightness
How to use the X-T100 Q Menu
Press the Q button and use the rear selector pad to select the item you want to change. Then scroll through the possible settings using either the command dial or the sub-command dial. Press the Q button or shutter half-press to exit.
Customizing the X-T100 Fn Buttons
These recommendations are just that – recommendations. After working with mirrorless cameras for years, these are the functions that I’ve found work best in travel photography. But that’s just me – something else may work better for you.
Programming the X-T100 Fn Buttons
To program the Fn buttons, press and hold the DISP/BACK button. It will take you straight to the Fn Setting menu.

Learn more about using and setting up the X-T100
I hope this helped you get started with your X-T100. I know it’s a lot of information, but it’s just one small piece of my travel photography course.
You can download a PDF version of this guide with even more information when you sign up for the Fujifilm X Course Membership (save 20% on your first 3 months) .
Please let me know if you have any questions!
Thursday 17th of June 2021
Is xt100 able to save custom profile? Cause i want to copy fujifilm recipes ive seen.
John Peltier
Sunday 20th of June 2021
Unfortunately no, this feature isn't available in the X-T100 or X-T200. You can still use most of those recipes but they can't be saved to the camera.
Yan sagita Roi
Monday 7th of June 2021
Hi John Thank you for your guides. they are really useful. you know how to transfer bigger size videos from the camera? my Fuji x-T100 seems to have problem when transferring video file size more than 2gb, it auto disconnects every time. I don't have any problem transferring files lesser than 2gb. What is the problem? Thank you Roi
Sorry I’m not sure what that problem could be, I’ve never heard of it before. Just make sure the camera firmware is up to date. Try changing the Auto Power Off time also. Otherwise you might need to take the SD card out of the camera and use a card reader with the computer.
Gareth lewis
Friday 1st of May 2020
Hi John Have just got the xt100 and am setting up. Your guide is really useful. Thankyou. One problem I have had is trying to set the FN button as AE lock. The menu allows me to set it but pressing the button does not engage A&E lock. I would like it to switch on/off on each press. Am I missing something here. Thankyou Gareth
Thursday 17th of March 2022
@John Peltier, Hi there, I've recently bought an X-T100 and I've found the same issue for video only. On Manual mode, you can lock the exposure by half pressing the shutter, but on video there doesn't seem to be a way to use AE Lock and the Fn button doesn't seem to work. Any help would be appreciated, Thanks, Piers
Saturday 2nd of May 2020
You're welcome Gareth. It's not working at all? Like "EL" doesn't come up in the display when you press it? The only thing I can think of is that it won't work when the exposure lever is set to AUTO since the camera really won't let you do anything concerning exposure. It also won't work in M mode. And I can't remember from using the X-T100, but I think that you have to hold down the AE-L on this camera to lock it - you don't have the "on/off switch" capability on this camera. Or my memory on that could be incorrect.
Apologies but I've had to close comments on all posts older than a couple weeks. Keeping up with spammers is a nightmare game of whack-a-mole. Please email me if you have any questions.
Currently Trending:
APS-C vs full-frame – which sensor size is best?
Why are we obsessed by full-frame sensors, alternatives to the fujifilm x100v here are 7 retro styled cameras, amateur photographer of the year 2023 winners announced, nikon z8 wins product of the year at the 2024 ap awards.
Advertisement
When you purchase through links on our site, we may earn an affiliate commission. Here’s how it works
The ultimate guide to flash photography
Flash photography is a lot more accessible thanks to many cameras having a built-in pop-up flash and the availability of Speedlite flashes with TTL auto exposure. Ian Pack is your guide.
Welcome to the AP Improve Your Photography Series – in partnership with MPB – This series is designed to take you from the beginnings of photography, introduce different shooting skills and styles, and teach you how to grow as a photographer, so you can enjoy producing amazing photography (and video), to take you to the next level, whether that’s making money or simply mastering your art form.

Each week you’ll find a new article so make sure to come back to continue your journey. The start may seem basic to some photographers, but it’s an important step in making sure you’re comfortable with your equipment and the basics of photography, as it’s part of the foundations that help build into great photographs, and once you know these, you’ll be able to play with them, and understand further articles in this series .
Ian Pack shares an insight into flash and his tips for using it in your photography, and learning how and when to use flash is an important part of mastering light, particularly when it comes to portraits:
Pop-up flash

Pop-up flash direct
Many crop-sensor DSLR and mirrorless cameras have a pop-up flash on top of the camera. This is either not used by some or little by others. Used with care it can be used outdoors to fill-in shadows and create catchlights in the eyes of the subject.

Pop-up flash diffuser
Pop-up flash is a small, hard and direct light source which doesn’t create flattering light, but there are several diffusers available which profess to soften the light from a pop-up flash. They are still a relatively small light source close to the flash which doesn’t provide optimum diffusion.

Pop-up flash on (note light reflected in the eyes)
Pop-up flash can also be used to control off-camera flashes, but is limited to short range line of sight. Dedicated flashes and wireless triggers will give better results.

Pop-up flash off (note darker eyes and shadows on face)
Hot shoe flash or Speedlites

Olympus FL-700WR hot-shoe flashgun.
Many photographers own a hot shoe flash or Speedlite and mainly use it as a convenient way to illuminate a photo. There’s so much more to Speedlites. When fitted to the camera hot shoe there will be the facility for TTL (through-the-lens) auto exposure which can be adjusted independently of the camera with the exposure compensation facility.

Speedlight ceiling bounce
Most Speedlites have a flash head that swivels allowing you to bounce the light from nearby ceilings or walls, which create a large flattering soft light. Do remember that any bounce surface that is not white will create an overall colour cast in your photos.
There are many light modifiers for Speedlites ranging from £10 to hundreds. One of the least expensive is the white translucent, shoot-through umbrella which diffuses the light from a Speedlite and is ideal for lighting solo portraits or small groups. Don’t be put off by the low power of Speedlites which average 50-60Ws (Watt seconds). Used with mid-range ISO settings and an aperture of f/4 or f/5.6, a Speedlite is a versatile tool.

Speedlight direct
Indoors simple solo portrait set-up
All you need to start creating beautiful portraits are a Speedlite, wireless trigger, a white shoot-through umbrella, an umbrella swivel, a light stand and a reflector to bounce light into shadows. This is my go-to headshot set-up.
Using the following settings as a starting point you can create portraits or head shots within mere minutes. With your camera set to manual, set the shutter speed around 1/125sec to 1/250sec depending on your camera’s flash sync speed. ISO 320, aperture f/5.6, daylight white balance. For flattering results without much distortion use a short telephone lens or a zoom setting from 70-85mm.

Shoot through umbrella
The Speedlite should be set to manual with the power at 1/16th. This is normally done with the wireless trigger. The spread of the beam from the Speedlite can be changed using the zoom setting. This does not affect the hardness of the light, just the coverage. 50mm is a good starting point when photographing with a shoot-through umbrella.
Once the Speedlite, umbrella and light stand are assembled, set the umbrella slightly above head height to one side of the subject, pointing the umbrella shaft at the subject’s nose. Turn the umbrella slightly toward the camera – this is known as feathering. Take a test frame to judge the exposure, lighting and pose. Adjust as necessary using the camera histogram to judge the exposure.

First frame
In the first frame with the shoot-through umbrella the background is lighter and busier than expected. I moved the Speedlite closer to my model, Max, and flagged one side of the flash to reduce the light falling on the background. The photos you see here are straight out of camera with basic raw processing.
In the final frame I’ve added a soft gold reflector to open the shadows or give them more detail as they were too dense for my liking. The reflector has also warmed the skin tone on the shadow side of Max’s face.

Final frame
Outdoor portrait
It’s also possible to create stunning outdoor portraits with a little thought and planning. Here I positioned Max in the shadow of a building to reduce the ambient light falling on him. The camera was set to Av, the Speedlite set to TTL and modified with a RogueFlashBender 3 Large Reflector with diffuser panel giving me a 25cm soft box.

With low power Speedlites, position the model in shadow for ultimate flash effect. The exposure was balanced with the ambient by setting the camera to Av aperture priority exposure and the flash to TTL High Speed Sync 1/5000sec at f/3.2, ISO 160, white balance daylight, TTL flash
Using the small soft box meant that Max was lit only to his waist. If you have a Speedlite, don’t let it gather dust, take it out and use it. If you want to begin using off-camera flash, a Speedlite is a great introduction to flash photography, both indoors and outdoors.
Ian’s top tips for flash photography
Creative coloured gels.

Coloured gels are an inexpensive accessory and great fun to experiment with. They can be used to add colour to shadows, as an accent light for portraits, the key light for added interest or a background light.
Flag the light

Light from umbrellas can be controlled by attaching a black board or flag to the Speedlite head. I use foam core board held in place with a strip of hook and loop fastener.
Get in close

By moving the light closer to the subject the background becomes darker and the light more flattering when using light modifiers like soft boxes/umbrellas. The ideal distance for a light modifier from the model is equal to the longest dimension of the light modifier.
Stabilise the stand

It’s good practice to ensure that your light stand is stable when you’re working alone. You can put the light stand riser through the handle of your camera bag. When using a hard case I attach the case to the light stand with reusable cable ties.
Use an umbrella swivel

For any photographer who works with Speedlites off-camera, a means of mounting to a light stand is essential. Umbrella swivels are essential. Most only tilt, and some have a ball head which aids accurate positioning of the Speedlite.
Choice of background

With care, even unpromising locations can create usable backgrounds. The piles of pallets created the industrial dockside feel I wanted. I used a 200mm prime to isolate Max from the surrounding distractions and a wide aperture threw the background out of focus.
Kit list for flash photography
Pixapro li-ion580 mkii speedlite.
This compact hot shoe flash can be used on and off camera with a wireless trigger. It has TTL auto exposure linked to your camera exposure meter, manual setting for ultimate control and a multi-flash function for creating stroboscopic images.
Rogue FlashBender 3 Large Reflector
These reflectors fold flat so slip easily into a camera bag. With the addition of a diffusion panel you have a small soft box. Smaller soft boxes are ideal when working outdoors in windy conditions as they have a smaller surface area than umbrellas.

On camera Speedlite bounced from a clean white wall to camera left to give a broad soft light similar to diffused window light. Canon EOS 5D Mark IV, Canon 85mm f/1.8, camera set to manual. 1/160sec at f/5.6, ISO 160, white balance daylight, TTL flash
Nam Grip LS-255C Carbon Fibre Light Stand
Weighing 500g this stand is ideal for mounting your Speedlite. It extends to 220cm and closes to 48cm. Where weight and bulk are an issue, it’s possible to carry a single Speedlite kit weighing around 1,500g.
White Translucent Shoot – Through Umbrella
One of the first light modifiers for anyone who works with Speedlites or other flashes. Available in sizes from 80cm to 200cm. Some fold down small enough to fit inside a camera bag, making them ideal for photographers on the move.
Tune in next week, for the next article in the series of the AP Improve Your Photography Series – in partnership with MPB .
- Part 1: Beginners guide to different camera types .
- Part 2: Beginners guide to different lens types .
- Part 3: Beginners guide to using a camera taking photos .
- Part 4: Beginners guide to Exposure, aperture, shutter, ISO, and metering .
- Part 5: Understanding white balance settings and colour
- Part 6: 10 essential cameras accessories for beginners
- Part 7: Beginners guide to the Art of photography and composition
- Part 8: Beginners guide to Photoshop Elements and editing photos
- Part 9: Beginners guide to Portrait Photography
- Part 10: Beginners guide to Macro Photography
- Part 11: Beginners guide to Street Photography
- Part 12: Beginners guide to Landscape Photography
- Part 13: How to shoot Action and Sports Photography
- Part 14: How to shoot wildlife photography
- Part 15: Raw vs JPEG – Pros and cons
- Part 16: How to create stunning black and white images
- Part 17: How to photograph events and music
- Part 18: Pet photography – how to photograph pets
Find the latest Improve Your Photography articles here .
Related articles
How to use flash on location Essential guide to off-camera flash

You may also like...

April 5, 2024
How to win APOY from 2023 winner Daniel Sands
The winner of APOY 2023 was Daniel Sands. Here, he shares his thoughts about his success, and adds some advice for this year’s entrants
by Ailsa McWhinnie

Motorola Edge 50 Pro announced with Pantone-certified camera
Motorola has announced its latest phone, the Motorola Edge 50 Pro in India and will be available to buy there from 9 April.
by Isabella Ruffatti

Super-massive astro camera wins megapixel race (for now)
The 3,200 MP Legacy Survey of Space and Time camera is the new king of astro cameras, looking into dark matter and energy
by Geoff Harris

Looking to improve your photography? Amateur Photographer is the magazine for you, subscribe today and pay just £26 for your first 13 issues!
No thanks, I’m not interested!
IF YOU ARE NEW TO PHOTODOTO START HERE: Start
Do You Need A Flash For Travel Photography?
Packing for a trip is arguably the worst part about travel. As photographers, not only do we have to choose which of our vast wardrobe of clothes to take with us, but we also have to decide which pieces of our ever-expanding portfolio of camera equipment to take with us. From picking which lenses and camera bag to remembering your spare memory cards, packing your photography gear for travel can be a nightmare. There is one decision, however, that can often make or break the standard of photographs you come back with. Do I need a flash for my travel photography ?

The answer to whether or not to take a flash with you on your travels will be different for everyone based on a few things.
For starters there are several options to consider such as where you are traveling to and what kind of travel photography you are going to be engaging in. Not to mention if you actually have the room to carry and extra piece of equipment with you? However, taking the time to consider these questions before you travel will help you capture those unforgettable moments.
To help make that decision easier for you we have outlined everything you need to consider when deciding if you need a flash for travel photography.
Types of Flash
Before deciding on whether or not you need to take a flash with you on your trip it is important to understand the different types of flash that are available to you.
On Camera Flash
On camera flash, like the name suggests, is a flash that is attached to your camera. This is usually as a built-in pop-up flash or a flash unit that you attach to the flash hotshoe found on the top of the camera.
The built-in pop-up flash can be a great emergency flash for those who travel without a flash but find they need one to capture a certain shot such as a backlit scene. However, they are quite small and generally produce a harsh direct light which can result in subjects which look flat and unnatural.
A better option would be to use an external flash unit mounted to the top of the camera. Generally, these are more powerful than built in flashes and they also offer much more control to the photographer.
From adjusting the direction of the flash to changing the exposure compensation and when the flash fires, you will have far greater control of your final image. You can even combine them with a diffuser for even greater control of the light.
They can be a great option for shooting indoors or capturing those unique travel photography portraits.
Find the best flash unit for you by reading this article.
Off Camera Flash
Yes, you’ve guessed it, off camera flash is all about placing the flash unit somewhere else other than on the camera. This kind of flash gives you greater control over how the scene is lit and you can even incorporate more than one flash unit.

However, this kind of flash set-up will probably involve you lugging around extra equipment. Plus, you may need the help of other people to hold the flash units in the right place for example. So, unless you have specific shots in mind that require this kind of set-up it may be better to stick to on-camera flash if any.
Reasons to Use a Flash
A flash isn’t just handy to have for after the sun goes down but can also enhance many different types of images taken during daylight hours too.
Fill the Shadows
Have you ever tried to take a photo that is half in shadow and half in light and no matter what you do you can’t get the image exposed the way your eye sees it? Well, using a flash can help fill in the shadows without the need for overexposing the other areas of the photo.
Alternatively, you can use image bracketing to achieve the result. While this requires a little extra time during the editing process, it means that you don’t need to carry that flash around with you.
Capturing Great Portraits
If your travel photography style includes capturing stunning portraits of locals, then the use of a well-positioned flash may be exactly what you need.
A good portrait has clear separation between the subject and background. This can easily be achieved without a flash by using a shallow depth of field . However, by intentionally underexposing the image by one or two stops and using the flash to light the subject the separation between background and subject can also be achieved.

Poorly Lit Indoors
Sometimes your travels take you to places where both natural and artificial light are in low supply. For example, inside the home of a Maasai warrior is such a case. These situations can make shooting quite difficult without a flash. Even if you whack up the ISO the image can still be underexposed. Bringing a flash into the situation would make a huge difference to the final image.
It may also make the difference between attempting to take the shot and not even bothering.
Shooting at Night
Life doesn’t just stop as soon as the sun goes down so why should your travel photography?
Some types of night-time photography don’t require a flash, such as astrophotography, cityscapes and light trails, all of which make great compositions. However, if you want to capture the vibrant city streets once the sun has set there is definitely no better way than with the help of your trusty flash unit.

The extra burst of light will really help your subjects stand out and bring your images to life.
Alternative Ways to light Your Scene
While a flash can really add that extra edge to some of your travel photos if you do decide not to take one with you it isn’t the end of the world. There are a few different ways that you can still use the natural and artificial light in the scene to your advantage.
Make Better use of the Available Light
Travel photography can be hard. You often don’t have time to fit everything in and can’t often afford to spend hours and hours waiting to get that one shot in that one particular spot at the expense of everything else.
While a flash unit may help in some situations, it can often be just as easy to get creative and remember the basics. Make sure you get out for the best light of the day. Think about moving your subject around the scene to make the most of the light available or even just shooting from a completely different angle.
Sometimes by only taking limited equipment with you, you are forced to use your creativity more and that is where the magic happens.

But isn’t that just another piece of equipment for me to carry?
True, you can buy specific photography reflectors which are very useful. Some even fold really small which are great for travel.
But don’t worry, every object that isn’t black reflects light to some degree you just need to be a little creative. From a strategically placed hat, piece of paper to using the natural reflection you get from a river or lake, reflecting the available light you have may be a great way to get around not having a flash.
While light diffusers are traditionally used in conjunction with flash units there is no rule that says you cannot use them with other light sources.
As with reflectors, you can buy specific light diffusers. However, you can also make your own from things that you normally travel with. For example, you could diffuse the harsh light from a lamp or even a torch by covering it with a plain t shirt or a scarf. The subject can then be lit how you want it to be but there is no need to travel with a flash unit or diffusers!
At the end of the day whether or not you need to bring a flash with you for your trip is a deeply personal choice. It depends on where you’re going, what type of trip it is and also the type of photographer you are.
For example, if you are heading somewhere sunny and intend on taking mostly landscape shots, then you probably wouldn’t have much use for a flash. However, if there is likely to be lower levels of light or portraiture is more your style then a flash may be of use.
Whether you choose to use an in-built flash, an external flash or no flash at all, as long as you are comfortable using your equipment you are sure to capture some amazing photos of your travels.
Click this link to learn how travel can inspire your wedding photography .

By Nicholas
Nicholas is a staff writer at Photodoto. His interests include photography, collecting cameras old and new, video editing, and all things 3d. If a new gadget comes out on the market, he's sure to be the first to try it. He enjoys experimenting with low light photography, very long exposures and high speed filming.
- Pingback: Inside my camera bag | Darren James | Shotkit
- Pingback: Travel Like A Pro, Take Travel Photos Like A Pro - Photodoto
- Pingback: How To Choose Gear For Travel Photography - Photodoto
Leave a comment Cancel reply
Your email address will not be published. Required fields are marked *
Save my name, email, and website in this browser for the next time I comment.
7 lessons to start making profit!
Click "Sign me up" and wake the pro photographer in you now!
Popular Posts

Black & White Is the Key to Better Color

130 Amazing Gifts for Photographers Handpicked from All Over the Web- Updated

6 Mistakes to Avoid in Long Exposure Photography

Privacy Overview
A Complete Beginner's Guide to Using Flash for Portrait Photography
Using flash for portrait photography is something that scares a lot of photographers, but once you master it, you will wonder how you ever worked without the complete creative and technical control it offers. If you are just starting out and unsure of how to get rolling, check out this fantastically comprehensive video tutorial that covers everything from the different types of flash through to how to use TTL and complex multi-light setups.
Coming to you from Ed Verosky , this awesome video tutorial will show you everything you need to know to get started working with flash for your portrait photography. By far, the most important bit of advice I would give budding strobe users is to keep it simple at first. A lot of people try to jump into using complex multi-light setups right off the bat and end up overwhelmed by trying to wrangle them all simultaneously before they have mastered the fundamentals of light's properties and behaviors. And don't worry, you can still make high-quality images using a single light; professionals do it all the time, in fact. Once you've mastered that, you'll feel much more comfortable moving on to using two and three lights. Check out the video above for the full rundown from Verosky.

Alex Cooke is a Cleveland-based portrait, events, and landscape photographer. He holds an M.S. in Applied Mathematics and a doctorate in Music Composition. He is also an avid equestrian.

Good and comprehensive article. Most beginners and amateurs rely on their speedlite on the hot shoe. When taking group or family images using the speedlite on the hot shoe, I find using a diffuser is very helpful. I carry one (G. Fong's Lightsphere) with me, works great, and is part of my camera bag inventory.
Complete and informative overview of lighting.
Simple Off Camera Flash Setup for Weddings
The wedding day is the most important day of your clients’ lives. Couples deserve to have their photos and also those of their family and friends to look as amazing as possible. Wedding photographers have many responsibilities. One of the most important things to do is capturing an image that represents the story of the event. This article will teach you how to do an off camera flash setup for wedding photography and make you take beautiful shots that will leave your clients ecstatic!
Why use off camera flash techniques?
It is important to note that one of the most difficult aspects of shooting weddings is dealing with different locations and weather. Lighting conditions can be less than ideal, leading to tough choices in the camera setting for good results. Time pressure adds to the challenge. It is important not only to create pleasing shots but also to get them quickly before they’re gone forever!
The only thing that can make it better is for a wedding photographer to have an arsenal containing off camera flash setups. With that, you always have control over your light source no matter what type of shoot comes your way.
The equipment you need to use off camera flash
You can’t attempt off camera flash photography without a camera. This is basic knowledge that every aspiring photographer should know if they want to take quality photos. Any cheap but decent digital SLR will do, may it be a Nikon or a Canon camera.
You can light your scene with any off camera flash. If you have a tight budget, you could buy an old manual flash for under $20 or invest in speedlites which range from around $400 to over ten thousand dollars. You need something that fits your needs and price point.
There are two main ways to determine how many exposure settings should be used when using flash: TTL and manual. The advantage of the first is that your camera will automatically tell you what it needs. For the second one, the person makes all the adjusments – no automatic interface can do this for you. Both have pros and cons like photographing without having a photgraphy background, or setting up electronic equipment for it to work.
A specific example of a flash includes the 580exII flash with a pocket wizard to a fire flash or the Canon 600 EX-RT flash which has a built-in transmitter. The look of the photos is the same with either set-up.
Wireless Flash
Wireless triggering offers versatility and ease of using your camera’s flash off camera. The three methods that can be used for this are optical, infrared, or radiofrequency (RF) which each have their benefits.

Light Stand
Lightweight and quick to set up is extremely important to me. Note that if you are using larger modifiers, I use heavier light stands.
Here’s my wedding go to

and my heavier ones for commercial and portrait work

Umbrella Bracket
It’s worth investing in this straight away because cheaper options don’t last long. It makes your lighting equipment useless after just one use! Don’t even bother with the $10. The MagShoe is my all-time favorite accessory because it’s well built and easy to adjust.

Flash Modifiers
There are different flash modifiers out on the market but when starting, umbrellas are an excellent, inexpensive way to modify your style. They’re cheerful and versatile so you can use them in a variety of ways depending on the type of look that you want to create.
I like this one because it’s got a black cover in the case you want to bounce, and then if you take it off, you can shoot-through it with the translucent side!

This starter modifier kit is what I recommend to everyone!

Batteries for Flash and Trigger
Of course, you always need to have an extra pack of batteries just in case.
Wedding Off Camera Flash Setup
Remember that off-camera flash photography is a universal skill. For most wedding days, you can use natural light to photograph just about anything. However, there are many times when adding a source of lighting becomes necessary and it’s always useful outdoors after the sun sets or in indoor spaces like rooms or churches with no windows.
There are a lot of ways to set up for off camera flash photography. To build a basic setup, have one flash mounted on the camera, and one on a light stand. There are different ways to coordinate flashes depending on what type of flash you use. When using off camera flash with the 600 EX-RT system, you can have a flash mounted on your camera because it is used to trigger the other flash at a distance. You can also turn off the flash on top of your camera to prevent it from firing any light if you only want to use the off-camera light.
You can place your flashes closer, or farther back from the subject in a way that best suits each photo’s needs and style without getting tangled up with wires.
Off-camera flash allows photographers more flexibility because they are free from attaching these lights onto their cameras themselves–they only need an attachment for remote control (either hardwired or wireless) connection between them and their external strobe units which lighten practically any type of scene imaginable thanks to this independence!
Lighting Positions
Surveying the venue and determining background is one of the most important steps before photographing in an off-camera flash. It doesn’t matter if you are using a studio or taking pictures on location, it is crucial to know where your subject will be standing in the room so that you can position light properly with appropriate angles.
The key factor for this type of photography style is exposure; You don’t have to keep on adjusting your camera setting. Your on-camera bounce card will provide some extra light, and the main light source is your OCF. You’re going to place it 45 degrees from you so that it shines onto your couple!
Camera Settings
To get the perfect shots, it is always important to be mindful of the camera setting. The camera flash power should not be too strong or else the subjects can’t still be seen well; if you adjust your settings and try to fix the over-exposure issue by changing any one factor such as ISO or shutter speed then other factors will have an impact on how dark your background becomes because they are all interconnected.
Do a lower flash power (1/64 is a good place to start) and higher ISO! This will allow the subjects’ faces to be more visible, but not too bright. The background glow will also show up much better with this kind of setup as well. You shouldn’t shoot above 2.8 aperture when doing these kinds of shoots for your photos not to have dark spots around them – so make sure you take several shots at different levels if necessary!

Off-camera flash setup for the getting ready room
Working with natural light is our preference, but we need to add an OCF if it’s not available. If you have a small window in your space and there aren’t any other options for light sources, use that as your backlight by having the client stand right up against it! We’ll set on flash power at a low level around 1200 ISO so they can get some nice glow from their skin and avoid hazy images with subjects having muddy skin tones. When you put up a flash, it will produce an image of your subjects having a much more balanced skin tone. You can also create natural-looking light sources with your flashes if there is nothing but overhead lights and no windows! Just be sure to turn off all ambient lighting and use the flash of your camera instead.
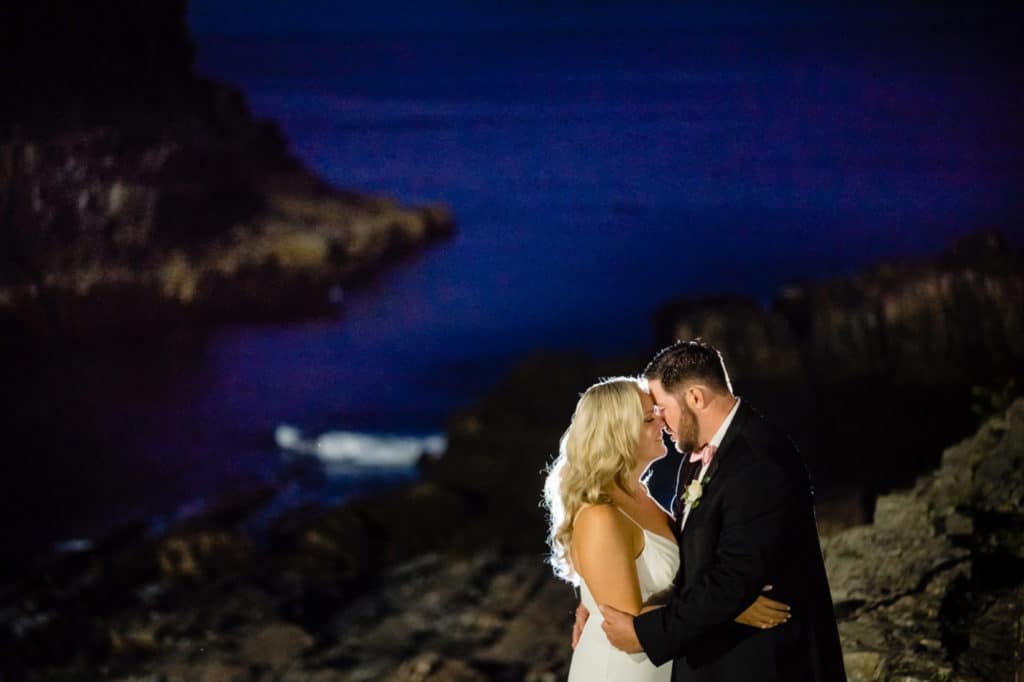
Camera flash for wedding portraits
The groom usually has to be a passive participant on the wedding day. He can’t show too much emotion, but he is still just as important in this vital ceremony that will make him happy for years to come. This setup involves one single flash and lowering ambient light so we don’t see anything else except what’s illuminated by it – which feels more real than any other type of photography could provide them with today
In a dark scene, make adjustments to the ISO, shutter speed, and aperture until you have reached what feels like an optimal level of darkness. Now turn on your off camera flash at a 45-degree angle close to the subject (the closer it is from them the lighter will be spread). Try to keep the most focus on his face but experiment with different angles!
To make sure you capture best angles and features, use a few different lighting patterns to give some variety in portraits with the same setup that you did for groom shots. For example, you can create dark portrait photos that have no crazy shadows on your subject’s face by following by reducing artificial light sources (if they are too bright) and adding directional or sidelights from one angle only without any fill flash

Off Camera flash setups for group photos
This includes photographing family and friends throughout the wedding. When shooting with only one flash, angle it at about 30 degrees. If you have two flashes, there are a few different setups to consider. Your first option is to put both of your lights on opposite 45 degree angles which will cover everything but can produce some strange shadows in the shot. The other setup just keeps one light at 45 degrees and brings the other closer to the camera while lowering its power- this way you’ll maximize softness without any weird spots or mismatched color temperatures (though if these qualities sound like what you’re looking for then try experimenting).
The last thing to consider for this off camera flash setup is whether you want the lighting on your subject even or harsh. If you’re in a room with high ceilings, a bounce flash will create more evenly lit subjects than a direct flash that has harsher shadows. But if the ceiling’s low and dark, bounce flashes won’t work without some supplemental light at ground level until it reaches into higher levels of ambient light

Off camera flash at the wedding reception
Photographing people on the dance floor can result in an amazing image. There are several ways to light a scene. One way is with two off-camera flashes, opposite each other. This creates moody effects and can create dark shadows if you’re not careful about where your subject’s face falls about the camera – be sure they have sufficient lighting! The flash on top of your camera can be helpful for some additional coverage when you need it but would often result in an inconsistent look that could overpower or wash out certain parts of the frame if you don’t test the angles properly. For most shots, put one light beside you; There can be times when moving around adds variety and dimensionality making those efforts worth it.
Make sure you have a secure plan for your lighting. It won’t be the first time someone has run into them and knocked it over while enjoying themselves on the dancefloor, so make sure to keep all of that in mind when planning out how they’re going to work with your setup.

Off Camera flash setup for first dances
For the setup during the first dance, put a flash with an umbrella directly next to or on top of your DJ booth because you never want it in our shots. It’s out of place here and has less chance of being knocked over. The best position is standing right beside one side of the umbrella so that as the bride and groom are dancing they can rotate towards us without having to move around too much. This also means both flashes will be connected which will produce better lighting than if we only had one light source from just below their faces
Camera flash setups for cake cutting
For the cake cutting event, set up a camera flash at 45 degrees adjacent to the couple. This is your time to get creative! Photograph it from different positions to capture all of your favorite moments.
Off Camera flash setups at night
Shooting at night is rewarding and beautiful. One of the many ways to capture a stunning scene from your favorite wedding day in raw form is with an off-camera flash. One technique of shooting is with the off camera flash behind you, but on one side or in front of the couple; make sure not to get too close because it will light up their faces from this direction instead! For these purposes turn off any camera flash
To achieve amazing back-lit photos, it’s important to have your off camera flash completely hidden behind the couple (using their bodies to block it). Position them close enough together and strategically place some of their limbs so they will cover up any hint of light from the flash. This way if there is a bright flaring event in your lens photo then that would be gone since no one could see anything coming from its direction due to how well positioned everything was before taking this picture.
It’s important to keep the light stand relatively low. This will ensure that a good amount of detail is captured in the picture while also being able to see subjects’ facial expressions as well. A height about mid-way between their waist and chest level should be sufficient for most shots; however, you can experiment with different heights if desired!
There are so many factors that come into play, including light and composition. With a little creativity, you can achieve the effect of off camera flashes without spending too much money on equipment. However, there isn’t one standard formula for setting up your flash photography; it’s always about experimentation! If you have any other ideas or tricks to share with fellow photographers let us know in the comments below!
Full transparency
Some of these links. are affiliate links, which means that if you click on it and buy something, I get a small kickback! This money goes directly into my chocolates and mango snack fund for wedding days!
I write blogs to help my clients understand that I’m a nerd. I research and test my wedding photography equipment to extreme measures because I love what I do and I take my job super seriously.
Culture and lifestyle of your wedding
- Greek wedding
- Boston Multicultural wedding photographer
- City Hall wedding
- Boston jewish wedding photographer
- Micro weddings
- Boston Persian wedding photographer
- Boston Indian wedding photographer
- Boston Gay wedding photographer
- Winter wedding
- Boston Asian wedding photographer
View more Boston wedding types
Vibe of your Boston weddings venue
- Estate or Mansion wedding
- Country club wedding
- Tent wedding
- Restaurant wedding
- Farm wedding
- Museum wedding
- Church weddings
- Waterfront wedding
- Outdoor wedding
- Beach wedding
View more Boston wedding settings
View more blogs
617.506.9059 [email protected]
Shooter Files by f.d. walker
Street Photography Tips, Interaction, Travel, Guides
Apr 24 2017
City Street Guides by f.d. walker: A Street Photography Guide to Moscow, Russia

*A series of guides on shooting Street Photography in cities around the world. Find the best spots to shoot, things to capture, street walks, street tips, safety concerns, and more for cities around the world. I have personally researched, explored and shot Street Photography in every city that I create a guide for. So you can be ready to capture the streets as soon as you step outside with your camera!
At over 12 million people, Moscow is the largest city in Russia and second largest in Europe by population ( Istanbul is #1). An urban, cosmopolitan metropolis with more than enough glitz and glam to cater to the elite, but without losing its fair share of Soviet era roughness around the edges. It can be fast paced, brash, busy, and trendy like other big cities, but it has its blend of West meets Russia atmosphere and beauty that provides plenty of unique interest. The Red Square is as famous as it gets, but there’s so much more to this city, including the most beautiful subway system you’ve ever seen. It would take years to capture all of Moscow, but that means you have an endless amount of areas to discover.

So here’s a Street Photography guide so you can be ready to capture all that Moscow has to offer before you even arrive!
- Patriarch’s Pond
- Old Arbat Street
- Maroseyka Street
- Tverskoy Boulevard
Top 5 Street Spots:
1. red square.
The Red Square is the most famous square in not just Russia, but all of Eastern Europe. The name actually doesn’t come from the color of the bricks or communism, but from the name in Russian, Krásnaya, once meaning “beautiful” before its meaning changed to “red.” This large plaza is what you see on the cover of guide books and magazines for Moscow, with St. Basil’s Cathedral being the center piece next to Lenin’s Mausoleum surrounded by the Kremlin Wall. Of course, the Red Square attracts hordes of tourist due to the main attractions, but all that activity around an interesting atmosphere does provide street photo opportunities. It’s also the central square connecting to the city’s major streets, providing a good starting point to explore outward.

You’ll also find the popular pedestrian only Nikolskaya Street connecting the Red Square to Lubyanka Square. This line of expensive shops includes plenty of activity, while also leading you to another popular square. Filled with history rivaling any city, the Red Square and surrounding areas are the heart and soul of Russia.

2. Patriarch’s Ponds
Patriarch’s Ponds is one of the most exclusive neighborhoods in Moscow. Despite the name being plural, there’s only one large pond, but it’s worth a visit with your camera. It’s a popular spot for locals and expats to come relax or take a stroll around the pond. You get an interesting mix of young and old too, from young love to “babushkas” feeding pigeons. It’s a very peaceful park atmosphere in one of the nicer areas within the city center, while bringing enough activity for street photography.

The pond is shallow and in the winter becomes a popular spot for ice-skating too. The area is also well-known for the location in the famous Russian novel, The Master and Margarita.
3. Old Arbat (Stary Arbat)
Old Arbat is the most famous pedestrian street in Moscow, and dating back to the 15th century, also one of its oldest. Originally, it was an area of trade, but soon became the most prestigious residential area in Moscow. During the 18th century, Arbat started attracting the city’s scholars and artists, including Alexander Pushkin. Cafes lined the streets and impressive homes filled the neighborhood. Since then, New Arbat street was created as a highway in the area, while Old Arbat was paved for a 1km pedestrian only walkway.

Due to the historic buildings, famous artists that lived here, and the bohemian atmosphere, Old Arbat has become a big attraction for tourists today. Now, there’s a mix of cafes, restaurants, souvenir shops, street performers, street merchants and other attractions for visitors, and some locals, to come enjoy. It can get really busy here and there’s usually something interesting going on so it’s a good street to come walk with your camera for guaranteed life.
4. Gorky Park
One of the most famous places in Moscow is Gorky Park. The official name is Maxim Gorky’s Central Park of Culture & Leisure, which gives you an idea of what goes on here. When built, it was the first of its kind in the Soviet Union. Divided into two parts, it stretches along Moscow River. One end contains fair rides, foods stands, tennis courts, a sports club, a lake for boat rides, and more. This end brings more active life due to its number of attractions, while the other end is more relaxed, where you’ll find gardens, trees, older buildings, and an outdoor amphitheater.

Gorky Park attracts mostly locals so it’s a good spot to capture the non-tourist side of Moscow life. Muscovites come here to escape the city and unwind in a picturesque setting. The park remains alive outside of the warmer months too, especially when the lake turns into the city’s largest outdoor skating rink. I’d recommend taking the metro out here to spend at least half a day exploring the massive park’s life with your camera.
5. Maroseyka Street
Maroseyka Street is a popular area not too far from the Red Square. The long, winding street turns into Pokrovka and is lined with restaurants, cafes, bars and places to stay. It’s actually where I like to stay when I’m in Moscow due to its location and solid street photography opportunities itself. You have Kitay-gorod station near and if you keep walking southwest, you’ll get to the Red Square. But if you walk northwest, as it changes to Pokrovka, you can find a long street of activity for photography with its own interesting atmosphere.

6. Tverskoy Boulevard
Tverskoy Boulevard is the oldest and longest boulevard in Moscow, beginning at the end of Nikitsky Boulevard, and finishing at Pushkin Square, a spot to come for activity itself. The boulevard is made up of two avenues, with pedestrian walkways in-between. You’ll find grass, shrubbery, trees, benches and more walking it’s almost kilometer length. Many people come here to enjoy some relaxation, walk their dog, or just to use it to walk wherever they’re going. Its center location also provides a nice place to walk with your camera near plenty of other spots you’ll want to check out anyway.
Sample Street Walk:
For a full day of Street Photography, covering some of the best spots, you can follow this sample street walk for Moscow:
- Start your morning walking around the Red Square (1), while exploring the surrounding area, including Nikolskaya Street
- Then walk northwest to Patriarch’s Ponds (2) and slowly walk the pond and surrounding area with your camera
- Next, walk east to the Pushkin Monument and stroll down Tverskoy Boulevard (6)
- Once Tverskoy Boulevard (6) ends, it will turn into Nikitsky Boulevard. Follow this down until you get to the start of Old Arbat Street (3), across from Arbatskaya station
- After you’re done walking down Old Arbat Street (3) for more street photography, spend some time checking out Moscow’s beautiful metro stations
- To finish off the day with more street photography, get off the metro near Red Square (1) again, Maroseyka Street (5) or wherever you’re staying for the night.

3 Things I’ll Remember about Shooting in Moscow:
1. museum metro.
The Moscow metro system was the first underground railway system in the Soviet Union and today includes 203 stations across 340km of routes. The elaborate system has some of the deepest stations in the world too, with escalators that seem to go on forever. None of this is what makes it so special, though. Many of its stations feel like stepping inside a museum, making it without a doubt the most interesting and beautiful metro system I’ve been in.

When built, Stalin wanted to make the metro stations “palaces for the people” with marble, chandeliers, and grand architecture. The best part is the variety of architecture and styles used, making many of the stations a completely different experience visually. You could easily spend a whole day traveling the stations and there are even tours available for people who wish to do just that. My advice, though, would be just to buy a ticket and hop on and off at different stations, while exploring different lines. The museum-like surrounding mixed with the crowds of characters can make for a great photography experience.

Since there are so many stations, here are some of my favorites to check out:
- Novoslobodskaya
- Mayakovskaya
- Elektrozavodskaya
- Komsomolskaya
- Ploschad Revolyutsii
- Dostoyevskaya
- Prospekt Mira

2. Moscow is Big
It’s no secret that Moscow is a big city, but it can feel even bigger with how spread out much of it is. This is especially true if you compare it to cities outside of Asia. If I compared it to cities in Europe, I’d probably say only Istanbul would warrant more time to really discover the depths of this city. Most only explore around the Red Square and surrounding area, but that is such a small part of the city. Although, that central area does give you plenty to see on its own.

Fortunately, I had a good friend living in the city to show me around, but it opened up my eyes even more to how much there is to discover in Moscow. It’s a big city with a variety of atmosphere that can take you from “east” to “west” and trendy to rugged depending on where you go. I’d imagine you’d have to live here a while to really know the city.
3. Cosmopolitan Mix of East meets West
Modern skyscrapers mixed with amazing architecture, a world-class metro system with museum-like beauty, trendy fashion and chic clubs, Moscow is a rich mix of Russian culture and history in a more western cosmopolitan package. There is a push to keep the Russian culture, while also pushing forward with a modern metropolis the whole world will envy. This comes with an impressive skyline, that continues to grow, and endless modernities, but with soviet nostalgia and atmosphere mixed in for good measure.

Mixed in with this grand western cosmopolitan atmosphere, is a strong national pride in Russia. This includes their famous leader, Vladimir Putin. Maybe no other place will you see a country’s leader more often. All over, from the pricey tourist shops to the underground walkway stalls, you’ll find goods with Putin’s likeness covering them. From t-shirts to magnets to Matryoshka dolls. There’s a strong national pride that can be seen around the city, which also extends to their leader. Moscow is many things. It’s East meets West, modernizations meets Soviet era, and a whole lot more.
What To Do For a Street Photography Break?:
Eat at a stolovaya.
Stolovayas are Russian cafeterias that became popular in the Soviet days. You grab a tray and walk down the line of freshly prepared local dishes, and select whatever you want from the chefs. They’re usually inexpensive and a much better value than restaurants, while giving you the opportunity to try from a wide selection of everyday Russian food. They’re also very tasty. I always include some borsch on my tray and go from there. The places themselves are all over Moscow and usually come with Soviet-era aesthetics to complete the experience.

Street Safety Score: 7
*As always, no place is completely safe! So when I talk about safety, I’m speaking in general comparison to other places. Always take precaution, be smart, observe your surroundings and trust your instincts anywhere you go!
Being the 2nd largest city in Europe with over 12 million people, you’re going to have your dangerous areas, but for the most part, it feels safe walking around. Russia is statistically higher in crime compared to most of Europe, but this generally doesn’t apply to tourists and visitors. Around the Red Square and surrounding city center, you should feel completely safe walking around. Pick pocketing can happen, but no more than other touristic places. I always explore Moscow freely without coming across too much to worry about. It’s a spread out city, though, so of course it matters where you are. Just use basic street smarts, know where you are and Moscow shouldn’t give you a problem.

People’s Reaction Score: 7
Moscow is fast paced, big city life, which usually means people aren’t too concerned with you, or your camera. I don’t find people notice or pay much attention to me when I’m out taking photos in Moscow. For the most part, people just go about their day. You shouldn’t get too many looks or concern. But it can depend on the area you are in. The more you stick out, the more you might get noticed with suspicions. I’ve never had any problems in Moscow, or Russia, but just be careful who you’re taking a photo of if you get out of the city center. Other than that, it’s about average for reactions.

Street Tips:
Learn the alphabet .
Much of Moscow, including the metro system, doesn’t use english. The Russian alphabet uses letters from the Cyrillic script, which if you aren’t familiar with it and don’t know the sounds, can be hard to decipher the words. This is most important for street names and metro stops when trying to get around. It can save confusion and make it easier getting around if you learn the basic alphabet. At the very least then, you can sound out the words to see which are similar in the english conversion, which can help matching them to maps. When out shooting street photography, getting around is as important as anything. So save yourself some time and frustration by learning the Russian Alphabet.

Use the metro
While Saint-Petersburg feels very walkable for a city its size, Moscow can feel very spread out, even for its bigger size. Outside of the Red Square area, you can have plenty of walking before getting anywhere very interesting, so you’ll need to take the metro a lot if you really want to explore the city. Maps are deceiving here too, it will always be further than it looks.

Another reason it’s less walkable than Saint-Petersburg is its completely different set-up. Moscow’s streets are mostly contstructed in rings with narrow, winding streets in-between. This is common with medieval city cities that used to be confined by walls, but you usually don’t have it in a city this massive. Saint-Petersburg has a more grid-like pattern that also uses the canals to help you know your way around. When it comes to navigating on foot in Moscow, it can be more difficult, so bring a map and take the metro when needed. It’s why Moscow’s metro carries more passengers per day than the London and Paris subways combined.
Explore other areas if you have time
Moscow is really big. While most people stay around the Red Square within the Boulevard Ring, there’s so much more to the city. I covered some other spots outside of this circle, but if you really want to see the city, you’ll need time. If you do have time, some other areas I’d check out first are Zamoskvarechye, along some of the south and western Moscow.

Inspiration:
For some more inspiration, you can look through the Street Photography of Moscow photographer Artem Zhitenev and check out 33 of my photos taken in Moscow .
Conclusion:
Moscow’s name brings a certain mystique, but once you’re there it might bring a different atmosphere than you expect. It’s big and sprawling, but beautiful in many ways. It can feel like a European capital on a grand scale, but you can definitely find its Russian side in there.

The urban sprawl of Moscow can be intimidating, but give it enough time and you’ll be rewarded with plenty to discover. All with the world’s best metro system to take you around.
I hope this guide can help you start to experience some of what Moscow contains. So grab your camera and capture all that Moscow has to offer for Street Photography!
If you still have any questions about shooting in Moscow, feel free to comment below or email me!
(I want to make these guides as valuable as possible for all of you so add any ideas on improvements, including addition requests, in the comment section!)
Click Here For More City Street Guides!
(A New Guide Posted Every Other Wednesday)

Comment Here! Cancel reply
For patreon exclusive educational content:.

Limited Edition Postcard Prints!
Street Photography Workshops
Donations Always Appreciated
I'll always keep Shooter Files free for everyone, but any donations would be greatly appreciated and help me keep it going. Many thanks to everyone following along!
Cheers! -f.d. walker
Search the Files

For Exclusive Patron Content:
- #Luxury travel
- #Unusual Moscow
- #Jewish Heritage
- #Russian traditions

Best spots in Moscow for photo maniacs
- #Special Interest
- #Photospots
- Capturing the Kremlin and central Moscow: the higher, the better

Of course, pictures of the Kremlin shot from the Red Square are no doubt iconic and must-have, but they are taken by thousands of tourists every day and can hardly make a wow-effect on your friends on Instagram and other social networks.
Another problem with shooting from Red Square is that the photos do not fully represent the scale of the medieval fortress of Kremlin. So, you need to make some steps further and higher to catch the right shot. You’ll be surprised by the fact that the panoramic views of the Kremlin are pretty easy to get. We have four hints for you: Zaryadie, Ritz Carlton, Patriarch bridge, and Radisson riverboat.
If you want to not only make beautiful photos but also to learn something interesting about the history of Russia, we recommend an individual tour of the Kremlin. You can order it online here .

First, go to Zaryadye, which is located right next to the Red Square, behind the St Basil’s Cathedral, on the closest Moscow river bank. The most impressive views over the Kremlin are unfolded from the so-called Flying bridge of Zaryadye and Glass Dome building in the back part of the park.
Zaryadye is the new place of attraction in Moscow. It’s a landscape park, opened in September 2017 by the Moscow government on the hill where the giant soviet hotel ‘Rossiya’ located before its demolition in the early 2000-s. As a bonus, you’ll get an incredible view over one of Stalin’s skyscrapers, located on the opposite bank of Moscow river — the so-called Vysotka at Kotelnicheskaya, used as a residence of many Russian famous people and officials.
- The roof of the Ritz Carlton Hotel
This option is ok only in case if you’re ready to pay the average bar bill of over 2500 rubles (about $40). Visit the O2 Lounge Bar on the roof of the Ritz Carlton Hotel, where all the global celebrities take their Moscow pictures, from Angelina Jolie to Robert Downey Jr.
But such photo investments seem to pay off immediately. The deck of the bar makes an excellent panorama point for the Kremlin walls and towers, the Historical Museum, the Great Kremlin Palace, and the Kremlin cathedrals. All these landmarks are not too far away, which makes them perfectly recognizable, even in the background.
- The Radisson riverboat

This hint will be useful in case you’re traveling to Moscow in the cold season. River transportation in Moscow doesn't stop in winter. Many enclosed and heated tourist yachts with panoramic windows and ice-breaking equipment can be found in the Moscow River. For instance, one of the most recognizable is the flotilla Radisson.
Their route goes past all the main sights of pre-revolutionary and Soviet Moscow – from Stalin's skyscrapers (Ukraina hotel and Vysotka at Kotelnicheskaya) to the Kremlin and the Novodevichy Convent. It is possible to go out to the open deck and take photos of you and your family or friends against a backdrop of the city’s lights and their reflection in the river. The cruise lasts 2.5 hours. You can book a tour with a car roundtrip transfer from your hotel to the pier and back: book online here
- Patriarch bridge

The bridge is located further from the Kremlin, than Zaryadye or Ritz Carlton, so the Kremlin walls on your photos will look smaller. The brighter side of walking through the bridge is that you can do more fabulous pics of the Moscow river and city center landscapes. The Moscow river and the pretty recognizable giant statue of Peter the Great are ideally viewed from the bridge. Be prepared that it’s a famous and popular pedestrian area for tourists all over the world so the bridge may be crowded.
Also, the bridge is a part of a long promenade which leads from the Christ the Saviour Cathedral through the Balchug island to the opposite bank of the Moscow River, where another pedestrian area — Museon embankment — is ready to joy you with its cafes, cozy lawns and impressive views over the river flow, ducks and boats.
- Moscow City

The best spot to shoot the famous Moscow business downtown is located on the Taras Shevchenko embankment. To get there you need to come to the metro stations Vystavochnaya or Delovoi Tsentr, then go to the Bagration bridge (use the metro navigation, the path is tricky), cross the bridge — and voilà! You’ve reached the best spot for shooting, posing, sending selfies, and Instagramming.
- Ponds and orangeries

There are two ponds in Moscow, that deserve your attention in summer: the Chistye ponds (actually there is only one pond, but it’s worth it) and the pond in Gorky Park, which is full of small boats and catamarans. Both lakes are lost between the green alleys and are drowning in all the shades of green. Those are the perfect spots to catch the moment of peace amid the madness of big city life.
- Banya: Russian steam bath read
- Luxurious travel to Moscow: best places to visit read
- 7 Top Things to Do in Karelia Region read
- Russian Souvenir: what to bring home from a trip to Russia read
- The Top 10 Unusual Things to Do in Moscow read
- Christmas Festival in Moscow read

We use cookies to improve your experience on our Website, tailor content, and measure advertising. By continuing to use our Website, you accept our Privacy Policy .
Your request has been sent successfully! Our travel expert will contact you shortly.
This site is protected by reCAPTCHA and the Google Privacy Policy and Terms of Service apply.

The 46 best photo spots in Moscow
Navigate forward to interact with the calendar and select a date. Press the question mark key to get the keyboard shortcuts for changing dates.
Navigate backward to interact with the calendar and select a date. Press the question mark key to get the keyboard shortcuts for changing dates.
1 The Moscow Kremlin
2 Red Square

3 Gorky Central Park of Culture and Leisure
4 st. basil's cathedral, 5 bolshoi theatre.

Track your travel spending and split costs with friends
Plan your trip. Keep your budget organized. Split the cost between tripmates. Wanderlog does it all.

Don’t forget to pack anything
Stay organized with a to-do list, packing list, shopping list, any kind of list.

16 Grand Kremlin Palace
17 state historical museum, 18 public museum of the moscow metro, 19 cafe pushkin, 20 armoury chamber, 21 vorob'yevy gory, 22 all-russian exhibition center, 23 moscow zoo, 24 alexander garden, 25 sokolniki park.

All travel reservations in 1 place
Never dig through your emails again — access all your flights, lodging, and any reservations in 1 place.

26 Muzeon Park of Arts
27 ostankino television tower, 28 patriarch's ponds, 29 neskuchny garden, 30 museum of soviet arcade games, 31 dormition cathedral, 32 the carlton, moscow, 33 monument to minin and pozharsky, 34 annunciation cathedral, 35 russian state library.
Perfect for road trips
See time and distance between places, and optimize your route to get the most of your day.

36 Winzavod
37 museum of the history of vodka, 38 komsomolskaya, 39 moscow state university, 40 poklonnaya hill, 41 ostrov mechty (dream island), 42 business district "moscow silk", 43 vorob'yevy gory, 44 memorial eternal flame, 45 street adventure.
Collaborate with friends in real time
Plan along with your friends with live syncing and collaborative editing.

46 Underground gallery
Top searches in moscow, popular road trips from moscow, what's the weather like in moscow.
It depends on when you visit! We've compiled data from NASA on what the weather is like in Moscow for each month of the year: see the links below for more information.
- Weather in Moscow in January
- Weather in Moscow in February
- Weather in Moscow in March
- Weather in Moscow in April
- Weather in Moscow in May
- Weather in Moscow in June
- Weather in Moscow in July
- Weather in Moscow in August
- Weather in Moscow in September
- Weather in Moscow in October
- Weather in Moscow in November
- Weather in Moscow in December
All road trips from Moscow
- Moscow to London drive
- Moscow to Paris drive
- Moscow to St. Petersburg drive
- Moscow to Berlin drive
- Moscow to Prague drive
- Moscow to Amsterdam drive
- Moscow to Budapest drive
- Moscow to Vienna drive
- Moscow to Istanbul drive
- Moscow to Florence drive
- Moscow to Venice drive
- Moscow to Stockholm drive
- Moscow to Milan drive
- Moscow to Krakow drive
- Moscow to Copenhagen drive
- Moscow to Warsaw drive
- Moscow to Helsinki drive
- Moscow to Munich drive
- Moscow to Brussels drive
- Moscow to Tallinn drive
- Moscow to Riga drive
- Moscow to Oslo drive
- Moscow to Turin drive
- Moscow to Hamburg drive
- Moscow to Vilnius drive
- Moscow to Yaroslavl drive
- Moscow to Nizhny Novgorod drive
- Moscow to Kyiv drive
- Moscow to Tula drive
- Moscow to Bruges drive
Explore nearby places
- Likino-Dulevo
- Ivanteyevka
- Orekhovo-Zuevo
- Semyonovskoye
- Ivanovskoye
- Rumyantsevo
- Dzerzhinsky
- Sovkhoz Imeni Lenina
- Dolgoprudny
All related maps of Moscow
- Map of Moscow
- Map of Danki
- Map of Shatura
- Map of Likino-Dulevo
- Map of Uspenskoye
- Map of Gorskoye
- Map of Ivanteyevka
- Map of Reutov
- Map of Domodedovo
- Map of Peresvet
- Map of Vorobyovo
- Map of Bronnitsy
- Map of Orekhovo-Zuevo
- Map of Moskovsky
- Map of Semyonovskoye
- Map of Izmaylovo
- Map of Nikolskoye
- Map of Ivanovskoye
- Map of Marfino
- Map of Govorovo
- Map of Nagornoye
- Map of Mosrentgen
- Map of Bratsevo
- Map of Rumyantsevo
- Map of Mytishchi
- Map of Putilkovo
- Map of Razvilka
- Map of Khimki
- Map of Dzerzhinsky
- Map of Sovkhoz Imeni Lenina
- Map of Dolgoprudny
Moscow throughout the year
- Moscow in January
- Moscow in February
- Moscow in March
- Moscow in April
- Moscow in May
- Moscow in June
- Moscow in July
- Moscow in August
- Moscow in September
- Moscow in October
- Moscow in November
- Moscow in December
Looking for day-by-day itineraries in Moscow?
Get inspired for your trip to Moscow with our curated itineraries that are jam-packed with popular attractions everyday! Check them out here:
- 1-Day Moscow Itinerary
- 2-Day Moscow Itinerary
- 3-Day Moscow Itinerary
- 4-Day Moscow Itinerary
- 5-Day Moscow Itinerary
Best attractions in nearby cities
- Top things to do and attractions in Khimki
Best restaurants in nearby cities
- Where to eat: the best restaurants in Mytishchi
- Where to eat: the best restaurants in Khimki
- Itinerary + map in one view
- Live collaboration
- Auto-import hotels and reservations
- Optimize your route
- Offline access on mobile
- See time and distance between all your places
IMAGES
VIDEO
COMMENTS
When starting out almost any flash will do, as even the cheapest can be fired off camera, and be modified to give you great quality light. 2. Flash Triggers. Once you have decided on which flash or speedlight fits your budget, then comes the maddeningly wide array of choices available to fire your flash remotely.
The off-camera flash setup often aims to achieve different lighting techniques like Rembrandt, butterfly, or three-point lighting. ... Yatharth Gupta is a seasoned portrait and travel photographer based in India. He is also a writer and a blogger and loves to explore new places. Leave a Comment Cancel Reply. Comment.
Don't fret - you can build a travel flash photography kit for $200 or less. While I love shooting in natural light, a travel flash kit can really expand what you can do with your photography while on the road. ... Nikon Zf Setup & Network Menus Walkthrough December 21, 2023; Depth of Field is More than Just Aperture November 27, 2023; How ...
RAW SOOC - Camera Settings: 1/4000, f/1.4, ISO 50. With the composition set and a darker ambient exposure dialed in, we need to add flash. To get the lighting how we wanted it, we held the flash directly above our subject and out of the frame. Once again, you can take control of the flash power through the Profoto Control app if the Connect ...
This type of electronic flash is shaped like a ring because it sits in front of the lens. It provides soft flat lighting. This is why it's commonly used in glamour and beauty photography. It's also ideal for macro photography. Because it sits in front of the lens, it won't cast any shadows on a very close subject.
Tip #5: Use Multi-Light Setups. When you like you're ready, we recommend graduating from one off-camera flash to two or more. Shooting with multi-light setups is both fun and creatively rewarding. For a two-light setup example, place your main or key light where you normally would.
To mount the flash to the camera, use the hot shoe on top of the camera body. Make sure the flash is not in the lock mode and slide it into the hot shoe. Never force it or you can risk damaging the contacts. If it's not doing on easily, double-check to ensure the flash's locking mechanism is set to unlock.
Date/Time: Set to your home time zone. Time Difference: Highlight Local and set the time offset for wherever you're traveling (+1 hours, -3 hours, etc). Sound & Flash: OFF. Disable all the unnecessary lights & sounds to better blend in. Sound Set-Up: Operation Vol. & Shutter Volume OFF. Turn off unnecessary sounds.
This is my go-to headshot set-up. Using the following settings as a starting point you can create portraits or head shots within mere minutes. With your camera set to manual, set the shutter speed around 1/125sec to 1/250sec depending on your camera's flash sync speed. ISO 320, aperture f/5.6, daylight white balance.
When getting started with flash photography, think of it as taking two photos in one. Get the background how you like it with the camera settings, and the subject exposed with flash settings. The exposure triangle becomes two triangles when you add a flash to your setup. You set your camera to expose for ambient light with your camera exposure ...
Here's my ultra portable light setup for travel that I used recently at Shutterfest 2023!🔥..💡Lighting Used for the Photo💡XPLOR 300 Pro | https://adorama.r...
If your travel photography style includes capturing stunning portraits of locals, then the use of a well-positioned flash may be exactly what you need. A good portrait has clear separation between the subject and background. This can easily be achieved without a flash by using a shallow depth of field. However, by intentionally underexposing ...
Outdoor Flash Photography For a Natural Look. When balancing flash and natural light, you can swing it in either direction, toward the flash for a dramatic look or toward the natural light for a subtly lit look. In fact you can get both looks with either if done right. Both have their uses and their place. Many people prefer a natural light ...
Travel photography is becoming a popular niche, and you're in the right place if you're thinking of giving it a try (or looking to take your current technique ... The entire setup only weighs seven pounds, and the Sony A7R IV's features are state-of-the-art. ... If you are shooting on a sunny day, use a fill flash and/or a reflector. Fill ...
A Complete Beginner's Guide to Using Flash for Portrait Photography by Alex Cooke April 6, 2022 2 Comments Video of Flash Photography for Portraits Crash Course 2022
To build a basic setup, have one flash mounted on the camera, and one on a light stand. There are different ways to coordinate flashes depending on what type of flash you use. When using off camera flash with the 600 EX-RT system, you can have a flash mounted on your camera because it is used to trigger the other flash at a distance.
Step 3: Learn the 5 Most Common Light Patterns. From left to right: Flat Lighting, Butterfly Lighting, Loop Lighting, Rembrandt Lighting, Split Lighting. Below are the common lighting patterns in flash photography: Flat Light: Flat lighting faces directly into the subject from the angle of the lens. Flat lighting is the least dramatic lighting ...
*A series of guides on shooting Street Photography in cities around the world. Find the best spots to shoot, things to capture, street walks, street tips, safety concerns, and more for cities around the world. I have personally researched, explored and shot Street Photography in every city that I create a guide for.
Photo Tips: After work hours are the best time to see people interacting with street performers, perfect for street photography. 8. Church of Nikolaya Chudotvortsa Tverskoy Old Believers' Community. This is a small, relatively unknown cathedral, but what makes this place special for me is its location.
Visit the O2 Lounge Bar on the roof of the Ritz Carlton Hotel, where all the global celebrities take their Moscow pictures, from Angelina Jolie to Robert Downey Jr. But such photo investments seem to pay off immediately. The deck of the bar makes an excellent panorama point for the Kremlin walls and towers, the Historical Museum, the Great ...
Architecture itself is pretty. Mikhail Rybin — Google review. Novodevichy Convent, also known as Bogoroditse-Smolensky Monastery , is probably the best-known cloister of Moscow. Its name, sometimes translated as the New Maidens' Monastery, was devised to differ from the Old Maidens' Monastery within the Moscow Kremlin.