Time Travel snowflake: The Ultimate Guide to Understand, Use & Get Started 101
By: Harsh Varshney Published: January 13, 2022

Related Articles
To empower your business decisions with data, you need Real-Time High-Quality data from all of your data sources in a central repository. Traditional On-Premise Data Warehouse solutions have limited Scalability and Performance , and they require constant maintenance. Snowflake is a more Cost-Effective and Instantly Scalable solution with industry-leading Query Performance. It’s a one-stop-shop for Cloud Data Warehousing and Analytics, with full SQL support for Data Analysis and Transformations. One of the highlighting features of Snowflake is Snowflake Time Travel.
Table of Contents
Snowflake Time Travel allows you to access Historical Data (that is, data that has been updated or removed) at any point in time. It is an effective tool for doing the following tasks:
- Restoring Data-Related Objects (Tables, Schemas, and Databases) that may have been removed by accident or on purpose.
- Duplicating and Backing up Data from previous periods of time.
- Analyzing Data Manipulation and Consumption over a set period of time.
In this article, you will learn everything about Snowflake Time Travel along with the process which you might want to carry out while using it with simple SQL code to make the process run smoothly.
What is Snowflake?
Snowflake is the world’s first Cloud Data Warehouse solution, built on the customer’s preferred Cloud Provider’s infrastructure (AWS, Azure, or GCP) . Snowflake (SnowSQL) adheres to the ANSI Standard and includes typical Analytics and Windowing Capabilities. There are some differences in Snowflake’s syntax, but there are also some parallels.
Snowflake’s integrated development environment (IDE) is totally Web-based . Visit XXXXXXXX.us-east-1.snowflakecomputing.com. You’ll be sent to the primary Online GUI , which works as an IDE, where you can begin interacting with your Data Assets after logging in. Each query tab in the Snowflake interface is referred to as a “ Worksheet ” for simplicity. These “ Worksheets ,” like the tab history function, are automatically saved and can be viewed at any time.
Key Features of Snowflake
- Query Optimization: By using Clustering and Partitioning, Snowflake may optimize a query on its own. With Snowflake, Query Optimization isn’t something to be concerned about.
- Secure Data Sharing: Data can be exchanged securely from one account to another using Snowflake Database Tables, Views, and UDFs.
- Support for File Formats: JSON, Avro, ORC, Parquet, and XML are all Semi-Structured data formats that Snowflake can import. It has a VARIANT column type that lets you store Semi-Structured data.
- Caching: Snowflake has a caching strategy that allows the results of the same query to be quickly returned from the cache when the query is repeated. Snowflake uses permanent (during the session) query results to avoid regenerating the report when nothing has changed.
- SQL and Standard Support: Snowflake offers both standard and extended SQL support, as well as Advanced SQL features such as Merge, Lateral View, Statistical Functions, and many others.
- Fault Resistant: Snowflake provides exceptional fault-tolerant capabilities to recover the Snowflake object in the event of a failure (tables, views, database, schema, and so on).
To get further information check out the official website here .
What is Snowflake Time Travel Feature?

Snowflake Time Travel is an interesting tool that allows you to access data from any point in the past. For example, if you have an Employee table, and you inadvertently delete it, you can utilize Time Travel to go back 5 minutes and retrieve the data. Snowflake Time Travel allows you to Access Historical Data (that is, data that has been updated or removed) at any point in time. It is an effective tool for doing the following tasks:
- Query Data that has been changed or deleted in the past.
- Make clones of complete Tables, Schemas, and Databases at or before certain dates.
- Tables, Schemas, and Databases that have been deleted should be restored.
As the ability of businesses to collect data explodes, data teams have a crucial role to play in fueling data-driven decisions. Yet, they struggle to consolidate the data scattered across sources into their warehouse to build a single source of truth. Broken pipelines, data quality issues, bugs and errors, and lack of control and visibility over the data flow make data integration a nightmare.
1000+ data teams rely on Hevo’s Data Pipeline Platform to integrate data from over 150+ sources in a matter of minutes. Billions of data events from sources as varied as SaaS apps, Databases, File Storage and Streaming sources can be replicated in near real-time with Hevo’s fault-tolerant architecture. What’s more – Hevo puts complete control in the hands of data teams with intuitive dashboards for pipeline monitoring, auto-schema management, custom ingestion/loading schedules.
All of this combined with transparent pricing and 24×7 support makes us the most loved data pipeline software on review sites.
Take our 14-day free trial to experience a better way to manage data pipelines.
How to Enable & Disable Snowflake Time Travel Feature?
1) enable snowflake time travel.
To enable Snowflake Time Travel, no chores are necessary. It is turned on by default, with a one-day retention period . However, if you want to configure Longer Data Retention Periods of up to 90 days for Databases, Schemas, and Tables, you’ll need to upgrade to Snowflake Enterprise Edition. Please keep in mind that lengthier Data Retention necessitates more storage, which will be reflected in your monthly Storage Fees. See Storage Costs for Time Travel and Fail-safe for further information on storage fees.
For Snowflake Time Travel, the example below builds a table with 90 days of retention.
To shorten the retention term for a certain table, the below query can be used.
2) Disable Snowflake Time Travel
Snowflake Time Travel cannot be turned off for an account, but it can be turned off for individual Databases, Schemas, and Tables by setting the object’s DATA_RETENTION_TIME_IN_DAYS to 0.
Users with the ACCOUNTADMIN role can also set DATA_RETENTION_TIME_IN_DAYS to 0 at the account level, which means that by default, all Databases (and, by extension, all Schemas and Tables) created in the account have no retention period. However, this default can be overridden at any time for any Database, Schema, or Table.
3) What are Data Retention Periods?
Data Retention Time is an important part of Snowflake Time Travel. Snowflake preserves the state of the data before the update when data in a table is modified, such as deletion of data or removing an object containing data. The Data Retention Period sets the number of days that this historical data will be stored, allowing Time Travel operations ( SELECT, CREATE… CLONE, UNDROP ) to be performed on it.
All Snowflake Accounts have a standard retention duration of one day (24 hours) , which is automatically enabled:
- At the account and object level in Snowflake Standard Edition , the Retention Period can be adjusted to 0 (or unset to the default of 1 day) (i.e. Databases, Schemas, and Tables).
- The Retention Period can be set to 0 for temporary Databases, Schemas, and Tables (or unset back to the default of 1 day ). The same can be said of Temporary Tables.
- The Retention Time for permanent Databases, Schemas, and Tables can be configured to any number between 0 and 90 days .
4) What are Snowflake Time Travel SQL Extensions?
The following SQL extensions have been added to facilitate Snowflake Time Travel:
- OFFSET (time difference in seconds from the present time)
- STATEMENT (identifier for statement, e.g. query ID)
- For Tables, Schemas, and Databases, use the UNDROP command.

How Many Days Does Snowflake Time Travel Work?
How to specify a custom data retention period for snowflake time travel .
The maximum Retention Time in Standard Edition is set to 1 day by default (i.e. one 24 hour period). The default for your account in Snowflake Enterprise Edition (and higher) can be set to any value up to 90 days :
- The account default can be modified using the DATA_RETENTION_TIME IN_DAYS argument in the command when creating a Table, Schema, or Database.
- If a Database or Schema has a Retention Period , that duration is inherited by default for all objects created in the Database/Schema.
The Data Retention Time can be set in the way it has been set in the example below.
Using manual scripts and custom code to move data into the warehouse is cumbersome. Frequent breakages, pipeline errors and lack of data flow monitoring makes scaling such a system a nightmare. Hevo’s reliable data pipeline platform enables you to set up zero-code and zero-maintenance data pipelines that just work.
- Reliability at Scale : With Hevo, you get a world-class fault-tolerant architecture that scales with zero data loss and low latency.
- Monitoring and Observability : Monitor pipeline health with intuitive dashboards that reveal every stat of pipeline and data flow. Bring real-time visibility into your ELT with Alerts and Activity Logs
- Stay in Total Control : When automation isn’t enough, Hevo offers flexibility – data ingestion modes, ingestion, and load frequency, JSON parsing, destination workbench, custom schema management, and much more – for you to have total control.
- Auto-Schema Management : Correcting improper schema after the data is loaded into your warehouse is challenging. Hevo automatically maps source schema with destination warehouse so that you don’t face the pain of schema errors.
- 24×7 Customer Support : With Hevo you get more than just a platform, you get a partner for your pipelines. Discover peace with round the clock “Live Chat” within the platform. What’s more, you get 24×7 support even during the 14-day full-feature free trial.
- Transparent Pricing : Say goodbye to complex and hidden pricing models. Hevo’s Transparent Pricing brings complete visibility to your ELT spend. Choose a plan based on your business needs. Stay in control with spend alerts and configurable credit limits for unforeseen spikes in data flow.
How to Modify Data Retention Period for Snowflake Objects?
When you alter a Table’s Data Retention Period, the new Retention Period affects all active data as well as any data in Time Travel. Whether you lengthen or shorten the period has an impact:
1) Increasing Retention
This causes the data in Snowflake Time Travel to be saved for a longer amount of time.
For example, if you increase the retention time from 10 to 20 days on a Table, data that would have been destroyed after 10 days is now kept for an additional 10 days before being moved to Fail-Safe. This does not apply to data that is more than 10 days old and has previously been put to Fail-Safe mode .
2) Decreasing Retention
- Temporal Travel reduces the quantity of time data stored.
- The new Shorter Retention Period applies to active data updated after the Retention Period was trimmed.
- If the data is still inside the new Shorter Period , it will stay in Time Travel.
- If the data is not inside the new Timeframe, it is placed in Fail-Safe Mode.
For example, If you have a table with a 10-day Retention Term and reduce it to one day, data from days 2 through 10 will be moved to Fail-Safe, leaving just data from day 1 accessible through Time Travel.
However, since the data is moved from Snowflake Time Travel to Fail-Safe via a background operation, the change is not immediately obvious. Snowflake ensures that the data will be migrated, but does not say when the process will be completed; the data is still accessible using Time Travel until the background operation is completed.
Use the appropriate ALTER <object> Command to adjust an object’s Retention duration. For example, the below command is used to adjust the Retention duration for a table:
How to Query Snowflake Time Travel Data?
When you make any DML actions on a table, Snowflake saves prior versions of the Table data for a set amount of time. Using the AT | BEFORE Clause, you can Query previous versions of the data.
This Clause allows you to query data at or immediately before a certain point in the Table’s history throughout the Retention Period . The supplied point can be either a time-based (e.g., a Timestamp or a Time Offset from the present) or a Statement ID (e.g. SELECT or INSERT ).
- The query below selects Historical Data from a Table as of the Date and Time indicated by the Timestamp:
- The following Query pulls Data from a Table that was last updated 5 minutes ago:
- The following Query collects Historical Data from a Table up to the specified statement’s Modifications, but not including them:
How to Clone Historical Data in Snowflake?
The AT | BEFORE Clause, in addition to queries, can be combined with the CLONE keyword in the Construct command for a Table, Schema, or Database to create a logical duplicate of the object at a specific point in its history.
Consider the following scenario:
- The CREATE TABLE command below generates a Clone of a Table as of the Date and Time indicated by the Timestamp:
- The following CREATE SCHEMA command produces a Clone of a Schema and all of its Objects as they were an hour ago:
- The CREATE DATABASE command produces a Clone of a Database and all of its Objects as they were before the specified statement was completed:
Using UNDROP Command with Snowflake Time Travel: How to Restore Objects?
The following commands can be used to restore a dropped object that has not been purged from the system (i.e. the item is still visible in the SHOW object type> HISTORY output):
- UNDROP DATABASE
- UNDROP TABLE
- UNDROP SCHEMA
UNDROP returns the object to its previous state before the DROP command is issued.
A Database can be dropped using the UNDROP command. For example,
Similarly, you can UNDROP Tables and Schemas .
Snowflake Fail-Safe vs Snowflake Time Travel: What is the Difference?
In the event of a System Failure or other Catastrophic Events , such as a Hardware Failure or a Security Incident, Fail-Safe ensures that Historical Data is preserved . While Snowflake Time Travel allows you to Access Historical Data (that is, data that has been updated or removed) at any point in time.
Fail-Safe mode allows Snowflake to recover Historical Data for a (non-configurable) 7-day period . This time begins as soon as the Snowflake Time Travel Retention Period expires.
This article has exposed you to the various Snowflake Time Travel to help you improve your overall decision-making and experience when trying to make the most out of your data. In case you want to export data from a source of your choice into your desired Database/destination like Snowflake , then Hevo is the right choice for you!
However, as a Developer, extracting complex data from a diverse set of data sources like Databases, CRMs, Project management Tools, Streaming Services, and Marketing Platforms to your Database can seem to be quite challenging. If you are from non-technical background or are new in the game of data warehouse and analytics, Hevo can help!
Hevo will automate your data transfer process, hence allowing you to focus on other aspects of your business like Analytics, Customer Management, etc. Hevo provides a wide range of sources – 150+ Data Sources (including 40+ Free Sources) – that connect with over 15+ Destinations. It will provide you with a seamless experience and make your work life much easier.
Want to take Hevo for a spin? Sign Up for a 14-day free trial and experience the feature-rich Hevo suite first hand.
You can also have a look at our unbeatable pricing that will help you choose the right plan for your business needs!
Harsh comes with experience in performing research analysis who has a passion for data, software architecture, and writing technical content. He has written more than 100 articles on data integration and infrastructure.
No-code Data Pipeline for Snowflake
- Snowflake Commands
Hevo - No Code Data Pipeline

Continue Reading
Radhika Sarraf
Amazon Redshift Serverless: A Comprehensive Guide
Suraj Poddar
Amazon Redshift ETL – Top 3 ETL Approaches for 2024

Snowflake Features: 7 Comprehensive Aspects
I want to read this e-book.
Overview of Snowflake Time Travel
Consider a scenario where instead of dropping a backup table you have accidentally dropped the actual table (or) instead of updating a set of records, you accidentally updated all the records present in the table (because you didn’t use the Where clause in your update statement).
What would be your next action after realizing your mistake? You must be thinking to go back in time to a period where you didn’t execute your incorrect statement so that you can undo your mistake.
Snowflake provides this exact feature where you could get back to the data present at a particular period of time. This feature in Snowflake is called Time Travel .
Let us understand more about Snowflake Time Travel in this article with examples.
1. What is Snowflake Time Travel?
Snowflake Time Travel enables accessing historical data that has been changed or deleted at any point within a defined period. It is a powerful CDP (Continuous Data Protection) feature which ensures the maintenance and availability of your historical data.

Below actions can be performed using Snowflake Time Travel within a defined period of time:
- Restore tables, schemas, and databases that have been dropped.
- Query data in the past that has since been updated or deleted.
- Create clones of entire tables, schemas, and databases at or before specific points in the past.
Once the defined period of time has elapsed, the data is moved into Snowflake Fail-Safe and these actions can no longer be performed.
2. Restoring Dropped Objects
A dropped object can be restored within the Snowflake Time Travel retention period using the “UNDROP” command.
Consider we have a table ‘Employee’ and it has been dropped accidentally instead of a backup table.

It can be easily restored using the Snowflake UNDROP command as shown below.

Databases and Schemas can also be restored using the UNDROP command.
Calling UNDROP restores the object to its most recent state before the DROP command was issued.
3. Querying Historical Objects
When unwanted DML operations are performed on a table, the Snowflake Time Travel feature enables querying earlier versions of the data using the AT | BEFORE clause.
The AT | BEFORE clause is specified in the FROM clause immediately after the table name and it determines the point in the past from which historical data is requested for the object.
Let us understand with an example. Consider the table Employee. The table has a field IS_ACTIVE which indicates whether an employee is currently working in the Organization.

The employee ‘Michael’ has left the organization and the field IS_ACTIVE needs to be updated as FALSE. But instead you have updated IS_ACTIVE as FALSE for all the records present in the table.

There are three different ways you could query the historical data using AT | BEFORE Clause.
3.1. OFFSET
“ OFFSET” is the time difference in seconds from the present time.
The following query selects historical data from a table as of 5 minutes ago.

3.2. TIMESTAMP
Use “TIMESTAMP” to get the data at or before a particular date and time.
The following query selects historical data from a table as of the date and time represented by the specified timestamp.

3.3. STATEMENT
Identifier for statement, e.g. query ID
The following query selects historical data from a table up to, but not including any changes made by the specified statement.

The Query ID used in the statement belongs to Update statement we executed earlier. The query ID can be obtained from “Open History”.
4. Cloning Historical Objects
We have seen how to query the historical data. In addition, the AT | BEFORE clause can be used with the CLONE keyword in the CREATE command to create a logical duplicate of the object at a specified point in the object’s history.
The following queries show how to clone a table using AT | BEFORE clause in three different ways using OFFSET, TIMESTAMP and STATEMENT.
To restore the data in the table to a historical state, create a clone using AT | BEFORE clause, drop the actual table and rename the cloned table to the actual table name.
5. Data Retention Period
A key component of Snowflake Time Travel is the data retention period.
When data in a table is modified, deleted or the object containing data is dropped, Snowflake preserves the state of the data before the update. The data retention period specifies the number of days for which this historical data is preserved.
Time Travel operations can be performed on the data during this data retention period of the object. When the retention period ends for an object, the historical data is moved into Snowflake Fail-safe.
6. How to find the Time Travel Data Retention period of Snowflake Objects?
SHOW PARAMETERS command can be used to find the Time Travel retention period of Snowflake objects.
Below commands can be used to find the data retention period of data bases, schemas and tables.
The DATA_RETENTION_TIME_IN_DAYS parameters specifies the number of days to retain the old version of deleted/updated data.
The below image shows that the table Employee has the DATA_RETENTION_TIME_IN_DAYS value set as 1.

7. How to set custom Time-Travel Data Retention period for Snowflake Objects?
Time travel is automatically enabled with the standard, 1-day retention period. However, you may wish to upgrade to Snowflake Enterprise Edition or higher to enable configuring longer data retention periods of up to 90 days for databases, schemas, and tables.
You can configure the data retention period of a table while creating the table as shown below.
To modify the data retention period of an existing table, use below syntax
The below image shows that the data retention period of table is altered to 30 days.

A retention period of 0 days for an object effectively disables Time Travel for the object.
8. Data Retention Period Rules and Inheritance
Changing the retention period for your account or individual objects changes the value for all lower-level objects that do not have a retention period explicitly set. For example:
- If you change the retention period at the account level, all databases, schemas, and tables that do not have an explicit retention period automatically inherit the new retention period.
- If you change the retention period at the schema level, all tables in the schema that do not have an explicit retention period inherit the new retention period.
Currently, when a database is dropped, the data retention period for child schemas or tables, if explicitly set to be different from the retention of the database, is not honored. The child schemas or tables are retained for the same period of time as the database.
- To honor the data retention period for these child objects (schemas or tables), drop them explicitly before you drop the database or schema.
Related Articles:

Leave a Comment Cancel reply
Save my name, email, and website in this browser for the next time I comment.
Related Posts

QUALIFY in Snowflake: Filter Window Functions

GROUP BY ALL in Snowflake
Rank Transformation in Informatica Cloud (IICS)
Panic hits when you mistakenly delete data. Problems can come from a mistake that disrupts a process, or worse, the whole database was deleted. Thoughts of how recent was the last backup and how much time will be lost might have you wishing for a rewind button. Straightening out your database isn't a disaster to recover from with Snowflake's Time Travel. A few SQL commands allow you to go back in time and reclaim the past, saving you from the time and stress of a more extensive restore.
We'll get started in the Snowflake web console, configure data retention, and use Time Travel to retrieve historic data. Before querying for your previous database states, let's review the prerequisites for this guide.
Prerequisites
- Quick Video Introduction to Snowflake
- Snowflake Data Loading Basics Video
What You'll Learn
- Snowflake account and user permissions
- Make database objects
- Set data retention timelines for Time Travel
- Query Time Travel data
- Clone past database states
- Remove database objects
- Next options for data protection
What You'll Need
- A Snowflake Account
What You'll Build
- Create database objects with Time Travel data retention
First things first, let's get your Snowflake account and user permissions primed to use Time Travel features.
Create a Snowflake Account
Snowflake lets you try out their services for free with a trial account . A Standard account allows for one day of Time Travel data retention, and an Enterprise account allows for 90 days of data retention. An Enterprise account is necessary to practice some commands in this tutorial.
Login and Setup Lab
Log into your Snowflake account. You can access the SQL commands we will execute throughout this lab directly in your Snowflake account by setting up your environment below:
Setup Lab Environment
This will create worksheets containing the lab SQL that can be executed as we step through this lab.

Once the lab has been setup, it can be continued by revisiting the lab details page and clicking Continue Lab

or by navigating to Worksheets and selecting the Getting Started with Time Travel folder.

Increase Your Account Permission
Snowflake's web interface has a lot to offer, but for now, switch the account role from the default SYSADMIN to ACCOUNTADMIN . You'll need this increase in permissions later.

Now that you have the account and user permissions needed, let's create the required database objects to test drive Time Travel.
Within the Snowflake web console, navigate to Worksheets and use the ‘Getting Started with Time Travel' Worksheets we created earlier.
Create Database

Use the above command to make a database called ‘timeTravel_db'. The Results output will show a status message of Database TIMETRAVEL_DB successfully created .
Create Table

This command creates a table named ‘timeTravel_table' on the timeTravel_db database. The Results output should show a status message of Table TIMETRAVEL_TABLE successfully created .
With the Snowflake account and database ready, let's get down to business by configuring Time Travel.
Be ready for anything by setting up data retention beforehand. The default setting is one day of data retention. However, if your one day mark passes and you need the previous database state back, you can't retroactively extend the data retention period. This section teaches you how to be prepared by preconfiguring Time Travel retention.
Alter Table

The command above changes the table's data retention period to 55 days. If you opted for a Standard account, your data retention period is limited to the default of one day. An Enterprise account allows for 90 days of preservation in Time Travel.
Now you know how easy it is to alter your data retention, let's bend the rules of time by querying an old database state with Time Travel.
With your data retention period specified, let's turn back the clock with the AT and BEFORE clauses .
Use timestamp to summon the database state at a specific date and time.
Employ offset to call the database state at a time difference of the current time. Calculate the offset in seconds with math expressions. The example above states, -60*5 , which translates to five minutes ago.
If you're looking to restore a database state just before a transaction occurred, grab the transaction's statement id. Use the command above with your statement id to get the database state right before the transaction statement was executed.
By practicing these queries, you'll be confident in how to find a previous database state. After locating the desired database state, you'll need to get a copy by cloning in the next step.
With the past at your fingertips, make a copy of the old database state you need with the clone keyword.
Clone Table

The command above creates a new table named restoredTimeTravel_table that is an exact copy of the table timeTravel_table from five minutes prior.
Cloning will allow you to maintain the current database while getting a copy of a past database state. After practicing the steps in this guide, remove the practice database objects in the next section.
You've created a Snowflake account, made database objects, configured data retention, query old table states, and generate a copy of the old table state. Pat yourself on the back! Complete the steps to this tutorial by deleting the objects created.

By dropping the table before the database, the retention period previously specified on the object is honored. If a parent object(e.g., database) is removed without the child object(e.g., table) being dropped prior, the child's data retention period is null.
Drop Database

With the database now removed, you've completed learning how to call, copy, and erase the past.

How to Leverage the Time Travel Feature on Snowflake
Welcome to Time Travel in the Snowflake Data Cloud . You may be tempted to think “only superheroes can Time Travel,” and you would be right. But Snowflake gives you the ability to be your own real-life superhero.
Have you ever feared deleting the wrong data in your production database? Or that your carefully written script might accidentally remove the wrong records? Never fear, you are here – with Snowflake Time Travel!
What’s The Big Deal?
Snowflake Time Travel, when properly configured, allows for any Snowflake user with the proper permissions to recover and query data that has been changed or deleted up to the last 90 days (though this recovery period is dependent on the Snowflake version, as we’ll see later.)
This provides comprehensive, robust, and configurable data history in Snowflake that your team doesn’t have to manage! It includes the following advantages:
- Data (or even entire databases and schemas) can be restored that may have been lost due to a deletion, no matter if that deletion was on purpose or not
- The ability to maintain backup copies of your data for all past versions of it for a period of time
- Allowing for inspection of changes made over specific periods of time
To further investigate these features, we will look at:
- How Time Travel works
- How to configure Time Travel in your account
- How to use Time Travel
- How Time Travel impacts Snowflake cost
- Some Time Travel best practices
How Time Travel Works
Before we learn how to use it, let’s understand a little more about why Snowflake can offer this feature.
Snowflake stores the records in each table in immutable objects called micro-partitions that contain a subset of the records in a given table.
Each time a record is changed (created/updated/deleted), a brand new micro-partition is created, preserving the previous micro-partitions to create an immutable historical record of the data in the table at any given moment in time.
Time Travel is simply accessing the micro-partitions that were current for the table at a particular moment in time.
How To Configure Time Travel In Your Account
Time Travel is available and enabled in all account types.
However, the extent to which it is available is dependent on the type of Snowflake account, the object type, and the access granted to your user.
Default Retention Period
The retention period is the amount of time you can travel back and recover the state of a table at a given point and time. It is variable per account type. The default Time Travel retention period is 1 day (24 hours).
PRO TIP: Snowflake does have an additional layer of data protection called fail-safe , which is only accessible by Snowflake to restore customer data past the time travel window. However, unlike time travel, it should not be considered as a part of your organization’s backup strategy.
Account/Object Type Considerations
All Snowflake accounts have Time Travel for permanent databases, schemas, and tables enabled for the default retention period.
Snowflake Standard accounts (and above) can remove Time Travel retention altogether by setting the retention period to 0 days, effectively disabling Time Travel.
Snowflake Enterprise accounts (and above) can set the Time Travel retention period for transient databases, schemas, tables, and temporary tables to either 0 or 1 day. The retention period can also be increased to 0-90 days for permanent databases, schemas, and tables.
The following table summarizes the above considerations:
Changing Retention Period
For the Snowflake Enterprise accounts; two account level parameters can be used to change the default account level retention time.
- DATA_RETENTION_TIME_IN_DAYS: How many days that Snowflake stores historical data for the purpose of Time Travel.
- MIN_DATA_RETENTION_TIME_IN_DAYS: How many days at a minimum that Snowflake stores historical data for the purpose of Time Travel.
The parameter DATA_RETENTION_TIME_IN_DAYS can also be used at an object level to override the default retention time for an object and its children. Example:
How To Use Time Travel
Using Time Travel is easy! There are two sets of SQL commands that can invoke Time Travel capabilities:
- AT or BEFORE : clauses for both SELECT and CREATE .. CLONE statements. AT is inclusive and BEFORE is exclusive
- UNDROP : command for restoring a deleted table/schema/database
The following graphic from the Snowflake documentation summarizes this visually:

Query Historical Data
You can query historical data using the AT or BEFORE clauses and one of three parameters:
- TIMESTAMP : A specific historical timestamp at which to query data from a particular object. Example: SELECT * FROM my_table AT (TIMESTAMP => ‘Fri, 01 May 2015 15:00:00 -0700’::TIMESTAMP_TZ);
- OFFSET : The difference in seconds from the current time at which to query data from a particular object. Example: CREATE SCHEMA restored_schema CLONE my_schema AT (OFFSET => -4800);
- STATEMENT : The query ID of a statement that is used as a reference point from which to query data from a particular object. Example: CREATE DATABASE restored_db CLONE my_db BEFORE (STATEMENT => ‘8e5d0ca9-005e-44e6-b858-a8f5b37c5726’);
The one thing to understand is that these commands will work only within the retention period for the object that you are querying against. So, if your retention time is set to the default one day, and you try to UNDROP a table two days after deleting it, you receive an error and be out of luck!
PRO TIP: Snowflake does have an additional layer of data protection called fail-safe , which is only accessible by Snowflake to restore customer data past the time travel window. However, unlike time travel, it should not be considered as a part of your organization’s backup strategy.
Restore Deleted Objects
You can also restore objects that have been deleted by using the UNDROP command. To use this command, another table with the same fully qualified name (database.schema.table) cannot exist.
Example: UNDROP TABLE my_table
How Time Travel Impacts Snowflake Cost
Snowflake accounts are billed for the number of 24-hour periods that Time Travel data (the micro-partitions) is necessary to be maintained for the data that is being retained.
Every time there is a change in a table’s data, the historical version of that changed data will be retained (and charged in addition) for the entire retention period. This may not be an entire second copy of the table. Snowflake will try to optimize to maintain only the minimal amount of historical data needed but will incur additional costs.
As an example, if every row of a 100 GB table were changed ten times a day, the storage consumed (and charged) for this data per day would be 100GB x 10 changes = 1 TB.
What can you do to optimize cost to ensure your ops team does not wake up to an unnecessarily large Time Travel bill? Below are a couple of suggestions.
Use Transient and Temporary Tables When Possible
If data does not need to be protected using Time Travel, or there is data only being used as an intermediate stage in an ETL process, then take advantage of using transient and temporary tables with the DATA_RETENTION_TIME_IN_DAYS parameter set to 0. This will essentially disable Time Travel and make sure there are no extra costs because of it.
Copy Large High-Churn Tables
If you have large permanent tables where a high percentage of records are often changed every day, it might be a good idea to change your storage strategy for these tables based on the cost implications mentioned above.
One way of dealing with such a table would be to create it as a transient table with 0 Time Travel retention (DATA_RETENTION_TIME_IN_DAYS=0) and copy it over to a permanent table on a periodic basis.
This would allow you to control the number of copies of this data you maintain without worrying about ballooning Time Travel costs in the background.
Time Travel is an incredibly useful tool that removes the need for your team to maintain backups/snapshots/complex restoration processes/etc… as with a traditional database. Specifically, it enables the following advantages:
- Data recovery/restoration : use the ability to query historical data to restore old versions of a particular dataset, or recover databases/schemas/tables that have been deleted
- Backups : If not explicitly disabled, time travel automatically is maintaining backup copies of all past versions of your data for at least 1 day, and up to 90 days
- Change Auditing : The queryable nature of time travel allows for inspection of changes made to your data over specific periods of time
Final Thoughts
Hopefully, this has helped understand how to use Snowflake Time Travel and the context around how it works, and some of the cost implications.
If your organization needs help using or configuring Time Travel, or any other Snowflake feature, phData is a certified Elite Snowflake partner, and we would love to hear from you so that our team can help drive the value of your organization’s data forward!

More to explore

Import vs Direct Query: Here’s What You Need to Know

HVR for Snowflake Best Practices

How to Automate Document Processing with Snowflake’s Document AI

Join our team
- About phData
- Leadership Team
- All Technology Partners
- Case Studies
- phData Toolkit
Subscribe to our newsletter
- © 2023 phData
- Privacy Policy
- Accesibility Policy
- Website Terms of Use
- Data Processing Agreement
- End User License Agreement
Data Coach is our premium analytics training program with one-on-one coaching from renowned experts.
- Data Coach Overview
- Course Collection
Accelerate and automate your data projects with the phData Toolkit
- Get Started
- Financial Services
- Manufacturing
- Retail and CPG
- Healthcare and Life Sciences
- Call Center Analytics Services
- Snowflake Native Streaming of HL7 Data
- Snowflake Retail & CPG Supply Chain Forecasting
- Snowflake Plant Intelligence For Manufacturing
- Snowflake Demand Forecasting For Manufacturing
- Snowflake Data Collaboration For Manufacturing

- MLOps Framework
- Teradata to Snowflake
- Cloudera CDP Migration
Technology Partners
Other technology partners.
Check out our latest insights

- Dashboard Library
- Whitepapers and eBooks
Data Engineering
Consulting, migrations, data pipelines, dataops, change management, enablement & learning, coe, coaching, pmo, data science and machine learning services, mlops enablement, prototyping, model development and deployment, strategy services, data, analytics, and ai strategy, architecture and assessments, reporting, analytics, and visualization services, self-service, integrated analytics, dashboards, automation, elastic operations, data platforms, data pipelines, and machine learning.
Strategic Services
Digital Engineering Services
Managed Services
Harness the power of Generative AI
Amplify innovation, creativity, and efficiency through disciplined application of generative AI tools and methods.
Focus Industries
Healthcare & Life Sciences
Retail & CPG
Energy & Utilities
Banking, Financial Services & Insurance
Travel, Hospitality & Logistics
Telecom & Media
Explore Client Success Stories
We create competitive advantage through accelerated technology innovation. We provide the tools, talent, and processes needed to accelerate your path to market leadership.
Global Delivery with Encora
Nearshore in the Americas
Nearshore in Europe
Nearshore in Asia & Oceania
Expertise at Scale in India
Hybrid Global Teams
Experience the power of Global Digital Engineering with Encora.
Refine your global engineering location strategy with the speed of collaboration in Nearshore and the scale of expertise in India.
15+ other partnerships
Accelerating Innovation Cycles and Business Outcomes
Through strategic partnerships, Encora helps clients tap into the potential of the world’s leading technologies to drive innovation and business impact.
Featured Insights
Using Generative AI to Prevent Physician Burnout
Unlocking the Potential of Gen AI for the Automotive Industry
Narrowing Down a Use Case for Shared Loyalty in Travel
Exploring The Potential of Web3 for Shared Loyalty in Travel
Latest News
Press Releases
Encora Earns Kubernetes Specialization on Microsoft Azure, E...
Encora Ranks in India's Top 50 Workplaces in Health and Well...
Encora Attains AWS Cloud Operations Competency
Encora Secures Top Rankings Across Ten ER&D Segments in Zinn...
Open positions by country
Philippines
North Macedonia
Make a Lasting Impact on the World through Technology
Come Grow with Us
< Go Back
Time Travel in Snowflake
Talati adit anil.
June 01, 2023
Consider a scenario where you accidentally dropped the actual table or instead of deleting a set of records, you updated all the records present in the table. What will you do? How will you restore your data that has already been deleted/altered? You must be hoping of going back in time and correcting incorrectly executed statements. Snowflake provides this feature wherein you can get back the data that is present at a particular time. This feature of Snowflake is called Time Travel .
Introduction
Snowflake Time Travel is a very important tool that allows users to access Historical Data (i.e. data that has been updated or removed) at any point in time in the past. It is a powerful Continuous Data Protection (CDP) feature that ensures the maintenance and availability of historical data.
Key Features
- Query Optimization: As a user, we should not be concerned about optimizing queries because Snowflake on its own optimizes queries by using Clustering and Partitioning.
- Secure Data Sharing: Using Snowflake Database, Tables, Views, and UDFs, data can be shared securely from one account to another.
- Support for File Formats: Supports almost all file formats: JSON, Avro, ORC, Parquet, and XML are all Semi-Structured data formats that Snowflake can import. Column type — Variant lets the user store Semi-Structured data.
- Caching: Caching strategy of Snowflake returns results quickly for repeated queries as it stores query results in a cache within a given session.
- Fault Resistant: In case of event failure, Snowflake provides exceptional fault-tolerant capabilities to recover tables, views, databases, schema, and so on.
- To query past data.
- To make clones of complete Tables, Schemas, and Databases at or before certain dates.
- To restore deleted Tables, Schemas, and Databases.
- To restore original data that was updated accidentally.
- To check consumption over a period of time.
- Cloning and Backing up data from previous times.
How to Enable & Disable Time Travel in Snowflake?
Enable time travel.
No additional configurations are required to enable Time Travel, it is enabled by default, with a one-day retention period. Although to configure longer data retention periods, we need to upgrade to Snowflake Enterprise Edition. The retention period can be set to a maximum of 90 days. Based on the retention period, charges will increase. The below query builds a table with a retention period of 90 days:
The retention period can also be changed using the ‘alter’ query as below:
Disable Time Travel
Time Travel cannot be turned off for accounts, but it can be turned off for individual databases, schemas, and tables by setting data_retention_time_in_days field to 0 using the below query:
Query Time Travel Data
Whenever any Data Manipulation Language (DML) query is executed on a table, Snowflake saves prior versions of the Table data for a given period of time depending on the retention period. The previous version of data can be queried using the AT | BEFORE Clause. Using AT, the user can get data at a given period of time whereas using BEFORE all the data from that point till the end of the retention period can be fetched. The following SQL extensions have been added to facilitate Snowflake Time Travel:
- CLONE: To create a logical duplicate of the object at a specific point in its history.
- TIMESTAMP: From a given time (Data & Time) provided.
- OFFSET: Time difference from current time till offset provided in seconds.
- STATEMENT: Using a Statement ID from the point where the last DML query was fired.
- UNDROP: If a table is dropped accidentally, it can be restored using the UNDROP command.
The below query generates a Clone of a Table from the given Date and Time as indicated by the Timestamp:
The below query creates a Clone of a Schema and all its Objects as they were an hour ago:
The below query pulls Historical Data from a Table from a given Timestamp:
The below query pulls Historical Data from a Table that was updated 5 minutes ago:
The below query collects Historical Data from a Table up to the given statement’s Modifications (Statement ID):
The below query is used to restore Database EMP:
The following graphic from the Snowflake documentation summarizes all the above points visually:

Data Retention
Snowflake preserves the previous state of the data when DML operations are performed. By default, all Snowflake accounts have a standard retention duration of one day which is automatically enabled.
- For Snowflake Standard Edition, the Retention Period can be adjusted to 0 from default 1 day for all objects (Temporary & Permanent).
- For Snowflake Enterprise Edition (or higher) it gives more flexibility for setting retention period, that is The Retention Time for permanent Databases, Schemas, and Tables can be configured to any number between 0 and 90 days whereas for temporary objects it can be set to 0 from the default 1 day.
The below query sets a retention period of 90 days while creating the table:

Snowflake provides another exciting feature called Fail-safe where historical data can be protected in case of any failure. Fail-safe allows a maximum period of 7 days which begins after the Time Travel retention period ends wherein Historical data can be recovered. Recovering data through Fail-safe can take hours to days and it involves cost.
The number of days historical data is maintained is based on the table type and the Fail-safe period for the table. Transient and temporary tables have no Fail-safe period.

Storage fees are incurred for maintaining historical data during both the Time Travel and Fail-safe periods. The fees are calculated for each 24 hours (i.e. 1 day) from the time the data changed. The number of days historical data is maintained is based on the table type and retention period set for the table.
Snowflake minimizes the amount of storage required for historical data by maintaining only the information required to restore the individual table rows that were updated or deleted. As a result, storage usage is calculated as a percentage of the table that changed. In most cases, Snowflake does not keep a full copy of data. Only when tables are dropped or truncated, full copies of tables are maintained.
Temporary and Transient Tables
To manage the storage costs Snowflake provides two table types: TEMPORARY & TRANSIENT, which do not incur the same fees as standard (i.e. permanent) tables:
- Transient tables can have a Time Travel retention period of either 0 or 1 day.
- Temporary tables can also have a Time Travel retention period of 0 or 1 day; however, this retention period ends as soon as the table is dropped or the session in which the table was created ends.
- Transient and temporary tables have no Fail-safe period.
- The maximum additional fees incurred for Time Travel and Fail-safe by these types of tables are limited to 1 day.

The above table illustrates the different scenarios, based on table type.
hbspt.cta._relativeUrls=true;hbspt.cta.load(7958737, '1308a939-5241-47c3-bf0f-864090d8516d', {"useNewLoader":"true","region":"na1"});
Snowflake Time Travel is a powerful feature that enables users to examine data usage and manipulations over a specific time. Syntax to query with time travel is fairly the same as in SQL Server which is easy to understand and execute. Users can restore deleted objects, make duplicates, make a Snowflake backup, and recover historical data.
About Encora
Fast-growing tech companies partner with Encora to outsource product development and drive growth. Contact us to learn more about our software engineering capabilities.
Encora accelerates enterprise modernization and innovation through award-winning digital engineering across cloud, data, AI, and other strategic technologies. With robust nearshore and India-based capabilities, we help industry leaders and digital natives capture value through technology, human-centric design, and agile delivery.
Share this post
Table of Contents
Related insights.

5 Axioms to Improve Your Team Communication and Collaboration
Good communication within a team is key to keeping everyone on the right track. But it can be ...

JavaScript: setTimeout() and Promise under the Hood
In this blog, we will delve deeper into how setTimeout works under the hood.

Exponential Smoothing Methods for Time Series Forecasting
Recently, we covered basic concepts of time series data and decomposition analysis. We started ...
Innovation Acceleration
Headquarters - Scottsdale, AZ 85260 ©Encora Digital LLC
Global Delivery
Partnerships
Query Syntax
AT | BEFORE 
The AT or BEFORE clause is used for Snowflake Time Travel. In a query, it is specified in the FROM clause immediately after the table name and it determines the point in the past from which historical data is requested for the object:
The AT keyword specifies that the request is inclusive of any changes made by a statement or transaction with timestamp equal to the specified parameter.
The BEFORE keyword specifies that the request refers to a point immediately preceding the specified parameter.
For more information, see Understanding & Using Time Travel .
Specifies an exact date and time to use for Time Travel. The value must be explicitly cast to a TIMESTAMP.
Specifies the difference in seconds from the current time to use for Time Travel, in the form -N where N can be an integer or arithmetic expression (e.g. -120 is 120 seconds, -30*60 is 1800 seconds or 30 minutes).
Specifies the query ID of a statement to use as the reference point for Time Travel. This parameter supports any statement of one of the following types:
DML (e.g. INSERT, UPDATE, DELETE)
TCL (BEGIN, COMMIT transaction)
The query ID must reference a query that has been executed within the last 14 days. If the query ID references a query over 14 days old, the following error is returned:
To work around this limitation, use the timestamp for the referenced query.
Specifies the identifier (i.e. name) for an existing stream on the queried table or view. The current offset in the stream is used as the AT point in time for returning change data for the source object.
This keyword is supported only when creating a stream (using CREATE STREAM ) or querying change data (using the CHANGES clause). For examples, see these topics.
Usage notes 
Data in Snowflake is identified by timestamps that can differ slightly from the exact value of system time.
The value for TIMESTAMP or OFFSET must be a constant expression.
The smallest time resolution for TIMESTAMP is milliseconds.
If requested data is beyond the Time Travel retention period (default is 1 day), the statement fails.
In addition, if the requested data is within the Time Travel retention period but no historical data is available (e.g. if the retention period was extended), the statement fails.
If the specified Time Travel time is at or before the point in time when the object was created, the statement fails.
When you access historical table data, the results include the columns, default values, etc. from the current definition of the table. The same applies to non-materialized views. For example, if you alter a table to add a column, querying for historical data before the point in time when the column was added returns results that include the new column.
Historical data has the same access control requirements as current data. Any changes are applied retroactively.
Troubleshooting 
Select historical data from a table using a specific timestamp:
SELECT * FROM my_table AT ( TIMESTAMP => 'Fri, 01 May 2015 16:20:00 -0700' ::timestamp ); Copy SELECT * FROM my_table AT ( TIMESTAMP => TO_TIMESTAMP ( 1432669154242 , 3 )); Copy
Select historical data from a table as of 5 minutes ago:
SELECT * FROM my_table AT ( OFFSET => - 60 * 5 ) AS T WHERE T . flag = 'valid' ; Copy
Select historical data from a table up to, but not including any changes made by the specified transaction:
SELECT * FROM my_table BEFORE ( STATEMENT => '8e5d0ca9-005e-44e6-b858-a8f5b37c5726' ); Copy
Return the difference in table data resulting from the specified transaction:
SELECT oldt .* , newt .* FROM my_table BEFORE ( STATEMENT => '8e5d0ca9-005e-44e6-b858-a8f5b37c5726' ) AS oldt FULL OUTER JOIN my_table AT ( STATEMENT => '8e5d0ca9-005e-44e6-b858-a8f5b37c5726' ) AS newt ON oldt . id = newt . id WHERE oldt . id IS NULL OR newt . id IS NULL ; Copy
Snowflake Time Travel in a Nutshell

Yeah, the title is a bit clickbaity, so if you are too sensitive, please stop reading, because the article won’t explain to you all the details of the mentioned feature of Snowflake. But despite that, it will show some interesting things that are not mentioned in the documentation and it will help to answer at least one question in the certification exam. So, I think it’s worth giving it a few minutes of your time.
Snowflake is an advanced data platform provided as Software-as-a-Service (SaaS). It enables data storage, processing, and analytic solutions that are faster, easier to use, and far more flexible than traditional offerings. Snowflake isn’t a service built on top of Hadoop or Spark or any other “big data” technology, it is a completely new SQL query engine designed for the cloud and cloud-only. To the user, Snowflake provides all of the functionality of an enterprise analytic database, along with many additional special features and unique capabilities.
In this article, we won’t go into explaining what Snowflake is but will be more specific about one of the cool features of this data platform, which is Time Travel. Let me know in the comments if you want a brief overview of this product or maybe some explanation of its other features.
Time travel
Snowflake Time Travel enables to query data as it was saved at a particular point in time and roll back to the corresponding version. It means that the intentional or unintentional changes to the underlying data can be reverted. Time Travel is a very powerful feature that allows:
- Query data in the past that has since been updated or deleted.
- Create clones of entire tables, schemas, and databases at or before specific points in the past.
- Restore tables, schemas, and databases that have been dropped.
To support Time Travel, the following SQL extensions have been implemented:
- OFFSET (time difference in seconds from the present time)
- STATEMENT (identifier for statement, e.g. query ID)
- UNDROP command for tables, schemas, and databases.
A key component of Snowflake Time Travel is the data retention period. When data in a table is modified, including deletion of data or dropping an object containing data, Snowflake preserves the state of the data before the update. The data retention period specifies the number of days for which this historical data is preserved and, therefore, Time Travel operations (SELECT, CREATE … CLONE, UNDROP) can be performed on the data.
By default, the data retention period is set to 1 day and Snowflake recommends keeping this setting as is to be able to prevent unintentional data modifications. This period also can be extended up to 90 days, but keep in mind that Time Travel incurs additional storage costs. Setting the data retention period to 0 will disable Time Travel. This feature can be enabled/disabled on account, database, schema or table level.
After the retention period expired the data is moved into Snowflake Fail-Safe and cannot be restored by the regular user. Only Snowflake Support can restore the data in Fail-Safe.
Querying historical data
When any DML operations are performed on a table, Snowflake retains previous versions of the table data for a defined period of time. This enables querying earlier versions of the data using the AT | BEFORE clause. Now let’s see the examples. For the sake of this article, we will create a separate DB in Snowflake, a table and fill it with some seed values. Here we go:

And we have our seed records. Now let’s add some duplicates.

Having duplicates in our table isn’t a good idea, so we can use Time Travel to see how the data was looking before dups appeared. As was mentioned before there are few different methods to do that, let’s check them all.

As you can see we are back to the first version of the data! Next queries will return the same result.

Also, it is possible to restore the data before the change happened by finding the Query ID that introduced mentioned change. We can find it on the “Query History” tab in “Activity”.

Cloning historical data
There is another feature in Snowflake that is worth investigating – Zero-Copy Cloning. Basically, it creates a copy of a database, schema or table. A snapshot of data present in the source object is taken when the clone is created and is made available to the cloned object. The cloned object is writable and is independent of the clone source. That is, changes made to either the source object or the clone object are not part of the other. Cloning in Snowflake is zero-copy cloning, meaning that at the time of clone creation the data is not being copied and the newly created cloned table references the existing data partitions of the mother table. But it is worth another article, so at the moment brief intro and later we will dig deeper.
Cloning with Time Travel works using the same parameters:
The results of SELECTs are the same:

Dropping and Undropping
When a table, schema, or database is dropped, it is not immediately overwritten or removed from the system. Instead, it is retained for the data retention period for the object, during which time the object can be restored.
To drop a table, schema, or database, the following commands are used:
- DROP SCHEMA
- DROP DATABASE
To undrop a table, schema, or database:
- UNDROP TABLE
- UNDROP SCHEMA
- UNDROP DATABASE
This is actually where the fun comes. Let’s start with a simple example and then go into the woods.
Simple example:

The dropped tables can be seen by using the command:

In the results of the SHOW TABLES HISTORY in the column “ dropped_on ” the last time the table was dropped will be shown. If the value for the corresponding table in this column is NULL it means that the table is up and running. Dropping and undropping the same table multiple times will not create additional records in this view, only the timestamp in “ dropped_on ” will be updated.
But if a table is dropped and then a new table is created with the same name, the UNDROP command will fail, stating that the table exists.
As you can see in the screenshot above there are two tables restored_table_2, but one of them has a timestamp value in the column “dropped_on”. This is because the first time I ran the query to create this table I used the wrong schema, so I ran CREATE OR REPLACE TABLE … command, which actually dropped a wrong table and created a new one with the same name. So if now I try to UNDROP the old table with wrong records, the query will fail as stated earlier.

But it doesn’t mean that the data from the previous table is lost. As we saw earlier, we still can see 2 tables in SHOW TABLES HISTORY. In order to restore the original (or in this case wrong) table, the newly created table has to be renamed:

And now the UNDROP will work.

And we can see the wrong records I added to this table:

Now, I hope you won’t do such a thing, but here we saw what happens if you drop a table and then create a totally new one with the same name and still we can recover an old table. So what happens if you drop this new table and then create again a new one again with the same name? Will you be able to recover the data from the most ancient table? The answer is yes. It will take some effort, but it is possible. This is how our SHOW TABLES HISTORY looks like right now, we have 5 tables, and all are up and running:

Let’s drop restored_table and create it again using the same command and add a few new records to it:

And now we go further and drop again restored_table and create a new one.

To restore the first table that was dropped we will need to go through a set of renamings. Our original table had 4 rows. Let’s go. Restore the second table.

Restore the original table and rename it to v1

And here we are, with all the versions of our data restored. As you can see in Snowflake it becomes obsolete the creation of different versions of the tables as you can always go back in time, but be careful with the data retention period – if it’s expired you cannot get your data back that easily.
In the end, Time Travel is a very powerful tool for:
- Restoring data-related objects (tables, schemas, and databases) that might have been accidentally or intentionally deleted.
- Duplicating or backing up data from key points in the past.
- Analyzing data usage/manipulation over specified periods of time.
Hope you find it useful 😉 see ya in the next one 😉
Photo by Maddy Baker on Unsplash
Leave a Reply Cancel reply
Your email address will not be published. Required fields are marked *
Sergi's Blog Cookies Policy
This Website uses cookies to improve your experience. Please visit the Cookies Policy page for more information about cookies and how we use them.
Hire Software Developers
Create a dedicated team of developers, designers, and IT consultants with the right skills and experience.
Trending Tech
- Fitness App Development
- Fintech Software Development
- Manufacturing
- Media & Entertainment
- Advertising
- Energy & Utilities
- Supply Chain & Logistics
- Travel And Hospitality
Building Next-Gen Solutions
Evolve business models, embrace innovation, improve the bottom line with industry-leading solutions.
- Custom ERP Software
- Learning Management System
- Enterprise CRM Solutions
- Enterprise Service & Maintenance
- Mobile Sales Force Automation (SFA)
- Help Desk Management System
- Spot Billing System
- Warehouse Management System
- Laundry Management System
- Vehicle Tracking System (VTS)
Unlock Digital Potential
Our business solutions maximize profits, accelerate growth, encourage innovation, and reduce costs.

- Case Studies
Browse through our software development success stories with tangible results.

- Live BI Visualization
Take a look at our diverse BI visualizations that convert raw data into actionable insights.

Explore our global, industry-wide, and tailored digital solutions that showcase our skills.
- Testimonials
- Project Execution Models
- Cookies Policy
- Corporate Environment & Social Responsibility
- Engagement Models
- Join Our Team
- Life @ SPEC
- Privacy Policy
- Hire Dedicated Developers
- Hire Power BI Developer
- Hire BI Developer
- Hire UI/UX Designer
- Hire Software Tester
- Hire Mobile App Developers
- Hire iOS Developer
- Hire Android Developer
- Hire Kotlin Developers
- Hire Flutter Developer
- Hire React Native Developer
- Hire Backend Developer
- Hire Java Developer
- Hire .Net Developer
- Hire Node JS Developer
- Hire PHP Developer
- Hire Laravel Developer
- Hire Front End Developer
- Hire JavaScript Developer
- Hire VueJS Developer
- Hire AngularJS Developer
- Hire Reactjs Developers
- Hire Full Stack Developer

Snowflake Time Travel: An In-depth Guide
October 18, 2023
March 19th, 2024
In the constantly evolving field of data management, Snowflake Database, a cloud-based database, has risen as a prominent player, renowned for its innovative features and robust capabilities. Among its array of features, one that shines particularly bright is the “Time Travel” feature, enabling users to journey through time and delve into the historical snapshots of their data.
In this blog post, we will embark on a voyage through Snowflake’s Time Travel feature, unveiling its importance, applications, and how it can empower businesses to make data-driven decisions like never before.

Snowflake Time Travel: An Overview
Imagine possessing the ability to turn back time and revisit your data precisely as it existed at any specific moment in the past. This is precisely what Snowflake’s Time Travel feature provides. It’s a distinctive data management capability that allows you to query and analyze your data at various points in time, all without the need for intricate ETL processes or additional storage. Essentially, this feature transforms your data warehouse into a time machine, enabling you to effortlessly explore the evolution of your data.
Key Aspects of Snowflake Time Travel:
Data versioning:.
Snowflake continuously maintains multiple versions of data, allowing users to access and query data at any specific historical point in time.
Granular Control:
Users can specify a timestamp or a range of times for which they want to access historical data. This granular control ensures precision.
No Data Duplication:
Snowflake doesn’t create duplicate copies of data for different time points, which saves storage costs.
Zero Data Loss:
It guarantees zero data loss, as all changes to data are tracked and stored.
Point-in-Time Queries:
Users can run SQL queries on historical data to analyze trends, troubleshoot issues, or recover accidentally deleted data.
Data Recovery:
Snowflake Time Travel is useful for data recovery, audit trails, and compliance requirements, ensuring data integrity.
Time-Travel Cloning:
Users can create a clone of a database at a specific time point for testing or analytical purposes without affecting the production data.
Good Read: Snowflake Developer: Role, Responsibilities, Skills, Salary and More
Pros of Time Travel in Snowflake
Historical data analysis:.
Snowflake’s Time Travel feature allows you to analyze data at different points in time, which is invaluable for historical trend analysis. This can provide insights into how your data has evolved and help you make data-driven decisions.
In the event of accidental data changes or deletions, Time Travel lets you revert to a previous timestamp, ensuring data integrity and minimizing downtime.
Auditing and Compliance:
Time Travel simplifies compliance and auditing processes by enabling you to track changes to data over time. This is particularly useful for meeting regulatory requirements.
Testing and Debugging:
Developers can use Time Travel to recreate and debug issues by analyzing data as it was during a problematic event. This can streamline troubleshooting and improve software quality.
Cloning data at critical points in time allows for data versioning, making it easier to manage and reference the historical states of data objects.
Ease of Use:
Snowflake’s implementation of Time Travel is user-friendly, requires minimal setup and configuration, and doesn’t involve complex ETL processes or additional storage.
Cons of Time Travel in Snowflake
Storage costs:.
Retaining historical data can lead to increased storage costs. Storing multiple versions of data, especially for large datasets, can impact your organization’s cloud storage expenses.
Query Performance:
The size of your dataset can affect query performance when using Time Travel. Querying historical data may be slower compared to querying the most recent data, and it may require additional optimization efforts.
Resource Consumption:
Running queries on historical data can consume computational resources. Organizations need to monitor and allocate sufficient resources to accommodate Time Travel queries without impacting other workloads.
Data Privacy:
Retaining historical data could potentially raise data privacy and security concerns, as older data may contain sensitive information that needs to be handled carefully.
How to implement Time Travel: Snowflake Time Travel Example
Snowflake employs a straightforward yet ingenious mechanism to enable time travel. It utilizes a blend of metadata and data storage, where each data object is accompanied by associated metadata that captures its historical context. Here’s how it works:
Time Travel Queries work on the following parameters.
- AS OF TIMESTAMP: Query data as it appeared at a specific timestamp.
- AS OF STATEMENT: Query data as it appeared before the given statement id
- FOR SYSTEM_TIME: Specify a time range and examine changes during that period.
Also, the Time Travel feature helps to create object cloning: If you intend to preserve particular historical data for reporting or analysis, you have the option to clone databases, schemas, or tables at a specific timestamp. This process generates a new object that holds the data exactly as it existed at the selected timestamp.
Below are some examples of SQL Statement help to recover historical or deleted data
SELECT * FROM your_table AS OF TIMESTAMP 'YYYY-MM-DD HH:MI: SS'
SELECT * FROM your_table FOR SYSTEM_TIME BETWEEN 'start_timestamp' AND 'end_timestamp';
CREATE OR REPLACE TABLE your_cloned_table CLONE your_source_table AS OF TIMESTAMP 'YYYY-MM-DD HH:MI: SS';
Moreover, the Time Travel feature also helps to undo or go back in the past and recover a deleted table, schema, and database provided the data retention period is not set to 0
For example,
UNDROP TABLE table_name UNDROP DATABASE db_name
- Managing Historical Data Retention
Snowflake employs a retention period that defines how far back in time you can travel. This period is customizable to suit your organizational needs, ensuring that historical data remains accessible within the specified timeframe.
The retention period can be checked in the Snowflake account’s data retention policy settings,
For Standard Edition, the retention period is 1 day which is enabled by default, and For Enterprise Edition up to 90 days. But, the Data Retention period is only 1 day for Transient and temporary tables whereas, it could be 0 to 90 days for Permanent tables depending on the snowflake edition.
Also, Data retention can be set at the account and object level (database, schemas, and tables)
Here is one example, Object parameter
“DATA_RETENTION_TIME_IN_DAYS” can be used to set a retention period of 50 days for a snowflake table and database.
— Database with a retention period of 50 days
CREATE DATABASE my_database DATA_RETENTION_TIME_IN_DAYS = 50;
— Table with a retention period of 50 days
CREATE TABLE my_table ( list of columns) DATA_RETENTION_TIME_IN_DAYS = 50;
Note: When the retention period over data is moved into Snowflake Fail-safe then:
- Data unavailable for querying
- Object cloning is not possible.
- Objects that can’t be restored were dropped.
Good Read: Snowflake vs Redshift: Revolutionizing Cloud-based Data Warehousing
Snowflake Time Travel: The Final Summary
Snowflake’s Time Travel feature is a transformative innovation in the realm of data warehousing and analytics . It empowers organizations to harness the historical context of their data, facilitating improved decision-making, enhanced compliance, and superior data management capabilities.
By offering a seamless and efficient method to navigate through time, Snowflake ensures that your data remains a valuable asset, not only in the present but throughout its entire lifecycle.
Nevertheless, it does come with some limitations, such as potential cost escalation, increased storage requirements, and possible performance impacts. Therefore, when working with a cloud database, it is always advisable to adhere to best practices to minimize unnecessary expenses.
SPEC INDIA, as your single stop IT partner has been successfully implementing a bouquet of diverse solutions and services all over the globe, proving its mettle as an ISO 9001:2015 certified IT solutions organization. With efficient project management practices, international standards to comply, flexible engagement models and superior infrastructure, SPEC INDIA is a customer’s delight. Our skilled technical resources are apt at putting thoughts in a perspective by offering value-added reads for all.
Delivering Digital Outcomes To Accelerate Growth
Table of contents.
- Snowflake Time Travel
- Data Versioning
- Granular Control
- No Data Duplication
- Zero Data Loss
- Point-in-Time Queries
- Data Recovery
- Time-Travel Cloning
- Historical Data Analysis
- Auditing and Compliance
- Testing and Debugging
- Ease of Use
- Storage Costs
- Query Performance
- Resource Consumption
- Data Privacy
- How to implement Time Travel
- The Final Summary
Related Blogs

Streamlining Data Comparison in Power BI with Excel Integration

Snowflake Private Data Sharing: A Detailed Guide

Business Intelligence vs Data Analytics: Comparing Insights

Power BI Projects: Deploy and Develop Reports with Git Integration
This website uses cookies to ensure you get the best experience on our website. Learn more
Use Kanaries Cloud for free as students and educators
Snowflake Time Travel: Clearly Explained
Published on 7/24/2023
In the realm of cloud computing and big data analytics , Snowflake has emerged as a leading data warehouse solution. Its architecture, designed for the cloud, provides a flexible, scalable, and easy-to-use platform for managing and analyzing data. One of the standout features of Snowflake is Time Travel . This feature is not just a novelty; it's a powerful tool that can significantly enhance your data management capabilities.
Snowflake Time Travel is a feature that allows you to access historical data within a specified time frame. This means you can query data as it existed at any point in the past, making it an invaluable tool for data retention and data governance . Whether you're auditing data changes, complying with data regulations, or recovering from a data disaster, Time Travel has you covered.
Want to quickly visualize your snowflake data? Use RATH (opens in a new tab) to easily turn your Snowflake database into interactive visualizations! RATH is an AI-powered, automated data analysis and data visualization tool that is supported by a passionate Open Source community. check out RATH GitHub (opens in a new tab) for more. Here is how you can visualize Snowflake data in RATH:
Learn more about how to visualize Snowflake Data in RATH Docs .

Understanding Snowflake Time Travel
Snowflake Time Travel is a feature that allows you to "travel back in time" to view and operate on historical data. This is achieved by retaining all changes made to the data in your Snowflake database for a specified period, known as the Time Travel retention period . This period can be set anywhere from 1 to 90 days, depending on your needs and the edition of Snowflake you're using.
The way Time Travel works is simple yet ingenious. Whenever a change is made to a table in Snowflake, instead of overwriting the existing data, Snowflake keeps a copy of the old data. This allows you to query the table as it was at any point within the retention period, effectively giving you a time machine for your data.
The role of Snowflake Time Travel extends beyond just viewing historical data. It plays a crucial role in data retention and data governance . With Time Travel, you can easily comply with data regulations that require you to keep a history of data changes. It also allows you to recover data that was accidentally deleted or modified, making it an essential tool for disaster recovery.
Benefits of Using Snowflake Time Travel
The benefits of using Snowflake Time Travel are manifold. First and foremost, it provides a robust solution for data auditing . By keeping a history of all data changes, you can easily track who changed what and when. This is invaluable in industries where data integrity and traceability are paramount, such as finance and healthcare.
Time Travel also plays a crucial role in data compliance . Many data regulations require businesses to retain a history of data changes for a certain period. With Time Travel, complying with these regulations becomes a breeze. You can easily demonstrate to auditors that you have a full history of data changes at your fingertips.
Another key benefit of Time Travel is in disaster recovery . Accidental data deletion or modification can be disastrous, especially if the data is critical for your business. With Time Travel, you can quickly restore the data to its previous state, minimizing downtime and data loss.
To illustrate the power of Time Travel, consider a scenario where a critical table in your database is accidentally dropped. Without Time Travel, recovering this table would require a restore from backup, which could take hours or even days, depending on the size of the table and the speed of your backup system. With Time Travel, you can simply query the table as it
existed just before it was dropped, and then recreate it with a single command. This can be done in minutes, regardless of the size of the table.
How to Enable and Use Snowflake Time Travel
Enabling Time Travel in Snowflake is straightforward. When you create a table, you can specify the Time Travel retention period by setting the DATA_RETENTION_TIME_IN_DAYS parameter. For example, the following command creates a table with a Time Travel retention period of 14 days:
Once Time Travel is enabled, you can query historical data using the AT or BEFORE keywords in your SQL queries. For example, the following query retrieves the state of my_table as it was 1 hour ago:
Restoring deleted data is just as easy. If you accidentally drop my_table , you can restore it using the UNDROP TABLE command:
This will restore my_table to its state just before it was dropped, effectively undoing the DROP TABLE command.
In conclusion, Snowflake Time Travel is a powerful feature that can greatly enhance your data management capabilities. Whether you're auditing data changes, complying with data regulations, or recovering from a data disaster, Time Travel has you covered. So why not take it for a spin and see how it can benefit your business?
Best Practices and Limitations of Snowflake Time Travel
While Snowflake Time Travel is a powerful tool, it's essential to understand its best practices and limitations to use it effectively.
One best practice is to set an appropriate Time Travel retention period for each table. The retention period should be long enough to allow for data recovery in case of accidental deletion, but not so long that it unnecessarily increases storage costs.
Another best practice is to use Time Travel in conjunction with a robust data backup strategy. While Time Travel can recover data within the retention period, it's not a substitute for regular backups, especially for data that needs to be retained for a long time.
As for limitations, one key limitation of Time Travel is that it can't recover data beyond the retention period. Once the retention period has passed, the historical data is permanently deleted. Therefore, it's crucial to ensure that your retention period is adequate for your needs.
Another limitation is that Time Travel can increase storage costs, as it requires keeping multiple versions of your data. However, Snowflake uses advanced compression techniques to minimize the storage impact.
Snowflake Time Travel for Data Compliance and Disaster Recovery
Snowflake Time Travel can play a crucial role in data compliance and disaster recovery. For data compliance, Time Travel allows you to keep a history of data changes, which is often required by data regulations. You can easily demonstrate to auditors that you have a full history of data changes, helping you comply with regulations and avoid penalties.
For disaster recovery, Time Travel can be a lifesaver. If critical data is accidentally deleted or modified, you can quickly restore it to its previous state using Time Travel. This can significantly reduce downtime and data loss, helping your business recover quickly from data disasters.
In conclusion, Snowflake Time Travel is a powerful tool that can significantly enhance your data management capabilities. It allows you to access historical data, comply with data regulations, recover from data disasters, and more. However, it's essential to understand its best practices and limitations to use it effectively.
We encourage you to explore Snowflake Time Travel further. Check out tutorials and documentation to learn more about this powerful feature and how it can benefit your business.
1. What is Snowflake Time Travel?
Snowflake Time Travel is a feature that allows you to access historical data within a specified time frame. This means you can query data as it existed at any point in the past.
2. How does Snowflake Time Travel work?
Whenever a change is made to a table in Snowflake, instead of overwriting the existing data, Snowflake keeps a copy of the old data. This allows you to query the table as it was at any point within the Time Travel retention period.
3. What are the benefits of using Snowflake Time Travel?
The benefits of using Snowflake Time Travel include data auditing, data compliance, and disaster recovery. It allows you to track data changes, comply with data regulations, and recover data that was accidentally deleted or modified.
Leveraging Snowflake's Time Travel
Learn how to leverage Snowflake's Time Travel feature in conjunction with DbVisualizer to effortlessly explore historical data, restore tables to previous states, and track changes for auditing and compliance purposes.
Introduction
Welcome to our tutorial on leveraging Snowflake's powerful Time Travel feature in combination with DbVisualizer. Snowflake's Time Travel provides an exceptional capability for data versioning, allowing you to delve into the past and query historical data effortlessly. By using Time Travel, you gain the ability to access data as it appeared at any given point in time within a specified retention period, all without the complexities of traditional backup and restore processes. This feature not only simplifies auditing and compliance requirements but also empowers you with granular control over data versions.
Throughout this tutorial, we will explore the numerous benefits and use cases of leveraging Snowflake's Time Travel. You'll discover how it facilitates data recovery, making it a valuable tool to rectify data corruption or accidental changes. Moreover, Time Travel enables historical analysis by uncovering data trends and patterns, empowering data scientists and analysts to gain deeper insights.
By leveraging Time Travel in conjunction with DbVisualizer, a versatile database management and visualization tool, you'll be able to efficiently query and explore historical data. This tutorial will guide you through the process of setting up Snowflake and DbVisualizer, configuring the connection, and demonstrating effective usage of Time Travel to enhance your data management workflows.
Get ready to unlock the full potential of Snowflake's Time Travel feature, as we equip you with the knowledge and skills to harness its power, streamline your data versioning processes, and uncover invaluable insights from your historical data. Let's dive in!
Prerequisites
To follow this tutorial, you will need the following:
- Snowflake : Cloud data warehouse with scalable architecture and seamless data sharing.
- DbVisualizer : Versatile tool for managing, querying, and visualizing databases through a user-friendly interface.
- Knowledge of basic SQL syntax and queries.
Setting Up Snowflake and DbVisualizer
In this section, we'll walk you through the process of setting up Snowflake and connecting it to DbVisualizer, enabling you to seamlessly manage and analyze your data.
Creating a Snowflake Account and Setting Up a Virtual Warehouse
- Begin by creating a Snowflake account if you haven't already. Visit the Snowflake website and follow their registration process.
- Once you've successfully registered, set up a virtual warehouse in Snowflake. This virtual warehouse will serve as your computing resource for querying and processing data.
- Within your Snowflake account, navigate to the Account section or dashboard where you'll find your account's connection details. This includes the URL, username, password, and role you'll need to connect to Snowflake.
Configuring a New Database Connection in DbVisualizer
- Launch DbVisualizer and open the "Database" menu. Choose the option to "Create a New Connection."

- Select "Snowflake" as the database type. This will prompt you to input specific Snowflake connection details.
- Enter the connection details you obtained from your Snowflake account. This includes the URL, username, password, and role.
- Choose the virtual warehouse you set up earlier from the available options. This warehouse will determine the compute resources allocated to your DbVisualizer queries.

- You might need to download the Snowflake JDBC driver before creating a connection if you haven’t already. To do that, navigate to the Driver manager:

Then click on “Start Download” to download the required JDBC driver for Snowflake.

- With all the necessary details input, click the "Test Connection" button within DbVisualizer. This will initiate a connection test to Snowflake using the provided credentials.

If the test is successful, you'll receive a confirmation message indicating that DbVisualizer can connect to Snowflake using the specified parameters.
Exploring Time Travel in Snowflake
Time Travel is a powerful feature offered by Snowflake, a cloud-based data warehousing platform, that allows you to query historical data at various points in time. This feature is particularly valuable for analytical and auditing purposes, as it enables you to track changes to your data over time without the need for complex versioning or snapshotting mechanisms.
In Snowflake, every table is associated with a period, referred to as a "time travel period." This period represents the duration for which historical data is retained in the table. Snowflake automatically maintains a history of changes made to data during this period, allowing you to retrieve data as it existed at different points in the past.
Enabling Time Travel for a Snowflake Database
Enabling Time Travel is straightforward in Snowflake and can be configured at the database level. When creating or altering a database, you can specify the time travel retention period. This period determines how far back in time you can query historical data. Time travel retention can be set in terms of hours, days, or even for an infinite retention.
For example, to create a database with a time travel retention period of 30 days, the SQL query would look like this:
This means that data changes made in the past 30 days can be queried using the Time Travel feature.

Querying Historical Data Using Time Travel Syntax in DbVisualizer
DbVisualizer is a popular database management and visualization tool that supports various database systems, including Snowflake. To query historical data using Time Travel in DbVisualizer, you can follow these steps:
- Write a Time Travel Query: Once connected, you can write SQL queries to access historical data using Time Travel syntax. The syntax involves using the AS OF clause in your query to specify the point in time you want to retrieve data from. For instance, a query like so:
Would fetch all rows from the specified table as they existed at the given timestamp.
- Execute the Query:

- After writing the query, execute it in DbVisualizer. The results will display the data as it was at the specified timestamp, allowing you to analyze historical changes.
- Explore Historical Data: You can further refine your Time Travel queries by adding additional conditions, joins, and aggregations, just like regular SQL queries. This enables you to perform in-depth analysis on historical data. Let's say you want to further refine this query by adding an additional condition to filter the results. For example, you might want to retrieve only the users who registered before a certain date:
- In this modified query, the "WHERE" clause filters the results to include only users who registered before August 1, 2023. This is an additional condition added to the Time Travel query to narrow down the historical data based on a specific attribute ("registration_date" in this case). You can continue to add more conditions, joins, and aggregations to perform more complex analysis on the historical data using the Time Travel feature.
Utilizing Time Travel for Data Recovery and Auditing
Time Travel in Snowflake goes beyond its role in historical data analysis; it also serves as a powerful data recovery and auditing mechanism. Whether you're exploring the past or rectifying accidental changes, Time Travel offers a smooth path to data restoration. This section delves into how you can employ Time Travel for data recovery and auditing purposes.
Restoring a Table to a Previous Point in Time using Time Travel
Time Travel in Snowflake not only facilitates historical data analysis but also serves as a data recovery mechanism. In scenarios where you need to restore a table to a previous state, Time Travel provides a seamless solution. Here's how you can achieve this:
- Identify the Desired Timestamp : Determine the specific point in time to which you want to restore the table. This could be a timestamp just before the undesired changes were made.
- Generate a New Table : Create a new table with the same schema as the original table. You can use the `CREATE TABLE` statement to do this.
- Insert Historical Data : Write an `INSERT INTO` query that utilizes Time Travel to retrieve the data from the original table as it existed at the chosen timestamp. For example:
This populates the new table with the data from the past.
- Verification and Validation : After restoring the table, verify the data to ensure that it matches the state it had at the chosen timestamp. You can run queries to compare the new table's data with the original table's data at that time.
Auditing Changes and Tracking Data Modifications with Time Travel
Time Travel is a valuable tool for auditing purposes, allowing you to track changes and modifications made to your data over time. By leveraging Time Travel, you can maintain an accurate record of every change without the need for complex versioning systems. This is particularly beneficial for compliance, regulatory, and internal auditing requirements.
- Enabling Detailed Tracking: With Time Travel enabled, Snowflake automatically keeps track of all changes to your data, including inserts, updates, and deletes, within the specified time travel period.
- Querying Historical Changes: You can query historical data using Time Travel to investigate specific changes. For example, you can identify who made a particular change, what the change was, and when it occurred.
- To initiate this process, you first need to create the `audit_changes` table, which will serve as a record keeper for changes:
- Subsequently, you'll establish a stream that captures historical changes for the target table. In this example, we're utilizing the `USERS` table:
- Once the stream is in place, you'll construct a task to populate the `audit_changes` table with the changes extracted from the stream:
- Finally, ensure the task starts executing with the following command:

- Ensure that the task status is marked as "started," as illustrated in the image above.
With this configuration in place, any modifications made to the `USERS` table will be automatically captured and logged into the `AUDIT_CHANGES` audit table. This mechanism allows you to effortlessly maintain a detailed record of alterations and their respective context.

In this tutorial, we've delved into Snowflake's Time Travel feature, showcasing its versatility in data recovery and auditing. Time Travel isn't just about historical analysis—it's a tool that simplifies data restoration and empowers robust auditing.
We began by grasping the essence of Time Travel—its ability to query data as it appeared at various times. This streamlines auditing, compliance, and versioning without complex backups.
We navigated setting up Snowflake and DbVisualizer, fusing data warehousing capabilities with an intuitive interface.
Our journey through Time Travel involved enabling it, executing queries in DbVisualizer, and refining queries for insights.
Beyond data recovery, we harnessed Time Travel for auditing. We explored restoring tables, tracking changes through an audit_changes table, and using Snowflake's features to populate it.
As we conclude, remember the fusion of DbVisualizer and Snowflake's Time Travel. This dynamic duo enhances data management, analysis, and visualization. Embrace DbVisualizer to unearth insights and streamline data tasks. Your data adventures await—happy exploring!
Frequently Asked Questions (FAQs)
What is snowflake's time travel feature, and how can i use it to query historical data.
Snowflake's Time Travel feature allows you to access historical data within a specified retention period. You can query data as it appeared at different points in time, without the need for complex backup and restore processes. To learn how to leverage this feature alongside DbVisualizer for efficient exploration and analysis of historical data, check out the tutorial on "Leveraging Snowflake's Time Travel with DbVisualizer."
How can I effectively use Snowflake's Time Travel in combination with DbVisualizer for auditing and compliance purposes?
Ar: If you're interested in tracking changes and maintaining an audit trail for your data, you can leverage Snowflake's Time Travel feature alongside DbVisualizer. By following the tutorial on "Leveraging Snowflake's Time Travel with DbVisualizer," you can learn how to set up Snowflake, configure the connection, and use Time Travel to effortlessly explore historical data, restore tables to previous states, and track changes for auditing and compliance purposes.
What are some practical use cases for Snowflake's Time Travel feature, and how does it benefit data analysis?
A: Snowflake's Time Travel is not only valuable for data versioning and recovery but also for historical analysis. By using Time Travel, you can uncover data trends, patterns, and insights from the past. The tutorial on "Leveraging Snowflake's Time Travel with DbVisualizer" demonstrates how to harness this feature to enhance data analysis workflows, making it easier to gain valuable insights from historical data.
How can I connect Snowflake with DbVisualizer to streamline data management tasks and analysis?
A: Connecting Snowflake with DbVisualizer can enhance your data management and analysis capabilities. DbVisualizer is a versatile tool that allows you to manage, query, and visualize databases in a user-friendly interface. If you're interested in learning how to set up this connection and leverage Snowflake's Time Travel feature, check out the tutorial that provides a step-by-step guide on "Leveraging Snowflake's Time Travel with DbVisualizer."
Where can I find a comprehensive guide on using Snowflake's Time Travel feature with DbVisualizer for historical data exploration and analysis?
A: If you're looking for a detailed guide on using Snowflake's Time Travel feature alongside DbVisualizer, there's a tutorial available titled "Leveraging Snowflake's Time Travel with DbVisualizer." This guide walks you through the process of setting up Snowflake, establishing a connection with DbVisualizer, and effectively using Time Travel to explore historical data, restore tables, and track changes for various purposes.

Ochuko is a full-stack Python/React software developer and freelance Technical Writer. He spends his free time contributing to open source and tutoring students on programming in collaboration with Google DSC.

Adding Dates in SQL: A Complete Tutorial
Glossary of the sql commands you need to know, substring_index in sql explained: a guide, sql not in: the good, bad & the ugly, sql add to date operations: a complete guide, sql cast function: everything you need to know, postgresql upsert: insert on conflict guide, unlocking the power of ctes in sql, insert into sql clause, enhancing business operations with visualization tools.
The content provided on dbvis.com/thetable, including but not limited to code and examples, is intended for educational and informational purposes only. We do not make any warranties or representations of any kind. Read more here .
We use cookies to ensure that we give you the best experience on our website. However you can change your cookie settings at any time in your browser settings. Please find our cookie policy here ↗
- Technology Consulting
- Elastic Scaling
- Acquisition & Due Diligence
Akava is a technology transformation consultancy delivering
Delightful digital native, cloud, devops, web and mobile products that massively scale., we write about current & emergent trends, tools, frameworks and best practices for technology enthusiasts.
- Announcements
- Web Development
- Microservices
- Web3 & Blockchain
- Software Development
- Containerization
- Machine Learning
- Infrastructure

Grokking Time Travel, a Top-Feature of Snowflake

Introduction
Configuring time travel, querying/cloning historical data/objects, undropping historical objects.
Snowflake is a cloud-based data warehouse similar to others such as Amazon Redshift and Google BigQuery. However, Snowflake differentiates itself quite a bit by supporting multi-cloud configurations, separation of storage and compute, fine-grained role-based access controls among many other data security features, and temporal data access.
In this post, I provide an overview of Time Travel , Snowflake’s feature that enables temporal data access, and highlight some affordances of the feature.
As mentioned, Time Travel is Snowflake’s feature that enables temporal data access. Users can access historical data that’s up to 90 days old starting with Snowflake’s Enterprise edition. The lowest edition in their tiered offering is the Standard edition, which allows access to 1-day old historical data.
Everyone gets to Time Travel! You get to Time Travel!
We all get to take advantage of this feature to do things like query historical data, create point-in-time snapshots of our data, and recover from accidental data loss.
Time Travel is enabled by default for all Snowflake accounts, but the DATA_RETENTION_TIME_IN_DAYS parameter that controls how far back we can access data is initialized at 1. Let’s take a moment to discuss how we can change the default Time Travel configuration.
Consider the image below. It shows a linear top-down hierarchy of the Snowflake account, database, schema, and table objects.
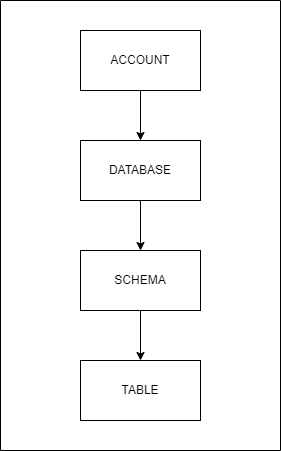
The DATA_RETENTION_TIME_IN_DAYS parameter can be configured for each of these objects using an ALTER statement.
By default, the DATA_RETENTION_TIME_IN_DAYS parameter is set to 1 at the account level, and its value is inherited by the objects lower in the hierarchy that do not have the parameter set for itself or an intermediate ancestor object. The principle is that an object’s data retention period is that of the one explicitly set on it, and if not set, inherited from its nearest ancestor.
If you are ever not sure what the parameter configuration for a Snowflake object is, you can use the SHOW PARAMETERS statement .
It’s worth noting that there are different types of tables such as temporary, transient, and permanent and the allowable data retention values vary by type.
Temporary and transient tables can have a data retention value of 0 or 1, while permanent tables may have a value ranging from 0 to 1 (Standard edition) or 90 (Enterprise edition and beyond). Snowflake provides a summary of this information as a table in their documentation.
Once we have configured the DATA_RETENTION_TIME_IN_DAYS parameter for objects in our Snowflake account and have some data stored, we can start writing queries that fetch historical data or clone historical objects. We can write time sensitive SELECT queries as well as CREATE…CLONE queries by using the AT or BEFORE clause.
The clauses are appropriately named as they convey precisely what they do. We can query historical data from an object as it was at an exact point in time or right before a point in time. The value we provide to the AT or BEFORE clauses may be a timestamp, offset from the present moment in seconds, or statement ID. These queries will fail, however, if we provide values that exceed the data retention period for an object or any of its children.
SELECT queries
The structure of a SELECT query with the AT or BEFORE clause is as follows.
Here’s an example showing a how we might query historical data from a table at the point in time before a query with the specified ID was executed.
CREATE…CLONE queries
The structure of a CREATE…CLONE query with the AT or BEFORE clause is like this.
We can use the following query to clone a table as it was 3 days ago.
The Snowflake documentation has a few more examples if you need more to get started.
We all make mistakes. We hope these mistakes don’t include things like dropping database objects that people and systems rely on, but in the event this does happen, Snowflake allows us to hit undo with the UNDROP statement that allows for the most recent version of a dropped database, schema, or table to be restored.
Dropped objects stick around in the system for the amount of time for which Time Travel is configured for a given object.
Additionally, objects can only be restored in the current database or schema so it’s a good practice to specify the database or schema to use before running the UNDROP statement. This is necessary even if an object’s fully-qualified name is used.
If you’ve somehow managed to dig further into your mistake and not only dropped a database object but also created a substandard replacement with the same name, you can still recover the dropped object. However, you will have to rename the substandard replacement before undropping the original object.
Allowing users to recover from errors and mistakes is an essential design principle and Snowflake nailed it!
You can read more details about restoring dropped database objects in the Snowflake documentation .
In this post, I provided an overview of Snowflake’s Time Travel feature that allows users to query historical data. I also showed how to configure Time Travel using the DATA_RETENTION_TIME_IN_DAYS parameter on Snowflake account, database, schema, and table objects. SELECT, CREATE…CLONE, and UNDROP statements that leverage Time Travel capabilities were also highlighted.
While everyone gets to time travel, some of us will be able to time travel further into the past than others due to our subscription tier or storage cost constraints. Check out the Snowflake documentation for details on how storage costs are affected by Time Travel configurations.
- Snowflake. Snowflake Time Travel & Fail-safe
- Snowflake. Storage Costs for Time Travel and Fail-safe
- Snowflake. Understanding & Using Time Travel
Akava would love to help your organization adapt, evolve and innovate your modernization initiatives. If you’re looking to discuss, strategize or implement any of these processes, reach out to [email protected] and reference this post.
« Back to Blog
Related Articles

Snowflake Backups To Amazon S3 Using Terraform
17 minute read
05/19/2021 10:15am

Exporting Snowflake Query Results with Snowsight
5 minute read
10/19/2022 9:10am

Machine Learning Visualization with Yellowbrick
9 minute read
09/15/2021 1:15pm
13 Key Snowflake Features: Traits that Take It to the Top
A compact list of snowflake features.
- Decoupling of storage and compute in Snowflake
- Auto-Resume, Auto-Suspend, Auto-Scale
- Workload Separation and Concurrency
- Snowflake Administration
- Cloud Agnostic
- Semi-structured Data Storage
- Data Exchange
- Time Travel
- Security Features
- Snowflake Pricing
Let’s deep-dive:
1. Decoupling of storage and compute in Snowflake
Snowflake’s decoupling of storage and compute features facilitates virtual warehouses and storage as separate entities. Leveraging this functionality of Snowflake, businesses can achieve greater flexibility in choosing the compute of their choice and incrementally pay for what they store and compute. Users can scale up / down or in/out based on the business SLA requirement. Scale up – Scale-out features do not require downtime and are almost instant.
2. Auto-Resume, Auto-Suspend, Auto-Scale
Snowflake’s auto-resume and auto-suspend features provide minimal administration. Using auto-resume, Snowflake starts a compute cluster when a query is triggered and suspends compute clusters after a set time of inactivity. These two features ensure performance optimisation, cost management, and flexibility.
In business circumstances where more users are querying heterogeneous queries, setting up auto-scaling can help automatically expand the number of clusters from 1 to 10 at an increment of 1 based on the volume of queries sent to a compute simultaneously.
3. Workload Separation and Concurrency
Concurrency is no longer a problem for Snowflake, unlike traditional data warehouses with concurrency issues where users and processes must compete for resources. Because of Snowflake’s multi-cluster architecture, concurrency is not an issue anymore.
This architecture also helps to divide workloads into their virtual warehouse and channel the traffic to each virtual warehouse (compute) by functions or departments.
4. Snowflake Administration
A data cloud as a service is provided by Snowflake (DWaas). Businesses can set up and administer a system without significant assistance from DBA or IT teams. Unlike the on-premise platforms, neither hardware commissioning nor software installation patch-update is s necessary. Snowflake manages software updates and introduces new functions and patches without downtime.
Snowflake automatically creates micro-partitioning. This feature reduces the requirement of manually indexing and clustering tables though these are available features in Snowflake.
5. Cloud Agnostic
Being a cloud-agnostic platform, Snowflake can migrate its workloads with other cloud providers. So, Snowflake is accessible on all three cloud providers: AWS, Azure, and GCP. Customers can easily integrate Snowflake into their existing cloud architecture and choose to deploy in locations preferred by their companies.
6. Semi-structured Data Storage
The requirement to manage semi-structured data, often in JSON format, gave rise to NoSQL database solutions. Data pipelines are created to extract attributes from JSON and mix them with structured data. By leveraging VARIANT, a schema on read data type, Snowflake’s design enables storing structured and semi-structured data in the exact location. Both organised and semi-structured data can be stored using the VARIANT data type. Snowflake eliminates the need for data extraction pipelines by automatically analysing data, extracting properties, and saving it in a columnar format.
Snowflake can connect to staging areas like s3 bucket, Azure blob or GCP blob storage to retrieve and transform files stored in these platforms. This is regardless of the cloud Snowflake is hosted. A snowflake-managed staging area is also available. Tasks/ Streams or Snowpipe can be set to retrieve data at a scheduled time or almost instantly, respectively. Snowflake can work with CSV, JSON, XML, Avro, ORC, and Parquet file formats. Snowflake can also store metadata of unstructured data stored in the staging area.
7. Data Exchange
A wide range of data, data services, and applications are available on the Marketplace. From some of the world’s top data and solution suppliers, you can find, assess, and buy data, data services, and apps through Marketplace. Direct access to data ready for querying and pre-built SaaS connections virtually eliminates the expenses and delays associated with conventional ETL operations and integration. The risk and hassle of duplicating and relocating outdated material should be avoided. Instead, you can receive automatic updates that are close to real-time and have secure access to shared, controlled, and live data.
8. Time Travel
One of the distinctive Snowflake elements is time travel. You may follow the evolution of data through time by using time travel. All accounts have access to this Snowflake feature, free and enabled by default for everyone. Additionally, this Snowflake feature allows you to retrieve a Table’s historical data. At any moment throughout the previous 90 days, one can access the table’s appearance.
Time travel encompasses the undrop feature. If an object has not been removed yet by the system, a dropped object can be recovered using the undrop command in Snowflake. When an object is undropped, it returns to its original condition. The option to undrop schemas or tables is also available.
The clone capability allows us to quickly duplicate anything, including databases, schemas, tables, and other Snowflake objects, in almost real time. Therefore, cloning an object involves editing its metadata rather than duplicating its storage contents. You can quickly produce a clone of the whole production database for testing purposes.
10. Snowpark
With the help of the Snowpark feature, data scientists and data engineers proficient in Python, Scala, R, and Java may create and manage their codes in Snowflake. Snowpark helps to employ the computing capabilities of Snowflake to retrieve, transform, train and apply data science models on the data stored in Snowflake, which has a more apparent performance advantage,
11. Snowsight
The new Snowflake web user interface, Snowsight, replaces the traditional Snowflake SQL Worksheet and enables you to easily construct basic charts and dashboards that can be shared or explored by many users, do data validation while loading data and conduct ad-hoc data analysis. The Snowflake dashboards tool is an excellent option because it works well for individuals or small group users in an organisation who wish to generate straightforward visualisations and share information among themselves.
12. Security Features
Snowflake assures security for its users through the following methods:
- • By adding IP addresses to a whitelist, you may control network policies and limit who can access your account.
- • By supporting several authentication techniques, including federated authentication and two-factor authentication for SSO.
- • Using a hybrid approach of role-based access control and discretionary access control. In role-based access control, privileges are assigned to roles which are then transferred to users. Still, in discretionary access control, each object in the account has an owner who controls access to the object. This hybrid strategy offers a substantial level of flexibility and control.
AES 256 strong encryption is used to automatically encrypt all data, both in transit and at rest.
13. Snowflake Pricing
The advantages of Snowflake pricing are:
- • Pay for actual consumption only.
- • We can cut back on resource use to save costs.
- • Flexible payment. We can either pay on-demand or in advance (pre-purchased).
- • Scale up or down the use of cloud services, computing, and data storage automatically based on your needs.
- • There are no chances of overbuying or overprovisioning.
Optimisation of Snowflake spending through integration with innovative cost-monitoring platforms.
Snowflake stands as an ideal and popular choice because of its unique and updated features. It is also available across many data cloud providers and regions, making it accessible and suitable for all organisations. Why wait? Let’s experience Snowflake. Try now: https://beinex.com/snowflake/ .
Related Links

Alteryx Data Preparation: A Key to Successful Data Analytics

The Future of Business Intelligence: AI-Augmented Analytics

Accelerate Your Digital Transformation: Tableau + AWS for Modern Cloud Analytics

What’s New in Tableau’s 2024.1 Release: Tableau Pulse, Metrics Layer, Viz Navigation, and More

Beinex: A Great Place to Work for the Second Consecutive Time!
Read what matters.
Sign up and receive knowledge handpicked by our Consultants and Subject Matter Experts
Modal title
Register now to attend the upcoming webinar..
How Business Intelligence is indispensable to Banking today
Last date for registration: 26/09/2022
Cookie policy.
We use cookies to enhance user experience and track website traffic. By clicking "Accept,” you consent to the usage of cookies on our website as outlined in our Cookie Policy . By selecting "Preferences," you can modify your cookie preferences anytime.
We use cookies, like most websites, to make it more user-friendly and ensure it works properly.
This Cookie Policy explains how Beinex recognizes you when visiting our websites using cookies and other similar technologies. It describes these technologies, why we use them and your rights to limit how we use them.
What is a cookie?
A cookie is a temporary text file that websites you visit the store on your computer or another device. On subsequent visits, cookies are returned to the website or another website that understands that cookie. Cookies are used to help website function or function more effectively, as well as to give website owners information. An improved and responsive service could be offered using this data. Cookies may be either first-party cookies, which we may put directly on your device, or third-party cookies, which may be set on our behalf by a third-party service provider. The use of cookies and other similar technologies may be used to gather information whenever you use this website (for example, web beacons, tags, scripts, and local storage).
We may group cookies that we employ on our website into any one of the following categories: "Strictly Necessary" cookies cannot be disabled in our systems since they are required for the Website to work. They are often only set in reaction to your actions, such as selecting your privacy settings, logging in, or completing forms, which constitute a service request.
What are the types of cookies employed by us?
Cookies used by us are enlisted below:
Analytics and Customization Cookies
These cookies gather data that can assist us in better comprehending how users interact with our websites. Additionally, we can utilise this data to assess our marketing initiatives’ success or design a well-tailored site experience just for you.
Advertising Cookies
These cookies are used to personalise advertising messages for you. They ensure that ads are correctly presented for advertisers, stop the same ad from repeatedly showing, and, in some situations, choose advertisements based on your interests.
Essential Cookies
These cookies are required for our website's essential operation and specific features, like granting access to secure sections.
Performance and Functionality Cookies
These cookies are not required to use our websites but are necessary to improve their functionality and performance. However, some features (like videos) might not operate without these cookies.
Social networking Cookies
These cookies make it possible for you to share the content of our website on external websites and social networks. Furthermore, these cookies might be employed for marketing functions.
Unclassified Cookies
These are cookies that haven't been assigned a classification yet. With the assistance Of their providers, we are in the process Of categorising these cookies.
Cookie Duration
Whether a cookie is "persistent" or "session," it will stay on your device for a long time. If you don’t erase a persistent cookie before its set expiration date, the web browser will retain it, which will be valid until that time. Contrarily, a session cookie will expire when your web session ends, and your browser is closed.
How to control cookies?
Cookies can be managed and controlled in several ways. Please be aware that deleting or disabling cookies may affect your use of our website and may prevent some features from working correctly. When you first visit our website, we will ask for your permission to use cookies if they are not necessarily required for the operation of our website. Consent can be given or cancelled by selecting "Manage" at the top of this page.
Any agreement to accept or reject cookies is restricted to the website for which this Cookie Notice is posted, not to any other websites or web pages that may connect to our website. Please see the relevant privacy or cookie notice on those websites for further details on the cookies those websites use.
Email correspondence
To improve the value and appeal of certain email communications we send you, we may additionally employ tracking technology to find out whether you have read, clicked on, or forwarded them. You must unsubscribe if you do not want us to be able to verify whether you have read, clicked on, or forwarded our communications because we are unable to send these emails without tracking enabled. Registered users can contact us at any time to change their communication settings or unsubscribe by following the instructions in each email correspondence they get from us.
Changes to This Cookie Notice
This Cookie Notice may occasionally be changed or amended at our discretion. When we make changes to this notice, we'll update the revision date at the top of the page, and the revised or changed Cookie Notice will take effect as of that date in terms of you and your information.
To be informed about how we use cookies, we recommend you revisit this Cookie Notice regularly.
Your Cookie Preferences
To enhance your usage of our website, we employ a variety of cookies. To find out more about the purposes of the categories below, click on them. You can decide which kinds of cookies to accept and modify your options whenever you want. Keep in mind that deactivating cookies may impact how you use the website. Visit our Cookie Policy to learn more about how we use cookies.
Manage Cookies
These cookies gather data that can assist us in better comprehending how users interact with our websites. Additionally, we can utilise this data to assess our marketing initiatives' success or design a well-tailored site experience just for you.
Essential Cookies 1
Provider: app.termly.io
Essential Cookies 2
Essential cookies 3.
COMMENTS
A key component of Snowflake Time Travel is the data retention period. When data in a table is modified, including deletion of data or dropping an object containing data, Snowflake preserves the state of the data before the update. The data retention period specifies the number of days for which this historical data is preserved and, therefore ...
Snowflake Time Travel is an interesting tool that allows you to access data from any point in the past. For example, if you have an Employee table, and you inadvertently delete it, you can utilize Time Travel to go back 5 minutes and retrieve the data. Snowflake Time Travel allows you to Access Historical Data (that is, data that has been ...
A key component of Snowflake Time Travel is the data retention period. When data in a table is modified, deleted or the object containing data is dropped, Snowflake preserves the state of the data before the update. The data retention period specifies the number of days for which this historical data is preserved.
Get Started With the Essentials. First things first, let's get your Snowflake account and user permissions primed to use Time Travel features. Create a Snowflake Account. Snowflake lets you try out their services for free with a . A account allows for one day of Time Travel data retention, and an account allows for 90 days of data retention.
Let me know in the comments if you want a brief overview of this product or maybe some explanation of its other features. Time travel. Snowflake Time Travel enables to query data as it was saved ...
The default Time Travel retention period is 1 day (24 hours). PRO TIP: Snowflake does have an additional layer of data protection called fail-safe, which is only accessible by Snowflake to restore customer data past the time travel window. However, unlike time travel, it should not be considered as a part of your organization's backup strategy.
Time Travel is one of the cool features that Snowflake provides to its users. It allows us to recover data that has been changed or deleted at any point within a specified time frame. We can do some amazing things with this powerful feature, such as: We can recover deleted objects such as tables, schemas, and databases.
Snowflake Time Travel is a powerful feature that enables users to examine data usage and manipulations over a specific time. Syntax to query with time travel is fairly the same as in SQL Server which is easy to understand and execute. Users can restore deleted objects, make duplicates, make a Snowflake backup, and recover historical data.
As mentioned, Time Travel is Snowflake's feature that enables temporal data access. Users can access historical data that's up to 90 days old starting with Snowflake's Enterprise edition.
In recent years, Snowflake has emerged as a popular cloud-based data warehousing platform due to its extensive range of advanced features. Among its many features, the Time Travel capability stands…
OFFSET => time_difference. Specifies the difference in seconds from the current time to use for Time Travel, in the form -N where N can be an integer or arithmetic expression (e.g. -120 is 120 seconds, -30*60 is 1800 seconds or 30 minutes). STATEMENT => id. Specifies the query ID of a statement to use as the reference point for Time Travel.
Let me know in the comments if you want a brief overview of this product or maybe some explanation of its other features. Time travel. Snowflake Time Travel enables to query data as it was saved at a particular point in time and roll back to the corresponding version. It means that the intentional or unintentional changes to the underlying data ...
Snowflake Time Travel: An In-depth Guide. In the constantly evolving field of data management, Snowflake Database, a cloud-based database, has risen as a prominent player, renowned for its innovative features and robust capabilities. Among its array of features, one that shines particularly bright is the "Time Travel" feature, enabling ...
Snowflake Time Travel: Clearly Explained. In the realm of cloud computing and big data analytics, Snowflake has emerged as a leading data warehouse solution. Its architecture, designed for the cloud, provides a flexible, scalable, and easy-to-use platform for managing and analyzing data. One of the standout features of Snowflake is Time Travel.
Time Travel is a powerful feature offered by Snowflake, a cloud-based data warehousing platform, that allows you to query historical data at various points in time. This feature is particularly valuable for analytical and auditing purposes, as it enables you to track changes to your data over time without the need for complex versioning or ...
As mentioned, Time Travel is Snowflake's feature that enables temporal data access. Users can access historical data that's up to 90 days old starting with Snowflake's Enterprise edition. The lowest edition in their tiered offering is the Standard edition, which allows access to 1-day old historical data.
Snowflake chapter about Time Travel, Fail-Safe, and Zero Copy Cloning. So far, we have seen many features that make Snowflake an attractive service, but the features we will see in this chapter make Snowflake unique!Let's look at the Snowflake storage feature (Time Travel, Fail-Safe & Zero Copy Cloning), and you'll understand why Snowflake is getting increasingly popular lately!
Auto-Resume, Auto-Suspend, Auto-Scale. Snowflake's auto-resume and auto-suspend features provide minimal administration. Using auto-resume, Snowflake starts a compute cluster when a query is triggered and suspends compute clusters after a set time of inactivity. These two features ensure performance optimisation, cost management, and flexibility.
First, some key Snowflake features that make this happen. Storage Layer Scale-able columnar, compressed & encrypted micro data files stored in elastic & scale-able cloud storage (AWS S3, Azure ...
Time Travel: "Snowflake Time Travel enables accessing historical data (i.e., data that has been changed or deleted) at any point within a defined period.". In this particular blog we are looking into one of the most important and valuable feature of the snowflake that is Time Travel. this feature provides us to go back in time and check ...