
How to Propagate the Wandering Jew: It’s Super Easy!
This tutorial is part of Garden Week here at Crafting a Green World. We’ve teamed up with some of our favorite DIY bloggers to talk about all things gardening!
Gardening can be scary if you don’t think that you have a green thumb. Why waste your money on expensive potting soil and plant starts, if you don’t think they’ll grow? Why spend a bunch of time weeding and watering, only to be disappointed?
If you’re new at gardening, the plant for you is the wandering Jew, or inchplant . It’s in the spiderwort family, so it’s a great houseplant–easy to care for, attractive, and kind of dangly when it’s grown a lot, so that you can set it in a hanging planter or let it trail off the edge of a bookshelf.
My favorite thing about the wandering Jew, however, is that it’s crazy easy to propagate. Not only does this make for an excellent kid’s gardening project, but, unlike much of life, it lets you get more plants for practically free! If you’ve got a grown-up wandering Jew, some extra pots, and good potting soil, then you’ve got yourself another six to a dozen wandering Jews right there for the taking. Here’s how:
1. Prepare a temporary water home for the wandering Jew cuttings. Propagating the wandering Jew is a two-step process that’s separated by several days; this is a bonus, because it means that each step takes just minutes.
Shot glasses? Jelly jars? Vases? Kid-sized cups? They all make great temporary homes for your wandering Jew cuttings.
2. Make cuttings from the wandering Jew. Grab a sharp pair of scissors, and begin to hack up your beloved wandering Jew.
Now, do not make this harder than it needs to be. All the important people will tell you to sterilize your scissors, and cut at a certain angle, and cut exactly at this or that certain place, and cut exactly this or that certain amount. You can do all this, absolutely, but if you did all that, you’d have a green thumb. And you don’t have a green thumb, do you?
The way that I’ve propagated my wandering Jews for years isn’t the “best” way, but it works perfectly for me. I use scissors–any old scissors–and cut my wandering Jew just above a leaf, so that I don’t leave the plant with a random stem sticking out above its highest leaf. Then I clip the lowest set of leaves off of the cutting, so that the cutting will have a node from which to grow new roots.
I put the cuttings in water, making sure that any nodes that I want roots to sprout from are covered, but that any leaves that I want to not rot and die are not covered. Then I set everything in a sunny window and leave it alone.

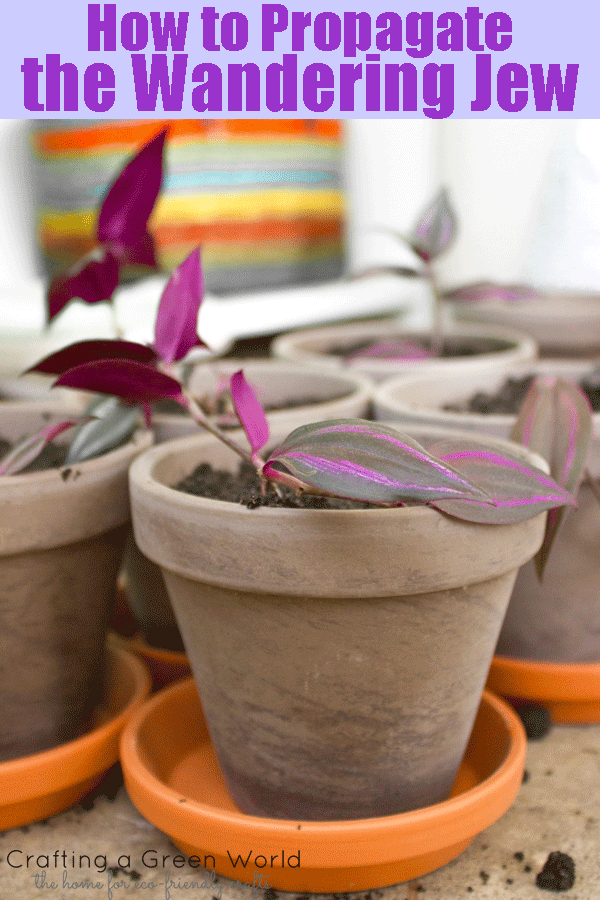
4. Transplant the cuttings into pots. Any day after all the cuttings have roots, but before the roots get giant and unwieldy, find a nice few minutes to set out little pots, and potting soil.
Fill each pot about halfway full of potting soil (get a really good kind !), then pick up a cutting stand it up gently in the pot, and scoop more soil in all around it until the cutting looks happy and settled. Water it well, and put it back in another sunny window, where you’ll water it as needed and watch it grow.

Don’t actually need six to a dozen more wandering Jews? My kids and I tend to give away all of our propagated wandering Jews in the few months after we’ve transplanted them. There’s always a special kid who my kids think would quite like a wandering Jew for their birthday instead of one more toy, always a housewarming or dinner party or get-together at which a wandering Jew is even more welcome than a sixteenth gifted bottle of wine, always a graduating senior who’s definitely not going to get cash from me, but is going to get something nice to set on their dorm room windowsill.
And when all the transplanted wandering Jews have finally gone away, well, there’s always another wandering Jew to propagate!
Share this page with a friend:
About the author.

Related Posts

How to: Make Paper Beads out of Junk Mail

Happiness is Recycling Folded Paper

Green Tea Party

Green Crafty Q&A: Weaving Plastic Bags

No Limit Hold’em: Make a Playing Card Bag

DIY: How to Save Your Favorite Jeans

DIY: Upcycle Old Jeans Into A Sexy Mini

Upcycle Old Denim Into a Market Tote
14 thoughts on “how to propagate the wandering jew: it’s super easy”.

Ooh I am new to this plant! I was just talking to a friend about how I had to abandon my house plants because Darrol is into eating the dirt right now. When he gets past this phase, I’m going to add Wandering Jew to my list of house plants to get.
It’s non-toxic to cats, according to ASPCA, so just right for our house. They do say it’s toxic to dogs, but our dog has shown zero interest in house plants, so she will be fine.

We are just starting to add houseplants back into our lives. While we don’t have a lot of space, I think the plants will help make our indoor air healthier. Might have to see about getting this next time I am at the store!

I always forget about that, but yes, indoor plants are AWESOME for air quality! I’ve heard there are species that are better than others–I’ll have to look it up.
Oh, if you look it up, that means I can just mooch off your knowledge (it’s kinda a recurring theme I think).

Hi. I have the worst luck with this plant. It grows, yes, but then it dies at the root. Over and over and over and it is endless!! Why does it do this? I water once a week, it is inside, in a morning sun window. Why does it keep dying at the root?
Do you think there might be something in your soil or your water that could be poisoning it? You could do an experiment, perhaps–water one pot with filtered water, or change your brand of potting soil, etc.

Dies at the root? Does the bottom part of the stem shrivel up? Starting from the roots and working it’s way up? Sounds like root rot to me. It comes from too much water or from the plant sitting in wet soil for a long time without getting the chance to dry out. It causes a fungus to grow and spread starting in the roots and eventually killing the plant.

Why won’t my clippings root in my glasses of water? No roots in over 2 weeks. ????????

Anyone have any wandering Jew slips hey could sen? Macmikeal(at)me(dot)com

I am trying to reboot a wandering Jew . Can you help me

Thank you for this, by instinct I threw some cuttings that broke off the plant into a cup of water and white strings starting to appear after only days. Actually I was googling to confirm what I was seeing was in fact roots, and thanks to your knowledge I can confirm they are. Now I know what to do after roots get to the point of planting. Trying this with a Pilea as well. Thanks!

Hello! I have already gotten to the potting process, so thank you for the propagation advice. How long does it normally take to make the plant big? My biology teacher mom wants to use the plant in a year in one of her labs, but she needs a full-sized plant. Will the cutting become full-sized and spilling over the sides of the pot in a year or is that too little time?
I think you could easily have a big and happy plant by then! If you want a plant with several vines, not just one, then propagate a new cutting and plant it in the same pot every few weeks. I recently saw a video where someone took the vine and used a bobby pin to pin it back to the soil at one of the nodes, and she claimed that the vine would root there without having to cut it, and she said it made her plant big and fluffy. I haven’t tried it for myself, but it’s on my to-do list!
Leave a Comment Cancel Reply
Your email address will not be published. Required fields are marked *
Start typing and press enter to search
How To Propagate Wandering Jew In 2 Easy Ways
Tradescantia zebrina or Wandering Jew is a plant loved for its striking looks and hardy nature. These plants can be grown both indoors and outdoors in America. They thrive in warm climates and are pretty easy to take care of. Read on for a complete guide on how to propagate Wandering Jew in soil and water.
- 1.1 Step 1: Take Cuttings
- 1.2 Step 2: Prepare the Pot
- 1.3 Step 3: Aftercare
- 2.1 Step 1: Get Cuttings
- 2.2 Step 2: Prepare the Water
- 2.3 Step 3: Aftercare
- 3 When to Propagate Wandering Jew
- 4.1 General Care
- 4.2 Potential Problems
- 5.1 Do you cut above or below the node?
- 5.2 Can you propagate a Wandering Jew from a leaf?
How to Propagate Wandering Jew in Soil
Propagating Wandering Jew plants in soil takes a little more effort than propagating them in water. Both methods have a high success rate, so you don’t need to worry about your efforts going to waste.
Step 1: Take Cuttings
Taking cuttings the right way is crucial for propagation . Use a sterilized sharp blade or pruning shears for clean cuts. If possible, cut at a 45-degree angle to help the cuttings take root faster.
You need to cut below a leaf node. These leaf nodes will sprout roots for the propagated plant. If there aren’t any leaf nodes, just make a cutting below the newest leaf. Your cuttings should be about 4 to 6 inches long.
Let the cuttings dry out so they can form calluses. This protects the cuttings from rotting once they are planted.
Step 2: Prepare the Pot
Take a pot at least 6 inches tall with a draining hole and fill it with a good potting mix. Leave 1 inch of space at the top of the pot. You can also use a hanging basket as Wandering Jews look great in hanging displays.
Make 2-inch-deep holes in the soil and plant your cuttings in these holes. Make sure they are spaced out evenly and have enough space to grow. Pat down the soil around the cuttings to make them more stable.
Step 3: Aftercare
Make sure the pot stays in a well-lit area. Too much direct light will harm the cuttings, so keep the pots in a partially shady area that receives plenty of indirect sunlight. Water the pot evenly so that all the cuttings receive sufficient water.
Alternatively, you can secure a transparent plastic bag over the pot. This will trap the moisture and you will only need to water the plant once in a few weeks.
You will start seeing new growth in a month.
How to Propagate Wandering Jew in Water
Wandering Jews can be propagated in water too. This method works great for thick-stemmed plants and is a lot easier too. If you are an amateur gardener or don’t have too much time, you can try propagating your Wandering Jews in water.
Step 1: Get Cuttings
Take several cuttings from your Wandering Jew plant. Make sure to use a sterilized blade to eliminate the risk of disease. Make cuts at a 45-degree angle below the leaf nodes .
Leaf nodes are small stubby protrusions on the stems that grow into buds or leaves. This is where the roots will sprout during propagation. The cuttings should be at least 4-6 inches long.
Step 2: Prepare the Water
Take a clear glass or jar large enough for your cuttings. Ideally, the top should be wider than the bottom. Fill it with lukewarm water.
Before putting your cuttings in the water, cut off the leaves on the bottom part of the stem. If any leaves are left submerged in the water, they will start rotting. Add water whenever needed to maintain the water level.
Place the jar on a windowsill where it will receive partial sunlight. Too much direct sunlight can be harmful to the plant, so avoid south-facing windows.
You should start seeing roots within a couple of weeks. When they reach a length of 3-4 inches, you can remove them from the water.
Now that you know how to root Wandering Jew in water, you can plant them in a good potting mix and use a pot with a draining hole. You can plant many young plants together to create a nice, lush look.
When to Propagate Wandering Jew
Propagating Wandering Jew plants is very easy and has a high success rate. They are adaptable and can survive even if you neglect them a little.
There is no perfect time for propagating a Wandering Jew plant, they can grow in any kind of weather. So if you want to propagate your Wandering Jew, don’t worry about waiting for a particular time.
They will grow faster during the summer and spring than during the winter, but that doesn’t mean that they can’t be propagated during the winter. Wandering Jews are not winter-dormant.
Wandering Jew Propagation Aftercare
General care.
Caring for a Wandering Jew plant is fairly easy. It needs a moderate amount of water, so water deeply but let the soil dry out before you water again.
You can reduce the frequency of watering during the winter as they rest when the temperature starts dropping. These plants love warm weather and will thrive in summer and spring.
They don’t need a lot of fertilizer. Applying fertilizer twice a year is enough, ideally once in summer and once in spring.
Don’t place them in areas that get direct sunlight. Wandering Jews love warmth but direct heat will damage the stems. Find spots that receive filtered or indirect sunlight throughout the day.
Wandering Jews start getting leggy growth after 2-3 years. To grow a bushier plant, you can just snip off stems, propagate them, and plant them back in the same container as the mother plant.
Potential Problems
Be on the lookout for aphids. They are attracted to thick-stemmed plants and create a huge infestation if left unchecked.
Observing the leaves is a pretty good way to gauge if you’re watering the Wandering Jew plant well. If the leaves look washed out, start to lose their signature variegation or get droopy, you need to water it more.
On the other hand, if the leaves start turning yellow, you need to cut back. It could be a sign of root rot, which will kill your plant. Always let the soil dry out before you water again.
Do you cut above or below the node?

While propagating plants, always cut below the node. This way, when you propagate the cutting, the node will start growing roots. This works for both propagating in soil and propagating in water.
If you can’t find any nodes on the plant, you can cut below the freshest leaf for the same effect. Remember to remove the leaves by cutting them or twisting them off.
There shouldn’t be any leaves in the lower part of the stem that is buried in soil or submerged in water. If there are leaves on the lower part of the stem, they will start rotting during propagation and make the cutting unviable.
Can you propagate a Wandering Jew from a leaf?

It is not technically impossible, but it has a very low success rate. It is quite unlikely that a leaf will grow into a new plant. Frankly, it is a lot more trouble than it is worth.
We suggest you try propagating with cuttings either in soil or in water. If you don’t want to spend too much effort, you can propagate your Wandering Jew in water. It doesn’t need any care till you transplant the cutting to a pot.
How to Propagate Wandering Jew (4 Ways With Tips!)
True to its name, the wandering Jew is a plant that tends to spread quite wildly unless pruned regularly. So if you want to have more pots and hanging baskets filled with its gorgeous foliage without buying new ones from the nursery, use those pruned stems for propagation!
A wandering Jew plant can easily be propagated by 1) soil, 2) water, 3) division or 4) air layering. This plant is most commonly propagated using 4-inch stem cuttings with leaves and nodes which root quickly. Roots can start developing from the nodes within 2–14 days, while new shoots will grow after at least 1 month.
Most people think that the wandering Jew can only be propagated using cuttings—the conventional way. However, there are actually other less common ways this can be done. If you are a garden geek like us, you probably know some of them. But do you know all of them?
1. Soil Propagation (5 Steps)
More often than not, herbaceous wandering Jew cuttings are propagated in soil. This is done by 1) selecting a healthy stem with leaves, 2) cutting at least 4 inches of stem below the node, 3) trimming the leaves from the lower half, 4) preparing the medium-filled propagating container, and 5) placing the cutting 1 inch into the rooting medium.
If you’ve ever experienced propagating other houseplants such as pothos and peperomias , then you’re probably familiar with how to do this already.
Still, I encourage you to go over these simple steps to propagating wandering Jew ( Tradescantia spp.)—also known as spiderwort and inch plant. Doing so will help you remember important details that could help you avoid failure!
1. Select the Stem
For successful propagation, carefully check the parent plant and select stems from the wandering Jew shoots that have the best condition and color.
Now, I know that many people think that just getting any stem will do for propagation . However, it’s important to keep in mind that this can not only affect the success of propagation but also the development of the cuttings in the long run.
Propagating plants like wandering Jew from cuttings will result in new plants that are identical to their parent plants. In other words, growing new plants from healthy stocks will produce good-quality clones!
You want to look for shoots that are not mushy. It might sound weird but wandering Jew stems are naturally tender but firm. Unlike other plants, they don’t have woody stems because they are succulent plants.
The leaves on them should be full and have vibrant colors—be it green, yellow, purple, pink, white, or a mix of all that. As much as possible, don’t use stems with discolored leaves.
Pro Tip: Use gardening gloves while checking wandering Jew for the perfect cuttings to prevent contact dermatitis.
Closely inspect each stem for possible pests that you might not be able to notice at first glance. If necessary, you could use a Jeweler’s loupe or magnifying glass to really see whether unwanted guests are living in your spiderwort.
2. Cut the Stem
With an ideally sterilized or clean knife or gardening scissors, cut 4–6 inches of wandering Jew stem below a node at roughly a 45° angle. A single cutting should have 2 nodes and 4–6 leaves.
Regardless of the exact tool you’re going to use, it’s crucial to make sure it’s completely clean before using it to get cuttings from your parent wandering Jew plant. Otherwise, you may unknowingly spread or introduce diseases and pests.
Pro Tip: Sterilize knives and scissors by dipping them in 70% isopropyl alcohol. Then, you could either let them air dry or pat them dry yourself before using finally using them.
This does not apply if you, like myself, just end up using your kitchen scissors (as for my indoor plants I am often in a rush). Those scissors should not carry any plant-affecting disease.
For this step, you should keep your gloves on since the sap can be especially irritating. You don’t want it to come into contact with your skin.

Then, you could start cutting away as much of the tips or sections of the stem as needed. Some only take 2–3-inch (5–7 cm) cuttings of wandering Jew plants. Tips and section stem cutting will both work for spiderwort.
However, experts recommend having all cuttings that are a minimum of 4 inches (10 cm) long for higher chances of successful propagation.
At least 2 nodes should be present in each cutting because that’s where the roots will grow from. There should also be at least 2 leaves left to allow for the cuttings to continue growing thanks to photosynthesis even after they are separated from their parent plants.
3. Trim the Leaves
Trim the leaves from the bottom half of all wandering Jew cuttings while making sure to leave at least 2–3 leaves at the top half of the stems. These leaves will allow the plant to still convert sunlight into energy and growth.
Over the years, I’ve been told to do this and so I simply follow it. But more recently, I found out that there was actually an important reason behind this.
I mean, sure—having several leaves will generally ensure quick rooting in plants. However, too much of anything can be a bad thing. This is true for fresh cuttings with tons of leaves as well.
Keeping all the leaves on spiderwort cuttings, especially really lush and bushy ones, will result in excessive water loss. As a result, the cuttings may quickly wilt and go to waste.
This happens because plants lose a lot of the water they absorb through their leaves. During the early stages, it’s important to prevent this as much as possible since the cuttings can die from losing too much water—even more so in dry environments.
But don’t worry, the solution to this is pretty easy!
As a good rule of thumb, all inch plant cuttings should have the leftover leaves from their bottom half (2–3 inches or 5–7 cm) removed with clean pruning shears.
Leave 2 cuttings at the very list so that the cuttings can still photosynthesize after they are severed from their stock plants. Doing otherwise could result in wasted time and effort as a leafless wandering Jew cutting is likely to wilt and die.
4. Place Cutting in Soil
Clean 3–4 plastic pots should be filled with ideally but not necessarily sterilized propagation medium such as moss, perlite, and soil. Leave 0.5–1 inch of space below the rim to avoid spillage.
To be clear, you don’t have to buy brand-new nursery pots every single time you want or need to propagate plants. You can simply reuse old ones after cleaning them thoroughly.
Some even use recycled plastic cups and other similar containers such as yogurt cups, plastic cups, bottom halves of water bottles, etc. Do not be afraid to reuse old material hanging around your place!
However, if you don’t have any extra pots at home I recommend getting this pack of small 4-inch (10 cm) nursery pots with drainage holes and humidity dome covers from Amazon!
Others have also been able to have several cuttings root quickly even when several are planted in bigger 6–8-inch (15–20 cm) wide pots. So just do what’s best for your time and budget!
More importantly, you want to create a good growing medium so that your wandering Jew cuttings will root and grow well. Don’t just use regular potting soil which provides way more nutrients than necessary for a very young plant that’s starting from a cutting.
Rather, home gardeners should strive to create a propagating medium that allows for good aeration, drainage, and moisture retention. Oftentimes, a mix of peat moss , perlite , and soil works great to encourage rooting at the nodes.
When you’re not sure of whether the medium is sterile or not, just moisten it and lay it on a baking tray. Then let it heat up to about 150–200°F (65–93° C) for at least 30 minutes.
5. Place Cutting in Soil
Insert the wandering Jew cutting at least 1 inch deep into the moistened propagating medium. Then, lightly press the soil around it to ensure that it can stand on its own.
Normally, you’ll hear many people recommend applying rooting hormone at the ends of your cuttings. However, this isn’t necessary for wandering Jew cuttings since they will root quickly without it.
Also, it’s best to let the basal stems of certain species—like the T, fluminensis, T. zebrina, and T. padilla— dry and callus over for 1–3 days before continuing with this step.
If, however, your inch plant doesn’t need to scab over where it was cut from the parent plant, you can go ahead and lightly water the propagating medium so that it becomes moist.
View this post on Instagram A post shared by Naiya #pettingmyplants (@pettingmyplants)
Remember, the role of your propagating medium—whatever it may be—is to not only support wandering Jew cuttings but to also keep it adequately moist. So if you don’t water it beforehand, the cutting will wilt just a few days after being put into the soil .
Your spiderwort cutting should be inserted by more or less 1–2 inches (2–5 cm) into the medium so it can stand by itself. Gently pat down the soil around the cutting to help it stay in place.
Once you’re done with everything, you can expect roots to start growing in as little as only a week—provided that it is kept with ideal growing conditions.
2. Water Propagation (4 Steps)
Similar to soil propagation, herbaceous wandering Jew cuttings are needed for water propagation. Do so by 1) selecting healthy stems, 2) cutting a 4-inch stem below the node, 3) trimming leaves from the bottom half, and 4) placing the cutting into a container filled with clean lukewarm water.
Propagating spiderwort cuttings in water isn’t really that much different from propagating them in soil. However, there are key differences between the two. Learn more about this as you continue scrolling through the article!
Although you can virtually propagate any stem you prune off the parent plant, they won’t have equal chances at successful propagation.
Check your parent wandering jew plant to pick out the shoots with the best growth. Only select tender but firm shoots to take cuttings from. Their leaves should also be in good condition and color.
Using regular gardening scissors, collect wandering Jew stem tips or sections that are 4–6 inches (10–15 cm) long by cutting each one at a 45° angle below the lowest node.

Ideally, each cutting should have 2 nodes in total and about 4–6 leaves along the entire stem. However, it’s better to have most if not all the stems by the top half.
Remove excess leaves from the lower half of all your wandering Jew cuttings. This is important for preventing excessive water loss as the cuttings cannot properly absorb water until they grow roots.
Again, it’s best to have most if not all leaves by the top half of the cutting so they don’t sit on water and rot during the propagation period.
4. Place Cutting in Water
Wandering Jew cuttings propagated in water are best kept in narrow-mouthed containers for support. This prevents them from getting fully submerged in water.
For this method, you don’t really need to use any “special” water such as distilled water which can be bought by the gallon. More often than not, regular room-temperature tap water can be used.
If, however, you want to be extra careful, you can simply use dechlorinated or filtered tap water. Rainwater will do quite well too if you have any stored at home.
View this post on Instagram A post shared by Wall of Crafts (@wall_of_crafts)
Personally, I think sterilized old glass bottles are the best containers to use for water propagation. Their narrow mouths are wide enough to let the lower half of wandering jew cuttings come into contact with water.
At the same time, the narrow mouths of glass bottles prevent the colorful foliage of inch plants from drowning and rotting in water. Remember, you only want to keep the nodes underwater for rooting, not the entire cutting.
Just keep in mind to regularly top off or replace the water as well to prevent the buildup of bacteria and other nasty—probably harmful—microorganisms in your propagation water. Do so every 1–3 days.
When you’re done with all that, you can start seeing root growth from the nodes in as little as 2–4 days. However, it’s best to let a cutting’s root system fully develop for a couple of weeks before transplanting it into a soil-filled pot.
Alternatively, water-propagated wandering Jew cuttings can be grown permanently in water to avoid transplant shock. This is possible through hydroponic systems like the simple Kratky method.
3. Propagating by Division (4 Steps)
Propagate mature wandering Jew plants using division during spring by 1) completely taking out the plant from the pot, 2) gently sectioning it off by 1–3 shoots, 3) trimming each division, and 4) placing each division in individual containers.
What many people seem to be unaware of is that the beautiful wandering Jew plant can be propagated without taking cuttings and waiting for them to root. In fact, a single spiderwort can be readily divided into multiple rooted plants!
1. Take Out the Entire Plant
Carefully ease the wandering jew, along with its well-developed root system, out of its original container. Don’t just pull it out with brute force!
This is most easily done with plastic pots as they can be repeatedly—but softly—squeezed until the root and soil inside have loosened up. Others have also used butter knives to loosen potted inch plants from their containers by scraping them against the inner walls.
Either way, as mentioned earlier, it’s best to wear gardening gloves while doing this. It will help you avoid suffering from skin irritation.
2. Divide by the Roots
Using your hands, gently pull apart the clumps of soil and spiderwort roots you’ve unearthed from the pot. Remember to do this only after the wandering Jew comes out for a period of activity. Simply put, it’s best to divide wandering jew plants for propagation during spring.
To avoid having all these messing up your home, I suggest dividing your spiderwort in the garden, garage, or inside a collapsible plastic playpen or kiddie pool.

Even a simple old baking tray will do well in catching all the loose dirt and plant material that will accumulate as you work on sectioning out your wandering Jew. Each section should ideally have 1–3 shoots or stems and as many roots retained as possible.
If you still can’t properly divide each section with your gloved hands alone, you can either use a clean knife or spade. Just be careful not to damage too many roots.
3. Trim Each Division
Afterwards, clean up each section by trimming away discolored and dry foliage. Normally, you’ll find these by the lower half of your wandering Jew sections.
When you spot any flowers, it’s best to pinch them off as well. A lot of tradescantia plants are actually sterile and don’t produce seeds. Besides that, varieties and cultivars that do produce seeds from their blooms don’t always grow plants that resemble their parent plants.
So it’s better to remove unnecessary flowers while your spiderwort sections are still recovering. In doing so, the divisions can redirect their energy from flowering to growing.
4. Place Divisions in Separate Containers
Finally, you can plant each wandering Jew division in its own container so that it has plenty of room for growth.
When the nodes of wandering Jew plants meet the soil, they will start growing roots there and develop new shoots to produce bushier inch plants.
Alternatively, you can simply grow a bunch of the sections, a few inches apart, directly in your yard or in a big shallow planter. This will make it look fuller and denser instantly.
4. Propagating by Air Layering (4 Steps)
A wandering Jew plant can be propagated through air layering by 1), selecting a good stem section with 1–2 leafless nodes 2), wrapping moist long fiber moss around the nodes 3) securing moss layer with plastic and strings, 4) cutting the rooted section after 1–2 months, and 5) planting it in a new pot.
Though it’s more commonly used for propagating woody plants and trees that are best grown outdoors, it’s possible to also air layer houseplants like wandering Jews!
Now, some may view this method as troublesome but most experienced home gardeners say that all the hassle is worth the end result. That said, if you think this will take too much time and effort, you can just do any of the earlier techniques I’ve already discussed.
1. Select a Stem Section
When you can, try to find leafless nodes on the shoots of your spiderwort plant. This helps you do away with trimming vibrant leaves that are already in perfect condition.
If you can’t find bare nodes, you’ll have to trim off leaves from 1–2 inches (2–5 cm) above and below the node.
In comparison to layering trees and other plants with woody stems, air layering wandering Jew doesn’t require you to wound the plant at all. The inch plant readily roots as long as its nodes are constantly touching a moist medium. Rooting powder is not even needed!
Plus, a great advantage to air layering is that you can guarantee successful propagation of wandering Jew with little to no risks.
Unlike propagation using cuttings, air-layered foliage plants are unlike to fail. They won’t suffer from water stress and significant carbohydrate loss since they are still connected to the stock plant while forming roots.
2. Wrap Moss Around Node
Rather than going for cut-up sphagnum moss, I suggest you buy dried long-fiber moss instead. Choosing moss with longer strands will allow you to easily wrap them around the node completely.
I recommend this 2-pound bale of dried sphagnum moss from Amazon.
Before you do that, make sure to properly rehydrate the moss you’ll be using first. You can use regular tap water for this as well. Then, squeeze out all the excess water to prevent the plant’s stem from getting too wet.

Once you start wrapping moist moss around the moss, continue until one or two nodes are completely covered by about 0.5–1-inch (1–2 cm) thick layer of moss all around.
3. Secure Moss With Plastic
Despite what other people may make you think, you don’t really need to buy expensive gardening tools and equipment to properly air-layer your wandering Jew.
To ensure constant contact between the node and moist moss, they should be snuggly secured together using a regular clean plastic bag. You can also use some plastic cling wrap. After that, use some strings or twist ties to keep it in place.
But make should this won’t be too difficult to undo because you will need to remoisten the moss regularly. Otherwise, no root will develop on the nodes.
If you do have the money for it, you can opt to use air layering pods ( here on Amazon) instead. When we consider long-term use, they may even be the most cost-effective as they can be cleaned and reused multiple times without any issues whatsoever.
4. Cut Rooted Stem Section
In a couple of weeks, you’ll be able to see roots grow from the nodes through the clear plastic wrapped around the stem section’s node. But don’t be in a hurry to cut it.
Wait for about 1–2 months until the root system of your sectioned wandering Jew stem is relatively established. Then, unwrap the plastic and gently remove the moss surrounding the node and the roots.
Using clean pruning shears, cut off the air-layered spiderwort shoot below the developed root ball of the stem section. You also want to softly lift the roots so that you can trim the excess stem hidden within the root ball.
5. Plant in New Pot
After cleanly cutting off the air-layered stem section along with the formed root ball, the propagated wandering Jew plant can now be planted and grown in its very own pot.
But to ensure that it doesn’t wilt after being separated from the mother plant, keep the newly potted spiderwort section loosely covered with a clear plastic bag for a whole week or so.
This will act as a mini growing tent to maintain moderate to high humidity for the developing plant.
3 Important Care Tips for Rooting Wandering Jew Cuttings
Wandering Jew cuttings should be provided with 1) diffused light from southern windows, 2) warm temperatures between 70–75°F, and 3) 60% humidity. These conditions should be maintained while the spiderwort cuttings are rooting.
I’ve heard some say that light is not necessary for good rooting. However, this is not true. Rooting wandering Jew cuttings do well with bright but diffused indirect light. This can be replicated indoors by placing your cuttings near south-facing windows.
Providing little to no light to propagating wandering Jew cuttings will result in slow rooting. Conversely, intense and direct sunlight exposure will cause leaves to burn or drop.
Keeping the rotting medium warm and no colder than 70°F or 21 ° C using seedling heat mats will also encourage rapid rooting for this colorful foliage plant.
While maintaining warm temperatures for your inch plant warm, it’s also important to provide relatively high humidity to keep the medium moist. The medium should never dry out completely during this period.
That said, you don’t want to cut off airflow completely. Otherwise, the cuttings may start rotting away. So when you place a plastic cover for humidity retention, make sure to air it out every now and then.
If you keep all of these things in mind while you propagate your own inch plant at home, you can expect to see new succulent shoots and colorful leaves growing after 1–2 months.
When should you get wandering Jew cuttings?
Herbaceous stem cuttings from wandering Jew plants are best taken during seasons when it’s actively growing. More specifically, wandering Jews are best propagated from cuttings anytime between spring and summer. If possible, the parent plant should also be watered the day before cuttings are taken from it.
Can you propagate a wandering Jew from just a leaf?
Wandering Jew plants cannot be propagated from leaves alone. Propagating from the leaf alone will only be a wasteful failure as it does not grow roots from its leaves. Generally, a cutting with at least 1 node along with 1 set of leaves is needed for propagation as roots grow from that area of the wandering Jew.
Do wandering Jew plants like to be rootbound?
Contrary to popular belief, wandering Jew—and any other plant for that matter—does not like being root or pot-bound. Rather, it will require repotting. Plants that are typically grown in containers such as wandering Jew experience stunted growth when root-bound. More importantly, root-bound plants are more susceptible to root rot and plant death.
How fast do wandering Jew plants grow?
Wandering Jew is a creeping perennial plant that most experts consider fast-growing . However, some varieties and cultivars may have more rapid growth than others. It is estimated that this plant can grow up to approximately 1 inch (2 cm) per 1–2 weeks, earning its other nickname—the inch plant. Propagated cuttings typically root within a week too.
Summary of How to Propagate Wandering Jew
Wandering Jew plants can easily be propagated using stem tip or section cuttings left to root in either a soil-based growing medium or clean lukewarm water. These are the most popular and common ways of propagation for inch plants.
To ensure the successful growth of more mature wandering Jew sections after propagation, home gardeners can opt to divide or air-layer established plants instead. New inch plants obtained from such methods are less likely to die compared to cuttings.
If grown in an environment with diffused light, warm temperatures, and relatively high humidity, wandering Jew cuttings can grow roots from their nodes within 2 weeks. Well-kept cuttings are also likely to develop new shoots and leaves 1–2 months after propagation.
- “Tradescantia” by n/a in N.C. Cooperative Extension
- “Ornamental Production” by n/a in Aggie Horticulture
- “Home Propagation of Houseplants” by n/a in University of Missouri Extension
- “Propagating Houseplants” by Gerald Klingaman and Janet Carson in University of Arkansas System Extension
- “Plant Propagation” by Susan M. Bell in University of Idaho Extension
Similar Posts
How to care for cast iron plants (and keep them healthy).
Cast iron plants are aptly named due to how resistant they are to various forms of neglect. Although they’re one of the easiest plants to care for, unfortunately, this means they are also one of the easiest plants to forget. To help you avoid that pitfall, here is a step-by-step guide on how to ensure…
How to Care for Philodendron Birkin – The Basics
Philodendron birkins are beautiful, tropical plants covered in stripes. Caring for these plants is easy, but are there any misconceptions you should avoid? The truth is, yes! Here are some of the factors you should keep in mind when caring for this plant. To grow philodendron birkin successfully, they must be grown in terracotta pots,…
20 Stunning Fast-Growing Indoor Plants for Your Collection!
Gardening requires a lot more patience than we’d like sometimes. While there is no such thing as a plant that will grow instantaneously, there are a few plants that grow a lot faster than the average houseplant! The 20 fastest-growing plants to grow indoors are: Plants can be notoriously slow at times and it can…
9 Reasons Why Wandering Jew Plants Turn Brown (How to Prevent It!)
The colorful foliage of a wandering Jew, also known as an inch plant, is incredibly striking. So there’s no surprise that they’re popular houseplants. But sometimes, their vibrant hues fade and turn brown! Wandering Jew plants turn brown because of 1) natural aging, 2) underwatering, 3) overwatering, 4) excessive sunlight, 5) high temperatures, 6) low…
How to Take Care of Rainbow Moss (The Final Guide!)
The rainbow moss, or peacock fern, is nearly impossible not to take home upon first sight. Its shimmery iridescent leaves are hard to find in plants. But it also needs a lot of care and attention. To help you take care of your rainbow moss, here’s everything you need to know! For successful growth of…
9 Reasons Why Wandering Jew Drop Leaves (With Solutions!)
One of the features I love the most of tradescantias is their striking foliage, especially varieties that are variegated. So as you can imagine, it’s never a fun experience to see a wandering Jew plant lose its leaves! A wandering Jew plant will generally drop and lose leaves because of 1) overwatering, 2) underwatering, 3)…
- PRO Courses Guides New Tech Help Pro Expert Videos About wikiHow Pro Upgrade Sign In
- EDIT Edit this Article
- EXPLORE Tech Help Pro About Us Random Article Quizzes Request a New Article Community Dashboard This Or That Game Popular Categories Arts and Entertainment Artwork Books Movies Computers and Electronics Computers Phone Skills Technology Hacks Health Men's Health Mental Health Women's Health Relationships Dating Love Relationship Issues Hobbies and Crafts Crafts Drawing Games Education & Communication Communication Skills Personal Development Studying Personal Care and Style Fashion Hair Care Personal Hygiene Youth Personal Care School Stuff Dating All Categories Arts and Entertainment Finance and Business Home and Garden Relationship Quizzes Cars & Other Vehicles Food and Entertaining Personal Care and Style Sports and Fitness Computers and Electronics Health Pets and Animals Travel Education & Communication Hobbies and Crafts Philosophy and Religion Work World Family Life Holidays and Traditions Relationships Youth
- Browse Articles
- Learn Something New
- Quizzes Hot
- This Or That Game New
- Train Your Brain
- Explore More
- Support wikiHow
- About wikiHow
- Log in / Sign up
- Home and Garden
- Planting and Growing
A Step-By-Step Guide on Propagating and Growing Inch Plant
Last Updated: November 4, 2023 Fact Checked
Propagating in Water
Propagating in soil, after rooting.
This article was reviewed by Ben Barkan and by wikiHow staff writer, Eric McClure . Ben Barkan is a Garden and Landscape Designer and the Owner and Founder of HomeHarvest LLC, an edible landscapes and construction business based in Boston, Massachusetts. Ben has over 12 years of experience working with organic gardening and specializes in designing and building beautiful landscapes with custom construction and creative plant integration. He is a Certified Permaculture Designer, is licensed Construction Supervisor in Massachusetts, and is a Licensed Home Improvement Contractor. He holds an associates degree in Sustainable Agriculture from the University of Massachusetts Amherst. There are 10 references cited in this article, which can be found at the bottom of the page. This article has been fact-checked, ensuring the accuracy of any cited facts and confirming the authority of its sources. This article has been viewed 12,039 times.
Inch plant ( Tradescantia zebrina ), also known as wandering Jew, silver inch, and spiderwort, is a colorful and easy-to-care-for plant that thrives in basically any environment. Propagating this vivid houseplant is an absolute breeze and if you’re a novice plant enthusiast, you’ve picked an excellent species to work with. Just FYI, after you take your cutting you can grow the plant in water or soil, but both options work well. In this article, we’ll walk you through the process from start to finish! As an important note, the name “wandering Jew” is actually pretty offensive, as the name is supposed to reflect the fact that the plant is invasive. There’s a big movement to use “wandering dude” instead. Aside from being more compassionate, we think that’s also just a cooler name. [1] X Research source
Things You Should Know
- Cut 4–6 inches (10–15 cm) of the inch plant’s stem and place it in water to propagate the plant.
- If you want to place the cutting in soil, put a plastic bag over the top of the plant and wait for expansive growth.
- Keep your inch plant in a bright area with plenty of indirect light and water it whenever the soil dries out entirely.

- If you want to propagate multiple cuttings, repeat this process as many times as you’d like. You can propagate multiple cuttings in the same container if you’re placing them in soil. If you’re using pots of water, get a separate container for each cutting.
- Leaving a node at the bottom will give the plant a place to develop roots. If you cut through or over a node, your plant won’t develop.
- Fun fact, the name “inch plant” comes from the nodes appearing every 1 in (2.5 cm) on the stem. [4] X Research source

- Inch plant grows like crazy, so this is totally optional. Don’t worry if you skip the rooting hormone.

- Most plant enthusiasts think it’s easiest to propagate inch plant in water. Both water and soil will work, though!

- Inch plant is really not difficult to care for at this stage. Just leave the plant alone and it’ll begin to thrive!

- You can also leave the inch plant in the water. It’ll continue to grow and thrive in water—it just won’t grow as thick and bushy as it will in soil.

- Inch plant is not a tepid grower. It’ll fill whatever pot you put it in and then some. If you want a giant plant, put it in a bigger pot!
- You can propagate multiple cuttings in a single pot if you’d like.

- If you’re propagating multiple cuttings, space them out evenly around the middle of the pot.

- This will lock the moisture from the soil in and keep your cutting moist.

- Take the plastic bag off and remove the rubber band.

- You can 100% place the plant outside so long as it doesn’t get lower than 60 °F (16 °C) at night, but bring the pot inside during the winter months.

- This is partly why inch plants are such popular options for new plant enthusiasts who aren’t comfortable tackling plants with tougher care regimens. When it comes to temperature and sunlight, your inch plant wants all of the same things you do!

- If you’re keeping the inch plant in water, just replace the water every few weeks or whenever the water gets dirty.

- If the leaves start losing color, it’s a sign that you’re either watering too often or not often enough.
- The inch plant will shed dead leaves periodically whenever it experiences new growth. Don’t worry—this is totally normal.
- Inch plants tend to droop and hang when they grow larger. If you want a bushier plant, trim back the excess growth periodically to keep the plant smaller. It’ll thicken up and grow like a shrub. Now all you have to do, is continue caring for your plant !
Expert Q&A
- Inch plant actually comes in 4 different varieties, although most people picture the species with the purple leaves and green streaks. Every variety is cared for the same way. [18] X Research source Thanks Helpful 0 Not Helpful 0
- Inch plant is extremely easy to propagate. If you’ve decided you wanted to turn your home into a tropical paradise full of plants, the inch plant is an incredible option to get started. [19] X Trustworthy Source University of California Division of Agriculture and Natural Resources Extension program of the University of California system devoted to educating and improving local communities Go to source Thanks Helpful 0 Not Helpful 0
- You can propagate inch plant outdoors at any point in any season so long as the temperature levels don’t drop below 60 °F (16 °C). Thanks Helpful 0 Not Helpful 0

You Might Also Like

- ↑ https://www.tabletmag.com/sections/community/articles/uprooting-the-wandering-jew
- ↑ https://ipm.missouri.edu/MEG/2018/1/cleaning_pruning_tools/
- ↑ https://www.montana.edu/extension/broadwater/blog-article.html?id=21879
- ↑ https://plants.ces.ncsu.edu/plants/tradescantia-zebrina/
- ↑ https://www.uaex.uada.edu/publications/PDF/FSA-6024.pdf
- ↑ https://aggie-horticulture.tamu.edu/ornamental/a-reference-guide-to-plant-care-handling-and-merchandising/propagating-foliage-flowering-plants/
- ↑ https://extension.missouri.edu/publications/g6560
- ↑ https://www.epicgardening.com/wandering-jew-plant/
- ↑ https://laidbackgardener.blog/2019/04/30/dying-leaves-on-a-wandering-jew/
- ↑ https://ucanr.edu/blogs/blogcore/postdetail.cfm?postnum=45719
About This Article

- Send fan mail to authors
Did this article help you?

Featured Articles

Trending Articles

Watch Articles

- Terms of Use
- Privacy Policy
- Do Not Sell or Share My Info
- Not Selling Info
Get all the best how-tos!
Sign up for wikiHow's weekly email newsletter
How To Propagate Wandering Jew? [COMPLETE BEGINNER’S GUIDE]
Wandering Jew, also known as Zebrina pendula and a native of Mexico, is a fast-growing plant with dangling branches and purple and green leaves frequently striped with silver. Wandering Jew thrives outside U.S. Department of Agriculture plant tolerance zones 9 through 11. It is a warm-climate plant that is typically grown indoors.
The wandering jew can be propagated in either soil or water. To propagate it in soil, you will have to make a cutting and plant them in a hole inside a soil-filled pot and water them. The cuttings will be inside a jar of water, and the bottom leaf node will have to be submerged.
The wandering jew is very simple to spread. It can be grown in a pot like a bonsai or, for a more rustic appearance, you can allow it to grow naturally enough to fit in a dangling container and let its branches hang from your window.
How To Propagate Wandering Jew In Soil
Plants of the Wandering Jew can be multiplied successfully and easily; they can adapt and live even if you give them little care. A Wandering Jew plant may grow in any climate; thus, there is no ideal season to propagate them. So do not bother awaiting a specific period if you want to grow your Wandering Jew .
Although they will grow more quickly in the spring and summer than in the winter, this does not preclude their propagation in the latter season. Jews on the move are not dormant in the winter. Propagating requires a little more work to grow wandering Jew plants in soil than in water.
You do not have to be concerned about your efforts being in vain because both techniques have a success rate. Proper cutting preparation is essential for proliferation. For clean cuts, use pruning shears or a sharp blade that has been sanitized; to aid in the cuttings taking root more quickly, if at all feasible, cut at a 45-degree angle.
A leaf node must be below the cut line; for the propagated plant, roots will emerge from these leaf nodes. Make a snip below the most recent leaf if there are no leaf nodes; your cuttings must be between four and six inches long. The cuttings should air dry so they can develop calluses.
When the cuttings are planted, this prevents them from decaying; fill a pot with a draining hole at least 6 inches in height with a quality potting mix. Leave a gap of 1 inch at the pot’s top. Wandering Jews look excellent in hanging displays, but you might also use a dangling basket.
Plant your cuttings in 2-inch-deep holes you have dug in the ground; ensure they have adequate room to grow and are distributed equally. To make the cuttings more sturdy, compact the soil around them. Keep the pot in a well-lit place at all times.
The pots should be kept in a shaded area with lots of indirect sunshine because excessively direct light will kill the cuttings. Water the pot uniformly to ensure that all cuttings get enough water.
Alternatively, you might cover the pot with a clear plastic bag. You would only need to water crops once every few weeks to keep the moisture. In a month, you will start to notice fresh growth.
How To Root Wandering Jew
If you decide to plant your stem in the soil to root it, you will want to begin with the correct soil type to give it the highest chance of succeeding. Make sure to use soil that drains effectively. To prevent your stem from rotting before it has an opportunity to develop roots, you should avoid using too heavy soil.
Make sure the soil is quite wet after selecting the appropriate type. To accomplish this, put your soil in a sizable container and immerse it in water for a short while, breaking up any soil clumps. Take a handful of the soil when it has been completely moistened, and press out as much moisture as possible.
Put that soil in the pot you will be using, breaking it up once more as you do so. After adding a top-notch propagation promoter, plant your stem directly in the ground. Even though it is not often necessary, a propagation promoter will help your new plant resist bacteria and have faster-growing roots.
The Wandering Jew needs to be rooted in water differently; for maximum results, fill your container with non-chlorinated, room-temperature water. Place the plant cutting inside the water after mixing your propagation promoter. Within a week, you will start to notice fresh root growth.
Your stem will have developed a strong set of roots after two weeks, and if you decide to propagate in water, it should be moved to well-draining potting soil to continue growing. After about a month, you will notice fresh growth above the dirt. Remember that the position of your plant in your house can affect the rate of germination and the timing of new growth.
The location of your new plant should be in a well-lit place that is out of direct sunlight. Depending on how quickly you notice improvement with the new plant or if the plant starts to look dull, you might need to change the location of your plant.
Wandering Jew Cuttings
These houseplants grow quite quickly; pruning is essential for proper growth. Your plant will grow new growth if you prune it. It is ideal for pruning long stems from old, healthy plants and rooting them next to the mother plant in the same container. The most efficient technique to multiply a Wandering Jew plant is stem cutting.
It is not as challenging as it might sound; take a cutting from the existing plant and allow it to establish roots so it can develop into a new plant. By taking slips, sometimes referred to as cuttings, from a mature, healthy plant, wandering Jews can be easily rooted. Under a node, which is a tiny, budlike projection where a leaf or bud is starting to develop, cut the stem using clean, precise scissors.
New roots begin to form here when the plant is being propagated. Cut the stem slightly below the most recent leaf if there is not a node visible. The best-rooted cutting is between 4 and 6 inches long.
Wandering Jew Plant Care
You could let the soil dry up between waterings for wandering Jew plants because they can thrive even with little neglect. Watering should be reduced in the winter when growth is slower. If necessary, fertilize your wandering Jew every two weeks during every summer and spring by applying a water-soluble fertilizer diluted to half-strength.
Your spiderwort plant might lose some of its foliage towards the base of the stems in the first year of growth. When a plant looks lanky, instead of pruning it back to make it look fuller, take cuttings from healthy stems and grow them in the same pot as the mother plant. Remove leaves that are fading or dried out.
Despite their considerable adaptability, spiderwort plants prefer medium to strong indirect light to grow. Move it to a brighter location if you notice the leaf marks disappearing, but ensure it is out of strong sunlight.
Brighter environments increase the likelihood of flowering in plants. Put your wandering Jew in potting soil that is all-purpose and well-drained. It will thrive in a warm, moderate environment with temperatures ranging from 55 to 70 degrees.
Final Thoughts
Due to their extreme hardiness and ability to adapt to various humidity levels and environmental factors, wandering Jews are simple to reproduce. They only need a little tender loving care. Aphids are to be avoided; they are drawn to plants with strong stems and, if unmanaged, can grow into a massive infestation.

Victoria is the owner and main author of hobby plants. She loves spending her free time in her garden planting and taking care of her plants. Victoria hopes you enjoy the content here!
Related Posts:
![How To Propagate Pothos? [COMPLETE BEGINNER'S GUIDE]](https://www.hobbyplants.com/wp-content/uploads/2022/07/how-to-propagate-pothos-300x158.jpg "How To Propagate Pothos? [COMPLETE BEGINNER'S GUIDE]")
IMAGES
VIDEO