- Coil Over Shocks & Bypass Shocks for Trucks
No products in the cart.
Return to shop
- 2.0″ Coil Over Shocks
- 2.0″ Coil Over Shocks w/ Reservoir
- 2.0″ Reservoir Shocks
- 2.0″ Emulsion Shocks
- 2.0 Coil Over Kit
- 2.5″ Coil Over Shocks
- 2.5″ Coil Over Shocks w/ Remote Reservoir
- 2.5″ Bypass Shocks
- 2.5″ Emulsion Shocks
- 2.5″ Reservoir Shocks
- 2.5 Coil Over Shock & Spring, 2-Corner Kits
- 2.5 Coil Over Shock & Spring, 4-Corner Kits
- 2.5 Coil Over w/ Remote Reservoir Shock & Spring, 2-Corner Kits
- 2.5 Coil Over w/ Remote Reservoir Shock & Spring, 4-Corner Kits
- 3.5″ Reservoir Shocks
- 3.5″ Piggyback Bypass Shocks
- 2.5″ Springs
- 3.0″ Springs
- 3.75″ Springs
- OEM Springs
- Viper LS Valve Spring Kit
- Steering Stabilizer
- 2.0″ Bumpstops
- 2.5″ Bumpstops
- Bumpstop Kits
- Bumpstop Parts
- 2.0″ Parts
- 2.5″ Parts
- Shock Rebuild Kits
- Shock Tools
- Rod End Kits
- F-O-A 3.0 Inch Axle Mount Shock Tabs, 2-pack
- F-O-A Angled Shock Tab, 2-pack
- F-O-A Flat Bottom Shock Tabs, 2-pack
- F-O-A Shock Reservoir Mounting Kit
- Ford F250 & F350 Billet Coilover Conversion Mounts
- Billet Coil-Over Adapter
- Anodized Billet Shock Reservoir Clamp
- Coil Over Towers
- Accessories

Uncategorized
The basics of long-travel suspension design, why you need a long-travel suspension system, basics of off-road suspension.
- Limit straps
- Coil over shocks
- Coil over springs
- Upper and Lower control arms
Installing a Long-Travel Suspension Kit
Find the parts you need today.

- Search for:
Username or email address *
Password *
Remember me Log in
Lost your password?
Username *
Email address *
- Mods 1 – Getting Started
- Mods 2 – Tire Size Guide
- Mods 3 – Tire Buying Guide
- Mods 4 – Performance
- Mods 5 – Lift & Level Kits
- Mods 6 – Grille Kits
- Mods 7 – Headlights
- Mods 8 – Fog Lights
- Mods 9 – Rock Sliders
- Mods 10 – Roof Racks
- Mods 11 – Front Bumpers
- Mods 12 – Rear Bumpers
- Mods 13 – Skid Plates
- Mods 14 – Wheels
- Switch Systems
- Rooftop Tents
- Acc Lighting
- Tail Lights
- Rock Sliders
- Skid Plates
- Front Bumpers
- Rear Bumpers
- Accessories
- Recovery Gear
- Refrigerators
- Trail Tested
- Maintenance
5th Gen Mods , Feature Friday , Off-Road , Overland , Suspension , Trail Tested
Feature friday: 10 must-see 5th gen 4runner long travel suspension setups.

Looking for a Wide Stance & Tons of Suspension Travel? Check Out These 10 Unique 5th Gen Toyota 4Runner Long Travel Off-Road & Overland Builds
This Week’s Topic: Long Travel 4Runners
Holy smokes do we have some awesome rigs for you for this Feature Friday! This week we are cranking up the suspension dial WAY past 11 with these 10 killer long traveled 5th Gen 4Runner builds.
So real fast, what is long-travel suspension?
The whole point of long travel is to gain better performance off-road, and more specifically for high-speed off-road applications.
In terms of parts, a typical lift kit allows you to gain more ground clearance by increasing your overall ride height. In simple terms, most common lift kits only require upgraded coilovers, extended rear springs, and maybe some upper control arms if needed/recommended for the lift height. Some of the options might just increase overall performance and some might actually give you more travel. That’s usually where 95% of us would stop and call it a day. Not these dudes…
Long travel kits use that same suspension upgrade concept and then take it to the next level with extended length coilovers, and in some cases, secondary shocks with remote reservoirs for increased damping for compression/rebound.
A long travel kit, due to changes in suspension geometry, will allow for increased wheel travel over factory suspension and assist you with running larger tires. To achieve additional “longer” wheel travel, these kits start with extended lower control arms (LCAs), upper control arms (UCAs) and build from there.
In addition to extended-length upper and lower control arms, most long travel kits will have upgraded wider/stronger axles with stronger joints, extended tie rods, limit straps, extended-length bump stops, and other strength enhancements like gusseted spindles, and gusseted control arm mounts.
For the rear of the 4Runner, a long travel kit will require extended brake lines, upgraded trailing arms, extended height springs, increased travel shocks, and of course, extended length bump stops. When it comes to shocks for long travel kits, they typically feature adjustable remote reservoirs to allow the internal shock body oil to stay within peak operating temperature while the suspension is aggressively cycling, as well as the ability to tune the ride.
Now enough talking, let’s see these rigs in action!!
10 Epic 4Runners with Long Travel
1. adam wolfe ( @builtbysquirrels ) – 2018 trd or.

Long Travel Suspension Details
- LSK 4.5” Prototype Kit
- Boxed LCAs with Recessed Shock Mounts & 1.5” Horizontal Uniball
- Built-in Air Bump Pads & Delrin Bushings
- Boxed UCAs With Heims & Vertical Uniball
- Fully Boxed Spindle Replacement with Dual Shear Steering
- ADS 8” Shocks with Reservoirs & 600lb 18” Springs
- ADS 2.125X2 Air Bumps
- Sway Bar Delete
- 12” Radflo Shocks
- Dobinsons 59-677V Springs
- DuroBumps Bump Stops
- 22” Brake Lines
What Do You Like About Your Setup?
I loved working with LSK Suspension to R&D a 4.5+ LT kit for the 5th Gen 4Runner. From start to finish, they were fantastic with a quick turnaround on sending new parts to swap out ones that weren’t working for this build. This finalized kit is incredible! Everything from the build quality to their customer support, I’m very happy with the choice of going with LSK.
But we’re not here to talk about the company, you’re here to know what it rides like. The answer is simple, it’s like a cloud off-road. The suspension articulates flawlessly while the wheels feel solid and planted. I just point and go, and the 4Runner takes me. Just a friendly reminder though, you’re 9” wider than stock. Having 17×9 wheels with a -12 offset and 35×12.5 tires, puts the outside tire to the outside tire to 89” wide. I believe the kids would call it THICCC . That being said, it’s unlike any other kit on the market and the only one with the upper and lower uniballs on the spindle for the 4runner.
2. Jonathan Armada ( @NC.4Runner ) – 2013 SR5 Premium

- Radflo Shocks/Coilovers
- Radflo Hydraulic Bump Stops
- Total Chaos +2 UCAs
- Total Chaos +2 LCAs
- Dobinsons Rear Arms
- Dobinsons Rear PHB
- Dobinsons Springs
I love how well the 4Runner rides with this suspension set up from Radflo.
The hydro bumps on all 4 corners keep the vehicle handling as if it still had sway bars. The 4Runner crawls really well since I’m able to keep all the tires on the grounds while the rig is articulating. The wider track also gives the 4Runner a better stance and stability off-road as well. And lastly, you can’t forget about that look!
3. AB Castro ( @Dj_ayybeats ) – 2005 SR5 2WD

- Dirt King 3.5+ Long Travel Kit
- Dirt King Upper Arm Sheer Kit
- Dirt King Bypass Shock Hoop Kit
- King Shocks Long Travel Spec 2.5 x 8” Coilovers
- King Shocks Long Travel Spec 2.5 x 8” 3 Tube Bypasses
- Camburg 4” Performance Spindle
- King Shocks 12” Triple Bypasses
- Califabrication Rear Shock Relocation
- Califabrication Adjustable Upper, Lower Links and Panhard Bar
- Dobinsons 3” Dual Rate Coils
- Locked Off-Road 2.0 x 2” Threaded Bump Stops
- Yukon 4:88 Gears
I like that I can daily my vehicle while still being able to take it off-road whenever I want.
This 4Runner is able to withstand the punishment I put it through whenever I take it out on the trail without any hiccups. The setup is simple yet so unique in its own way. This rig is definitely a neck breaker whenever I take it out on the streets or off-road.
Jon’s Note: Yes I know this is 4th Gen 4R, but it’s SO SICK!!
4. Tim Curley ( @milk.wagon ) – 2018 SR5

- Dobinsons MRR Rear Long Travel Setup
- Dobinsons MRA59-A575 3-Way Adjustable Shocks
- DuroBumps Extended 5.5″ Bump Stops
- Toytec 1″ Body Lift
- Dobinsons Adjustable Rear Upper Control Arms
- Dobinsons Adjustable Rear Lower Control Arms
- MetalTech 4×4 Extended Stainless Steel Brake Lines
- Dobinsons Adjustable Rear Panhard Bar
- Dobinsons C59-701V Variable Rate Rear Springs
Watching the Dobinsons rear long travel go to work on some rock shelves is almost as fun as actually driving up to them yourself. The amount of articulation the 4Runner gets from these bolt-on parts is truly impressive.
Since my 4R is part of the SR5 gang (open diffs), keeping both rear wheels planted goes a long way in terms of crawling. By no means does this modification replace the need for lockers, but it sure does bring the capability of a SR5 4Runner to a whole new level.
5. Richard Yan ( @ryr_t4r ) – 2019 TRD OR

- Total Chaos +3.5 Race Kit with King Coilovers & Triple Bypass Shocks
- Dirt King Double Shear Upper Gussets
- Custom Gussets For Main Hoop & Engine Crossbar
- Boxed In Lower Control Arms
- DRT Body Mount Relocation Kit
- The rear is custom by AZWillis Fabrication. It’s a cantilever rear end achieving 18″ of wheel travel. It’s also a custom 4 Link with no pan hard bar.
This setup rides nice and smooth. Long travel kits are all about the tuning of the shocks and having the proper setup. You can pay however much you want for a suspension setup, but if it’s not properly tuned, then it’s a waste of money.
I had a lot of trial and error trusting the wrong people when it came to getting this setup dialed in. However, after I had to redo a few things, the stars started to align and I was able to finalize this long travel kit for my 4Runner.
6. Johnny Shin ( @ramensavedmylife ) – 2016 SR5

- BTF 4.5+ Coilover LT Kit
- 2.5 / 8” King Shock Coilovers w/ Triple Tube Secondary Shocks
- 2.0 x 2” Hydro Bump Stops
- 2.5 Stock Replacements w/ OME 899s
- Timbren Rubber Bump Stops
The truck definitely still needs a lot of work, but I do still enjoy how it handles thus far. The limited travel and cushion in the rear still bugs me honestly. But that should all get sorted out in a couple of months when some new suspension bits come in.
I’m just glad I went LT before all the mid travel jazz. Might as well just pay once and enjoy than pay twice and regret it. This truck’s platform has so much potential and I’m still putting all the pieces together.
7. Nathan Krig ( @trdlun4r ) – 2021 TRD Pro

- Total Chaos 3.5” Race Long Travel Kit
- King 2.5” Long Travel Coilovers w/ 700lb springs
- Total Chaos Secondary Shock Hoop w/ King 2.5” Triple Tube Bypass Long Travel Shocks
- Total Chaos UCAs
- OME 700lb 3” Lift Springs
- Total Chaos Rear Control Arm Kit
- 3” King Rear 2 Tube Bypass Shocks
- King Shocks 2” Stubby Air Bumps
I chose components that work well together and that would provide a wide range of tuning for different terrains. Adding the secondary triple bypass front shocks allows the rig to run with no front sway bar and still allows the 4Runner to handle great both on and off-road.
Knowing I can drive how I want, take a turn when I want, and cruise at the same speed off-road as I can on-road is what I wanted out of this build, and it delivers on that with ease.
8. Jacob Cutting ( @mag4rnr ) – 2019 SR5

- BTF Fabrication +4.5” LT Kit
- 8” Coilovers w/ 700lb Springs
- 8” Three Tube Bypass
- 2” 2.0 Bump Stops
- 8” Two Tube Bypass
- Dobinsons 701V Springs
This LT setup allows me to get where I need to go fast and as smoothly as possible. The 4Runner floats over everything I put it through both on and off-road.
With all the extra wheel travel I can keep my tires on the ground while articulating through obstacles. This helps out huge for better traction while off-road since the SR5 doesn’t come with a rear locker like the TRD Off-Road models. Overall this setup is has been great and as an added bonus, the 4R also looks awesome!
9. Chris Alexander ( @shepherdrunna ) – 2018 TRD OR

- Total Chaos +2 Standard Kit
- Total Chaos LCAs
- King Coilovers
- CVJ Extended Axles
- Gusseted Spindles & Cam Tabs
- 12″ Stroke King Coilovers w/ Remote Reservoirs
- Metaltech Upper and Lower Links
- Dobinsons 677V Variable Rate Springs
- Icon Track Bar w/ Eimkeith PCK
- Extended Break Lines
What I enjoy most is the performance this setup delivers both on and off-road. The front long travel works excellent off-road on a variety of terrain while still providing a comfortable driving experience on the highway.
The price point is was pretty reasonable and the customer service by Total Chaos was excellent. All of the products I put on my 4Runner are tried and true. You can’t go wrong with Total Chaos combined with King Shocks.
10. Clinton Saephan ( @amg_t4r ) – 2016 Trail

- Total Chaos +2 Long Travel
- Kings Shocks 2.5 w/ Remote Reservoirs & Adjusters
- 600lb Springs
- Califabrication 3 Link Kit
- Fox 2.0 14” Coilovers w/ Reservoir
- 14”- 250 + 16” – 250 Top-Bottom Spring Rate
What I like about this long travel kit is just how comfortable it rides on and off-road compared to stock/mid travel. The Total Chaos LT kit performs extremely well while rock crawling even though it was originally built for racing, which is what I first liked about it. I definitely love the added stance it also gives to the 4Runner. It just makes your rig look tough and aggressive.
The up travel and down travel performs amazingly as well. I’m able to keep my rigs tires planted on the ground most times while traversing over sketchy terrain. With the LT kit being wider than the stock track width, the rig feels a bit safer while going through sketch sections or tipsy areas out on the trail. You will not be disappointed with this kit from Total Chaos.
Final Thoughts

These next-level long travel 4Runners were absolutely amazing! I enjoy how each owner picked a long travel suspension kit for their own reasons as well. The SR5 group chose LT to help compensate for the lack of rear locker in their 4Runners. Several owners mentioned this, and to be honest, that never even crossed my mind as a reason to justify a better suspension system. See, even I learned something with this Feature Friday.
Other builds on this list were built to go fast through any terrain. You can see that in the @builtbysquirrels , @magrnr , and @trdlun4r builds. These rigs are next level and have been built to literally conquer any terrain, and fast. All the builds this week were absolutely KILLER! I can’t wait to see next week’s submissions.
If you would like to be considered for next week’s Feature Friday, we will be showcasing AFTERMARKET HEADLIGHTS.
We want readers to get inspired by a variety of rigs/products. Submit your build for Feature Friday and you might get featured. If you would like to submit your build for next week, include your setup details and an awesome photo that shows it off.
Have a great weekend everyone!

Jon Gangloff
@TRDJON - I love Toyota news, reviews, and how-tos! There are big things on the horizon for Toyota and I can't wait to share them with you all!

What size tires are on NATHAN KRIG (@TRDLUN4R) – 2021 TRD PRO? I really like the set-up.

It would be interesting if someone highlighted the changes needed for LT in the rear. I’ve purchased the TC kit for the rear of my 5th gen (not installed yet), and was wondering if the sway bar needs extensions, or just run it like it is.
Also, Ben at Filthy Motorsports posted a vid on youtube on 5th gen 4runner rear shocks and considerations thereof, when running LT.
It kinda makes your head spin!
Thanks for the article, Mike

You can buy extended adjustable links, from Dobinson’s for example, I run MT rear LT shocks and your lower trailing arms will bottom out on the axle housing before the swaybar becomes a limiting factor. I run a combination of offset trailing arms and extended sway bar links and get full ~12″ of travel out of the rear shocks.

Honestly, I’d delete the rear swaybar. Try it before the lift goes on to test it out. You won’t even notice it’s gone.
Delete? That is a possibility. When I’m done I want to try it out with and without to see how it goes. I’m adding a bunch of weight in the build so I’m curious to see if the adjustable shocks and stiffer springs are enough by themselves, or do I still need the sway bar.

There was some very sweet builds in this line up as to be expected once someone gets to the point of true LT. Keep up the great articles.
- Get Free Parts & Get Paid! Apply to Write
GET 20% OFF
Take up to 20% off at the trail 4runner store.
- Hybrids & EVs
- Motorsports

These Are the Three Best Full-Size Off Roading Trucks–According to KBB
Are you dreaming of a brand new truck that you can drive from the dealership to the trail without any modifications? Several automakers offer factory-built off-roaders. Kelly Blue Book ranked the best off-road trucks for 2021. Luckily, the top three full-size 4×4 pickups survived into 2022:
- Ram 1500 TRX
- Ford F-150 Raptor
- Ram 2500 Power Wagon
2021-2022 Ram 1500 TRX

Ram designed its top-trim 1500 pickup truck–the TRX–for blasting across the desert. With a supercharged Hellcat V8, the TRX is the fastest internal-combustion-powered pickup–ever.
“The supercharged 6.2-liter 702-horsepower engine in the Ram 1500 TRX is a beast, far surpassing the Ford Raptor’s 450.” Allyson Harwood for KBB
Ram threw a bunch of off-road kit at the TRX. It’s got a heavy-duty Dana 60 axle with an electronic locking differential. Its 32-inch tires ride on long-travel suspension (13-inches up front, 14-inches in back). Ram even built this truck with full time 4WD .
But with no locking differential for the front axle, the 2021-2022 Ram TRX is ill-suited to low-speed rock-crawling. Though this machine is well-built for its singular purpose, it didn’t top KBB ‘s off roading trucks list.
Learn how the TRX is almost quicker than the Dodge Charger Hellcat .
2021-2022 Ford F-150 Raptor

The Ram TRX is playing catch-up because the Ford F-150 Raptor has been the name in high-speed off-roading for over a decade. 2021 marked this specialty 4×4’s third generation and Ford gave it some major upgrades.
The new Ford F-150 Raptor is available on 37-inch tires. To fit all the rubber, it boasts 14-inches of suspension travel up front and 15-inches in the rear. This off road truck rides on Fox racing shock absorbers.
The Raptor currently offers a twin-turbocharged V6 that makes a respectable 450 horsepower. Its locking rear differential and (optional) limited-slip front differential help get this power to the ground. A rumored Ford Raptor “R” will even soon feature a supercharged V8.
See the Ford Raptor in a drag race .
2021-2022 Ram 2500 Power Wagon

The original Dodge Power Wagon was the first factory-built 4×4 truck. The legendary off-roader was built with technology developed for World War Two. Ram brought the name back as an option package for the Ram 2500 in 2005.
The Ram 2500 Power Wagon offers capabilities, direct from the factory, that no other off road truck can match. Every Power Wagon comes with the powerful 6.4-liter HEMI V8, but its not designed for high-speed desert racing. Instead, Ram engineered the Power Wagon to be able to conquer any obstacle at its own pace.
“The Power Wagon, based on the Ram 2500, is the off-road specialist of the range. It deploys an ingenious suspension with a disconnecting anti-roll bar, 360-degree camera system, and a Warn winch with a synthetic line.” Colin Ryan for KBB
The Ram Power Wagon features both front and rear electric locking differentials. In addition, this is the only truck available with a winch. Because this Ram 2500 is a three-quarter-ton truck, it was able to skirt the crash test limitations that keep automakers from offering smaller trucks with a factory-installed winch.
Find out how the Ram Power Wagon got its name .
The World’s Fastest Truck May Surprise You

The Ford Bronco and Ranger Have the Same Frustrating Issue

An Engine Failure Lawsuit Slams the Ford Maverick and Escape

The Hyundai Santa Cruz Is Fixing Its Biggest Problem

Henry Cesari
Henry Cesari joined MotorBiscuit in 2021 and brings his deep interest in vintage cars, trucks, and motorcycles to the site. Having restored his first classic car at just 16 years old, Henry has wrenched on everything from overland campers to Japanese motorcycles and even pre-war Bugattis. Henry is also an avid attendee at local car shows and genuinely enjoys connecting with fellow auto enthusiasts.
Henry earned a Bachelor’s in Anthropology and English from the University of Vermont. He has since incorporated his love of the written word with his admiration of classic cars. While Henry is interested in vintage cars, he believes the golden age of cars is yet to come. He is confident journalists will play an important role in this revolution by exposing the industry as it is now and envisioning its possible future.
Camburg Engineering
We’ll be closed December 25th and January 1st for the holidays
Lost password?
New to site? Create an Account
Already have an account login, we’ll be closed friday dec. 30th & monday jan. 2nd for new year’s.
Phone: 714-848-8880 | Email: [email protected]
Shop By Vehicle

Camburg Toyota Tacoma 2wd/4wd 16-23 Race Series Long Travel Kit
$ 3,895.00 – $ 7,699.90
Description
- What’s Included
- Vehicle Applications
In this high end Camburg Long Travel kit you will find nothing but the very best in A-Arm performance. Starting with our lower arm, uni-balls in the lower frame pivots, uni-ball lower ball joint replacement, and a stout boxed race arm. The upper arm pivots on urethane bushings with zerk fitting and 1.25″ uniballs replace the stock ball joints. We adapt the uniball to the spindle with heat treated stainless steel adapters. Utilizing Camburg SPEC 8″ travel 2.5″ reservoir coilovers by FOX or King there is no need to cut the stock coil-over mounts. The shock design has an external top cap so the shock has a shorter overall extend length then all other off-road race shocks. The steering upgrade includes heat treated stainless steel tie-rod and inner clevis which utilizes a FK 3/4″ heim joint. This system will yield up to 15″ travel on a 2×4 and 14″ on a 4×4. This system can also be upgraded with our weld-on bypass shock mount and a custom FOX or King 2.5″ 3 tube bypass shock.
With this kit you have the ability to run a coilover, with a bypass shock and/or hydraulic/air bump stop for the ultimate control for off-road use. We have a Camburg spec. FOX or King 2.5 coilover that we’ve designed to yield maximum useable wheel travel and control with specific valving. For bypass shock setups give us a call or send an email for pricing.
Fiberglass front fenders need to be installed in conjunction with this suspension system. While this kit is able to be 95% bolt-on, we recommend having it installed by a reputable off-road shop familiar with these types of products and components. This is not for your beginner mechanic to handle.

Long Travel Kit (CAM-310101-U):
- Tubular 1.25 uniball upper control arms
- Boxed uniball lower control arms
- Lower 1.25 uniball spindle adapters
- Steering extensions
- Extended front brake lines (CAM-330004)
- 12″ limit straps
- Upper coilover shock mounts
- L/T Kit with heim uniball upper arms (CAM-310101-H)
- Camburg 4340 4wd axle shafts (CAM-310033)
- FOX 2.5 coilover kit (CAM-310028-3)
- King 2.5 coilover kit (CAM-310028-5)
- FOX 2.0 x 2.5″ bump stops w/ cans (2x 980-02-311 & CAM-040027)
- King 2.0 x 2″ bump stops w/ cans (2x BS2020 & 20AB422-104)
- Camburg 2.5 bypass shock mount kit (CAM-310052)
- FOX 2.5 bypass shock kit (CAM-310106-1)
- King 2.5 bypass shock kit (CAM-310106-2)
- Heim steering upgrade (CAM-310101-1)
- 2wd models are able to run a coilover, bypass shock and air bump stop
- 4wd models can run a coilover and air bump stop or coilover and bypass shock, not all 3 like the Prerunner model
- Fiberglass front fenders are required
- Specific L/T kit coilovers at minimum are required to install this kit and L/T axles on 4wd trucks
Shock Specs: CLICK HERE FOR SPEC SHEET
- 2.5 x 8″ remote coilover
- 16″ x 500-600 lb coils
- 23.9″ extended | 16.4″ collapsed
- Tapered/Raised lower spring seat
- 2″ Longer lower rod end
- 1.25″ width shock spacers
- 90 degree res. fitting on shock
CAM-310028-3 FOX 2.5 Remote Coilovers w/ DSC Adjusters
You may also like…

Camburg Toyota Tacoma Pre/4wd 05-23 L/T Bypass Mounts and Shocks

Camburg Toyota Tacoma Pre/4wd 05-23 Long Travel Spring-Under Kit

Camburg Toyota Tacoma Pre/4wd 05-23 Long Travel Rear Bedcage and Shocks
- Bolt-on design
- Designed for 16″ travel bypass shocks
- Maximizes useable bed space
- Powdercoated black

Suspension 101: Pick the Right Setup for Your Ride
Tires help get power to the ground, and without the right set, it’s possible to sit in an infinite burnout and not go anywhere. But what many don’t understand is that the proper suspension setup is much more important than the right set of shoes.
If the best tires for cars can’t make effective contact with the terrain then they won’t get you anywhere. Getting the power down (traction on the terrain) is one important thing, ride comfort and safety are others altogether. When picking your suspension setup, to get the best off-road suspension all three need to be taken into consideration. Most off-road capable vehicles nowadays see much more time on the street than they do on the dirt, so you’ll need to consider how much comfort and performance you’re willing to sacrifice on either terrain in the interest of building a vehicle that best meets all of your specific needs. There is not a perfect suspension design that does all things perfectly: It’s a give-and-take situation. But you can still find the best suspension for off road that is also a great riding and performing rig both on and off the highway.
Multiple suspension designs exist, and they all offer certain qualities that make them better for one situation versus another. So to properly set up your rig, you’ll first need to know what’s out there, how they work, what they do well, and what they don’t do well. From there you can decide what suspension setup is best for you and how to modify it to better suit your exact needs.
Solid Axles

Solid axle, leaf spring suspension is the cheapest and easiest to get decent results from.
Henry Ford used solid axles for his Model T as far back as the early 1920s. They were done differently than today with a transversely mounted leaf spring (simply put, a single sideways mounted leaf spring). Obviously, it’s no longer a new design as it’s been around for almost a century, having gone through multiple rounds of upgrades and tweaks since inception, but they work great off-road, and even with the decent amount of bumpsteer they come with, they do fairly well on-road as well. A long travel leaf spring setup can handle substantially more weight with fewer problems than other designs. This is why we see solid axles under most SUVs and every sized truck. However, suspension systems for solid axles are many, and they all have their own strengths and weaknesses, as well as their individual ways of modifying them for the dirt.
Leaf Spring Suspension

Airbags were added to this long travel leaf spring setup to add weight-carrying capability.
With a factory truck leaf spring rearend on a 2014 Ford Super Duty, the main two leaves locate the axle and handle basic operation spring duties. The upper and lower springs are overloads and only come into play when the vehicle is carrying a heavy load.

Here, a race pack featuring multiple smaller leaves is designed to simultaneously carry the weight of the vehicle and move freely, allowing for a better ride through rough terrain. This pack has also been powdercoated to match the vehicle.
By far the simplest design and cheapest to modify, a long travel leaf spring setup is just multiple pieces of spring steel (a steel with memory that returns to its original shape after being deformed) stacked in varying widths (rates) or amounts of leaves depending on the need. The axle is mounted to the center of the leaf (in most situations) and the frame secures both eyelets of the spring, one solid mounted and the other with a shackle to allow for suspension travel. Stock leaves generally have a main pack, which allows for a pleasant ride during normal, unloaded daily driving. Below that spring (and sometimes above it) is an overload spring that takes over when the vehicle is loaded. It’s a much more robust spring designed to only come into play when the rig has a large load on/in it.
Suspension lift with a truck leaf spring setup is simple; in the rear, blocks can be used, which simply put a spacer in the suspension, raising the vehicle by whatever thickness the spacer is, although these blocks will create added axle wrap under acceleration, wearing out driveshaft components or worse. So, the use of blocks should be kept to just a few inches in lift, anything higher and you should consider getting new leaves made, adding a leaf to your existing pack, or having your existing leaves reached by a qualified shop. Adding blocks will give you a stock-like ride with stock-like performance with the benefit of larger tires; adding a leaf will make the ride stiffer, and for the most part will just add more room for tires; re-arching the leaves will generally make the ride stiffer, and again, only add room for more tires. Getting new leaves made will make the ride just about whatever you want it to be.
Lifting or modifying a front leaf spring rig should only be done with new leaves or with parts designed specifically for the front of a leaf spring vehicle. Blocks are not a good idea up front. There’s just too much of a rotational load on the front end to make them safe at all.
Drawbacks to truck leaf spring solid axles are mainly a lack of “tuneability” when compared to four-link setups (see 4-Link section below). Axle wrap is also a concern, but can be taken care of with a set of traction bars fairly easily.
Four-Link Suspension

Pure Performance’s 4-Link design for later model Ford Super Dutys uses a bracket mounted to the factory radius arm mount, which gives the new four-links a place to mount to the truck. Spring duties are then taken care of by coils in this instance, with a large reservoir shock controlling it all.

This show-ready four-link setup has triangulated upper links that help locate the axle, stopping it from wandering from side to side. It also uses trailing arms (lower) that the bypass shocks mount to. Usually, you’d see a coilover here, but the owner has elected to use air springs instead.
Ram trucks use this radius arm suspension design. It’s very similar to four-link designs except caster will change as the suspension cycles. Carli Suspension’s radius arm setup for the Ford Super Duty includes new arm mounts, coil springs, reservoir shocks, radius arms, a steering stabilizer, and more. This is one of the higher-end suspension systems out there. This is where it gets interesting. Four links, three links, radius arm, and triangulated link setups are the ultimate way to tune your rig’s suspension. A link suspension, similar to those found under late-model Jeep Wranglers, Rams, and Ford Super Dutys, consist of multiple solid arms, which connect the axle to the vehicle with some sort of pivoting joint. The axle then can move freely with little restriction within the limits that the links set. The solid links will also keep the axle aligned exactly how you want it to be, at any point in the suspensions travel, no matter the engine load. Springs (air, coils, coilovers, hydraulic arms, and so on) of any type are then used to keep the vehicle at ride height.
Due to the solid links and free choice of shock and spring combos, this type of suspension is the most tuneable for any terrain or situation. With the right knowledge, it can literally be set up to do just about anything, which is why it’s one of the best suspensions for off-road. Adjusting things like the angle and/or the length of each link will affect how the vehicle reacts to acceleration, braking, turning, size of terrain, high-speed performance, and low-speed performance. If you’ve ever seen an off-road racing Trophy Truck take off from a stop and hit a turn at high speed, you would have noticed the excessive lifting and rolling of the vehicle during both situations. They were not designed to take corners well at all. But, this is an aspect designed and tuned into the suspension. Those trucks are made to travel at very high speeds through desert terrain that often includes sections of “whoops” (large repetitive bumps in the road) that are commonly over a few feet tall. The suspension is designed to move quickly to keep the tires on the ground as much as possible, maximizing driver control. And the rear link setup is usually designed more to load the rear tires allowing for maximum rearend traction. A rock buggy would have a totally different set of link geometry to help it claw its way over large boulders. These are the two extremes. Most link setups are designed to be somewhere in between.
For most of us, we’re just fine with a small lift kit to gain clearance for both larger truck rims and tires, as well as whatever objects the terrain has to throw at us. Those lifts range from simple coil spring spacers adding a couple of inches to more involved kits that come with slightly longer links and new coil springs, possibly coilovers. From there, you’ll start getting into long arm suspensions that relocate the factory link mounting points and use much longer links to achieve extra travel while keeping wheel alignment angles correct throughout the range of travel. A coilover would then be the most common type of shock/spring to be used.
Beam Suspension

An off-road racing twin I-beam design. This one cycles a massive 26 inches of travel.
Ford designed the beam suspension. It was a revolutionary design when it was released. Modifying involves drop-down brackets and springs for light to medium off-road use. All out race systems use new, longer I-beams and radius arms as well as coilover shocks.
Ford’s Twin Beam (I-Beam for 2WD, Twin Traction Beam for 4WD) suspension is a true HD truck suspension and was available in Rangers, Broncos, E-Vans, and F-Series trucks. It was originally designed to reduce bumpsteer in vehicles that had previously used a solid axle, 2WD, or 4WD. It’s a sort of happy medium between a full solid axle (which handles heavy loads extremely well and works well on the dirt) and A-arm suspension (which handles great on the road, but not as well with heavy loads or in off-road situations). Currently, no late-model vehicles sold after 2014 use this suspension design; the 2WD E-Vans were the last ones in production.
The Twin Beam can be best thought of as a single “L” frame: The bend in the “L” is where the wheel mounts and the other two sides which are pivot points that are mounted with bushings to different parts of the frame. One pivot basically is secured under the motor mount on either side, and the other under the passenger and driver doors, respectively. By making either of the two sides longer, the amount of usable wheel travel can be increased upwards of 30 inches of travel or more. Coil springs are the most common way of suspending the vehicle here. The most common way of achieving a midrange suspension that can perform well on either terrain is with a set of drop brackets and matching coil springs to gain lift and a bit of wheel travel. Any more than that, you’re looking at coilovers with custom mounts as well as longer I-beams and the adjoining radius arm.
Twin Beam suspensions are a favorite of high-speed desert racers due to the ease of getting huge amounts of wheel travel out of them at lesser cost than with A-arm designs. Plus, since they were originally designed to handle very heavy loads, the steering and other parts are built robustly enough from the factory to handle harsh desert terrain at very high speeds. Drawbacks from this type of suspension design include uneven tire wear and unstable camber throughout the suspension’s range of travel.
Double Wishbone Suspension

Correctly tuned suspension will allow you to climb even the toughest terrain.
Double wishbone systems, also known as A-arm suspension, are the best of all designs on the street, but lack slightly in the dirt (in stock form).

Drop-down brackets are commonly used to help gain some ground clearance with double wishbone systems. This one is an extreme drop down bracket example; most are only a few inches tall.
The Double Wishbone Suspension (aka A-arm) design was and is a total departure from straight axle thought and is actually a bit closer to a link setup in theory. While the Twin Beam style looked to reduce bumpsteer from the solid axle design, A-arm suspension takes it a step further by completely isolating the wheel and tire while keeping its travel perfectly (when designed correctly) aligned to the road, maximizing driver comfort and control.
Utilizing a dual set of wishbones (often called A-arms or control arms) and a steering knuckle in which the wheel is secured, this suspension type keeps the wheel aligned almost perfectly throughout its range of travel. Therefore, it allows for extremely good on-road manners, but not as much off road in stock trim. The dual A-arms are generally parallel, so when the wheel moves over the bumps, the angle of the wheel and tire stays the same and therefore steers straight, whether at full droop or full compression. Spring types are all over the board here. Torsion springs are the late-model favorite although coil springs and struts are also in the mix from the OEMs.
The aftermarket offers steering knuckles that will allow a small 1- to 3-inch lift while keeping stock ride. There’s also a whole slew of coil and strut spacers, as well as torsion bar keys that will also allow for just a few inches of lift with minimal effect on ride quality. For even more ground clearance, kits generally end up relying on drop-down brackets, which take the mounting points for the control arms and move them down to achieve the lift. The sky is the limit there; 16-inches of lift or even more is entirely possible.
For high-performance, long-travel suspension setups, new longer control arms and custom spindles are the norm. Stock springs will be ditched and replaced with coilovers in most cases; 12 inches of travel and 6 inches of lift is a common occurrence here. Just know that these types of kits are closer to “race only” designs and on-road performance will be hindered.
Editor’s Note: A version of this article first appeared in the Winter 2015 print issue of Tread Magazine.

Lorem ipsum dolor sit amet, consectetur adipisicing elit sed.
Follow us on


- Get Started
- Accessories
- Acc Lighting
- Front Bumpers
- Rear Bumpers
- Rock Sliders
- Skid Plates
- Trail Tested
- Maintenance
2nd Gen , 3rd Gen , Lift Kits , Long Travel , Off-Road , Overland , Suspension
8 best long travel kits for the tacoma.
When it comes to long travel (LT) suspension on the Toyota Tacoma, you have many options to choose from. You don’t have as many compared to mid-travel lift kits and leveling kits for the Tacoma , however, there is an LT kit out there for everyone’s needs.
Before we get into the specifics of a long-travel suspension and the offerings on the market, it’s important to understand what long travel is and why you might want to add this type of suspension to your Toyota Tacoma. Long travel isn’t for everyone as it’s rather expensive depending on the parts you’re running and designed for a very specific style of off-roading.
Long travel kits are designed for go-fast and rock crawler builds looking for more articulation (wheel travel) from their suspension. We will touch on the differences later but first, let’s learn the terminology.
Table Of Contents

- LCAs and UCAs: The foundation of what’s considered “long travel” starts with your A-arms; LCAs (lower control arms) and UCAs (upper control arms). Your lower and upper control arms push the wheels farther away from the vehicle’s center frame and are measured in inches; 1″, 2″, 3″, and beyond. Aftermarket A-arms can be boxed or tubular, are made of Chromoly, aluminum, and/or steel depending on the brand. Lower control arms often add internal gussets for increased strength and tube style upper control arms add external gussets for added strength. Long travel a-arms are typically configured with heim joint or bushing pivots at the frame/shock bucket and uniball joints or ball joints at the spindle knuckle pivot however some companies offer uniball joints for both.
- Coilovers: The primary shock used for LT starts around an 8″ stroke and at least a 2″ body, however, most are 2.5″ body shocks. If you’re not running secondary bypass shocks, you want coilovers that offer remote reservoirs and compression/rebound adjusters.
- Secondary Bypass Shocks: Bypass shocks are designed to handle compression and rebound damping. With secondary bypass shocks, you don’t need compression and rebound adjusters on your primary coilover, but you can run them. Secondary shocks usually range from 2.0″ to 3.0″ wide.
- Shock Hoops: Tubular hoops with shock mount tabs welded to the frame are designed to hold the secondary bypass shock to the lower control arm.
- Shock Stroke: The measurement of how far the shock shaft enters the shock body between full extension (droop) and full compression (bump). Long travel shocks usually range in lengths of 12″ – 18″ for the rear and 8″ – 10″ for the front.
- Remote Reservoirs: Remote reservoirs help to dissipate oil heat in the shock body when the suspension is cycling. Remote reservoirs can contain a larger volume of oil which helps prevent the shock from overheating and allowing for more consistent damping.
- Bump Travel: When the shock compresses in an upward motion. Also known as up-travel.
- Droop Travel: When the shock rebounds in a downward motion. Also known as down-travel.
- CV Axles: Extended and typically stronger CV (Constant Velocity) axles push the knuckles farther from the center frame and oftentimes offer more articulation than factory CV axles.
- Brake Lines: Extended soft brake lines help to prevent snapping brake lines when the suspension cycles at full droop.
- Tie Rods: Extended and stronger steering rods connect your steering rack to your knuckles.
- Rod-Ends: High articulation heim joints that connect steering knuckles to the tie rod and the tie rod to the steering rack.
- Steering Clevis Kits: The steering rack clevis/bolt assembly threads into the steering rack which connects to a heim join that’s connected to the inner tie rod.
- Bump Stops: Either extended height rubber bump stops or welded-on brackets for hydraulic bump stops (usually hydraulic).
- Bump Stop Cans: Metal cans welded to the frame that hold hydraulic bump stops in place.
- Fiberglass Fenders: Extended height and width fenders allow tires more up travel clearance.
- Limit straps: Straps that prevent the suspension from overextension at full droop.
- Bed Cage: Bolt-on or welded cage in the bed of a truck designed to be mount points for rear 14″ – 16″ shocks. Bed cages hold spare tires, jacks, and other Prerunner accessories among other benefits.
- Spring Under Axle (SUA): Leaf springs are set on perches underneath the axle. Usually provides more bump travel over SOA.
- Spring Over Axle (SOA): Leaf springs are set on perches on top of the axle. Usually provides more ground clearance over SUA.
Define “Travel”

Define Travel
Travel is determined by the amount (in inches) of the distance between full droop (down-travel) to full bump compression (up-travel). Usable wheel travel is when all your suspension components work together creating a full range of motion. You can measure wheel travel by removing your shocks and cycling the suspension from full droop to full bump. Factory travel differs on many makes and models, however, 8″ is average for the Tacoma. Companies that offer long travel for the Tacoma quote anywhere from 10-14″ of usable wheel travel.
Shock Travel Vs. Shock Stroke?
Oftentimes travel is confused with the shock stroke measurement. Shock stroke is a measurement of how far the shock shaft enters the shock body between full extension and full compression.
Factory Travel Vs. Mid Travel

Pictured: ARB BP-51 Mid Travel Coilovers
Factory or “stock” travel is the amount of wheel travel you have from the factory, usually around 8″ for the Toyota Tacoma.
What Is Mid-Travel?
Mid-travel is a term used to describe a suspension that increases factory travel with extended-height coilovers that feature taller and wider shock bodies that are threaded/ adjustable for ride height. These kits are often paired with aftermarket UCAs (upper control arms) with built-in positive caster to reflect/correct the alignment change after lifting the Tacoma.
Sometimes mid-travel suspension kits are often mistaken with other coilover set-ups as the terms are intertwined. For example, just because a coilover is adjustable doesn’t mean it’s mid-travel. The Bilstein 5100 is a perfect example – it’s adjustable but definitely not considered mid-travel. The Bilstein 5100 kit and similar lift/leveling kits/shocks are simply referred to as such; lifts and leveling kits. I would refer to this style of lift as an “entry-level” lift kit and sometimes these upgrades don’t lift your Tacoma at all, guys just upgrade shocks for factory ride height.
Where entry-level lift kits are physically lifting your truck and mildly increasing performance (0″-1″ added wheel travel), mid-travel suspensions are not only lifting but providing much more control and drastically increasing performance (1″-2″+ in added wheel travel). You can compare these to long travel lift kits that usually result in 3″-5″+ in added wheel travel.
Good examples of entry-level suspension kits would be the OME Nitrochargers , Eibach Pro-Truck Lift kit , and again the Bilstein 5100 kit linked above. Good examples of mid-travel setups would be the OME BP-51s and kits like the Fox DSCs, Kings, Icon extended travel stage 2 kit, Bilstein 8112s, and many others.
With mid-travel, you’re changing the factory suspension greatly but there’s still room for more travel.
If you want to push your Tacoma faster and harder than mid-travel allows, a long-travel suspension is likely the next step.
What is Long-Travel?

What Is Long Travel?
Long travel suspension is when you increase the length and/or height, and often the strength of your factory suspension components beyond the limits of your factory suspension geometry. Compared to mid-travel, long-travel suspensions provide even more wheel travel.
Where mid-travel kits feature extended-length coilovers and aftermarket UCAs to correct caster, long travel kits contain many more parts. In a typical LT kit, you see extended-length UCAs, extended-length LCAs, larger coilovers (typically an 8″ stroke to start), secondary bypass shocks, extended-length CV axles, extended brake lines, extended tie rods with strengthened rod ends, extended (both height and width) fenders, extended bump stops to prevent bottom out, limit straps to prevent top out, and more.
See how many times I listed “extended”? With long travel, everything is longer/wider, and stronger.
With LT, shocks usually range in shock strokes from 8″-12″ for the front and 12″-18″ for the rear.
How Much Travel Do You Need?
Where 4″ of up travel and 4″ of down travel is the standard of most Tacomas. 6″ of up and down travel is a good starting point to look at when it comes to LT. For go-fast rigs, the priority should be on up travel whereas rock crawler rigs focus on both but less on up travel.
Go fast rigs want about 60%-70% more up travel whereas rock crawler rigs want about 30%-40% up travel, however, this is not always the case and you should engage the company you’re considering to determine what’s best for your build.
Example – Go fast Tacoma with 12″ of total travel in the front:
A go-fast long-travel Tacoma should aim for 7″ up travel and 5″ down travel.
For the rear, up travel should be 25% more than the front. Take 25% of the 7″ front up travel and add that to the rear up travel.
If 25% of 7″ = 1.75″ we want our rear up travel to be at least 8.75″.
Travel Distance (Wider per side)

+2″ Vs. +3″ Vs. +4″ – which distance should you choose?
Long travel is measured by “per side”. When you see a +2″ kit, that’s 2″ wider per side creating a track width of +4″ overall.
2″ Class
2″ kits are usually the “stage 1” of LT, also referred to as “Prerunner” kits, ranging from +2″ and up then typically scaled in 1/4″ measurements; +2.25″ and/or +2.5″, etc. The +2″ class kits yield anywhere from 11″-13″ of usable wheel travel. In this class, companies make many great options. For example, Total Chaos offers a standard 2″ kit and an expedition 2″ kit. The expedition kit offers 2 more inches of ground clearance over the standard 2″ kit. So even though a kit is marked as a 2″ long kit doesn’t mean they all boast the same specs. Also in this class, Camburg makes a 2″ Trail Series kit that’s designed around tight trail use and to perform well for daily driving all without needing to upgrade fenders. There are many other 2″ kits on the market but one that stands out is the JD Fabrication 2.25″ kit that pushes upwards of 13″ of wheel travel and also features a slew of additional upgrades. With 2″ LT you don’t always need fiberglass fenders but a mild 1″ flare is recommended. If you avoid fiberglass, you will need to trim your factory fenders to see clearance at full compression (bump travel). This class is designed for daily drivers and weekend warriors, especially with something like the 2″ Trail Series from Camburg.
3″ Class
Next, you have 3.5″ kits and these are typically considered race kits commonly featuring uniball joints over ball joints. In the 3″ class, Total Chaos offers two versions of their 3″ class; the standard series and the race series. The race kit offers 2.5″ more ground clearance and is 5 pounds lighter per lower arm than the standard series. TC offers both poly bushing uppers and/or heim joint uppers. Both kits pull about 12.5″ of wheel travel. Also in the 3″ class, you have Dirt King. Dirt King offers their signature kit with bushing uppers and/or heim uppers yielding around 13.5″ of wheel travel. DK also offers kit-specific 4340 Chromoly axle shafts and/or prebuilt axles with factory Tacoma joints. Finally, you have Camburgs 3.5″ Race Series kit which is similar to the TC and DK kits, although it does stand out quite a bit in their overall offering which we’ll get into below. There are so many great options in the 3″ race class. With 3″ LT you will need fiberglass fenders; at least a 3″ flare and 2″ rise. This class is meant for hard-core weekend warriors who go out often and want to push the limits in the desert and/or in the rocks.
4″ Class
Last but not least, you have the 4″ class. This is a bit overkill for most but is very impressive nonetheless. With kits such as the LSK 4.5″ and the JD Fabrication 4″, you can get into the most advanced and race-focused rock and/or crawling-focused IFS long travel kits on the market. Most advanced doesn’t always mean best though. With 4″ class LT, you need large flare + rise fiberglass fenders, and all the suspension components are very custom; axle shafts, steering rods, brake lines, limit straps, shocks, bump stops, and even fabricated spindles that allow even more up/down travel. In this class, most kits come with everything you need because everything is such a custom length. Extending your track width out 4″ per side or even 4.5″ per side is a lot. This class is designed for someone who is looking to hit the ultimate send button on dunes.
UCAs & LCAs

Not all uppers and lowers are created equal and long travel all starts with UCAs and LCAs. Here are a few key elements to look at when shopping for lower and upper control arms.
LCA Ground Clearance
An important item to consider when shopping for lower arms is clearance. Camburg uses a uniball adapter that goes under the uniball joint which positions the arm lower and actually offers less ground clearance than the factory. Dirt King and Total Chaos, for example, use the factory ball joint cradle so the lower arm goes above the joint which offers similar or even better ground clearance than the factory depending on tire size and other variables. For go-fast applications, ground clearance might not be as important for you. However, for rock crawling, ground clearance is very important. Pay attention to where the lower arm mounts to, on, or around the ball joint adapter.
LCA Front Slant
A slanted front surface for sliding over obstacles is very important for all drivers to consider, both go fast and rock crawling. Dirt King, Camburg, and JD Fabrication all offer a slant on the front of their LCAs. Pictured in the image above, you will see the JD Fab lowers with an aggressive slant on the face. Total Chaos, Marlin Crawler RCLT, and LSK on the other hand feature a completely boxed design with a flat front surface – not good for sliding over obstacles.
LCA Frame Pivots
Most companies such as Total Chaos uses polyurethane bushings at the frame pivot points. Dirt King, for example, uses Delrin bushings while JD Fabrication and Camburg both use 1″ uniballs. JD Fabrication takes it a step further and adds seals to their uniballs. Both the Derlin bushings and uniballs are going to offer a stiffer joint than poly bushings. Having stiffer joints is nice when you have 20%+ more leverage pulling/pushing on the frame pivots. With uniball joints, you have a wider range of alignment specs to increase your positive caster. Polyurethane bushings tend to squeak over time and don’t hold up well under extreme weather conditions.
LCA Wheel Placement
Some lower control arms have a positive caster spec and/or forward tire mounting built in. This is where you need to call each company you’re considering to ask whether or not they have a positive caster built into the arms and if not, how much room there is for adjusting the caster or pushing the wheel forward altogether. Dirt King, for example, has a positive caster spec built in, and so does JD Fabrication however JD goes a step further with its design. JD Fabrication builds cam tabs that allow forward positioning of the arm up to 7/8″ and that’s adjustable in increments of 1/4″. No one else offers that.
A major item to consider for UCAs is the uniball or ball joint and the cup. On vertically positioned uniballs, up travel is limited at the uniball cup colliding with the inner wheel well, and down travel is limited at the uniball colliding with the uniball cup. UCAs with an aggressive uniball cup slant will typically achieve more down travel. Pay attention to this slant on the UCA cup when purchasing UCAs.
UCAs from the LSK and Marlin Crawler LT kits, on the other hand, feature high-articulation horizontal uniballs. The down travel is now limited by limit straps and the up travel is limited by your tires depending on size. There is no doubt that high articulation horizontal uniballs on UCAs offer more up/down travel, however, this is highly dependent on tire size and other suspension components.
UCA Caster Correction
Because the Tacoma upper control arm is mounted from the factory in a different plane than the lower control arm, as you lift or lower the truck the caster changes. The more you lift the truck the more caster you lose. This is why it’s always recommended to add a “caster-corrected” upper arm when you lift a Tacoma. Most of the companies on this list all make caster-corrected UCAs, however, if you move forward with a kit, do your research first.
Uniballs Vs. Ball Joints

Camburg & Moog Ball Joints (left) and Total Chaos Uniballs (right)
The choice between uniballs and ball joints has long been a debate, although both have some noticeable differences over factory joints.
Uniballs are known to have more articulation than traditional ball joints which is nice when you’re looking for the most possible travel from an LT setup. On top of offering an impressive range of motion, the uniballs architecture is stronger than that of a ball joint. Uniballs do require maintenance though and if neglected – over time they can start to squeak, and/or become loose. Because uniballs are typically stronger and offer the most articulation, they are used on most builds for professional race classes like Ultra4.
Ball Joints
Ball joints on the other hand were designed for the daily drivers of today’s world. Unlike uniballs, ball joints are a sealed architecture and therefore require less maintenance. Some will say that ball joints have less articulation than their counterparts, however many companies like JBA offroad claim a full 90 degrees of motion, and other companies that feature an aggressive uniball cup slant can also achieve high articulation with ball joints.
Sealed Uniballs
JD Fab uses its own solution which is the best of both worlds. They have custom EMF joints made with the factory Tacoma taper machined into the pins. An EMF joint is identical to a uniball in design however it’s built in a way to be completely sealed from the elements. The design gives you all the strength and articulation of the uniball while offering the sealed, maintenance-free design of a standard ball joint. They are also easily rebuildable which is a huge cost savings compared to replacing uniballs.

You have many options when it comes to shocks; King, Fox, Radflo, Icons, ADS, etc. They all make shocks for LT suspension setups although King and Fox tend to lead the race. Fox is actually the largest shock manufacturer in the world. They make shocks for many applications and Tacoma applications are no exception. King also dominates the Tacoma market and is known for producing some of the highest-quality race shocks on the market. Regardless of which you choose, you can’t go wrong with either brand. There is a reason why every major LT manufacturer pairs their kits with either King or Fox; they’re both very dependable race shocks, although Fox is slowly gaining more Tacoma traction. Compared to other shocks, Fox uses higher-quality seals, shock oil, and shafts. Fox is also more expensive than King, but again both are great choices.
There are many types of shocks that can be used for a long travel setup; coilovers, bypass shocks, piggybacks, and smoothie shocks.
Coilovers & Bypass Shocks (Front)
Companies that make an LT kit usually spec very specific shocks for that kit. For example, some companies lean on Fox and some on King. Some companies adjust the valving for those shocks in-house, and some outsource it or they’ll even pair the kit with Toyota OE shocks. That said, most will spec an 8″ stroke with reservoirs along with an 8″ stroke on the secondaries, also with reservoirs. For most LT suspension kits, an 8″ stroke is plenty of shock travel for the front of the Tacoma running a +3″ kit or under. If you can, order the shocks that the company recommends because they are often tuned specifically for that kit.
Reservoirs & Adjusters
Reservoirs along with compression/rebound adjusters are an added bonus on all shocks. If you plan on pushing your limits and going fast, then reservoirs will help to keep your shocks from overheating. Adjusters are going to offer adjustments for stiff or loose piston stroke which means you can adjust them to be stiff while on road and loose while offroad. Adjusters are great for someone who plans on using the truck as a daily and weekend wheeling.
Double Shear

Double shear is defined as twice the shear force breaking strength. So for example, let’s look at double shear steering on the knuckles. In a factory steering setup, the tie rods’ rod end is connected to the knuckle with one bolt on one mounting surface (single shear). With double shear, a single bolt is still used, however, you sandwich that bolt between two surfaces (double shear). Now instead of one surface resisting the load, you have two surfaces. The bolt in double shear will have twice the shear strength of a bolt in single shear.
When it comes to long travel, many components are upgraded to double shear; inner and outer rod ends for steering, UCAs on the coil bucket, secondary shocks, and more.
Steering Rack
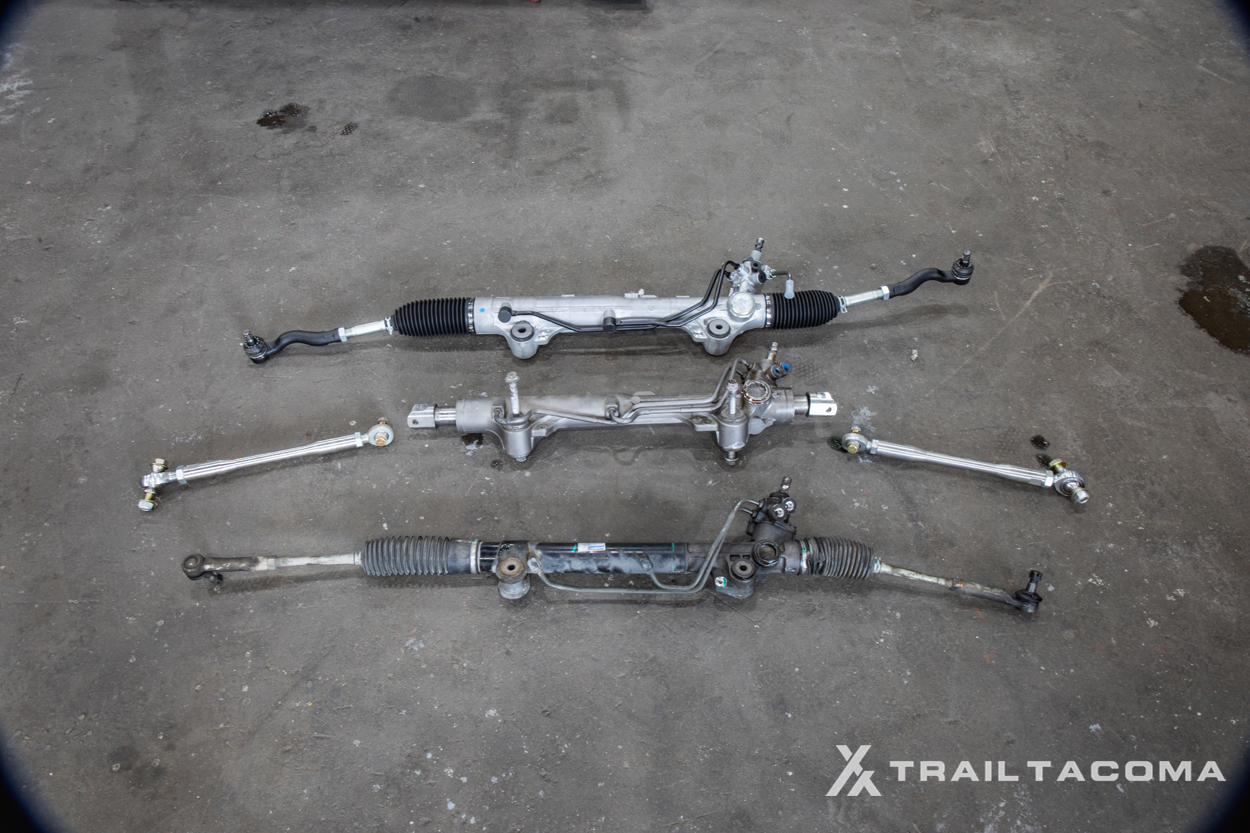
Factory Steering Rack (bottom), Tundra Steering Rack (Middle), Land Cruiser Steering Rack (top)
Most long-travel suspension kits on the market offer a solution for increased strength tie rods and rod ends but not a full steering rack replacement solution.
For most LT kits today, the rod ends being used are known as heim joints or “heims”. The outer rod ends thread onto the tie rod and connects to the knuckle. The inner rod ends thread onto the other end of the tie rod and connects to the steering rack. You can use factory inner rod ends or upgraded heim joints.
Depending on what steering rack you’re running will depend on how that inner rod connects up to a steering rack. If you’re running a factory Toyota steering rack and factory inner rods, just thread your tie rod onto the inner rod end.
If however, you upgrade to a Tundra or 200 series Land Cruiser rack, you will need a steering clevis kit with the correct thread pitch and bolt diameter . For the LC200 rack, you will want a 28mm clevis and for the Tundra, you want a 24mm clevis ( RC Fabrication can sell you both of these). You can, however, use the factory inner rod end that comes on the LC200 rack as the rod end is a good length for the Tacoma and plenty strong enough to turn a 37″ tire. But for the Tundra rack, you need to shorten the inner rod and rack down as the width is too long for the Tacoma. That is why Solo Motorsports makes a modified steering rack specifically made for the Tacoma.
Not many guys want to run the factory steering rack, especially after upgrading all of the other steering components. It’s the path of least resistance to the steering rack after double shear steering, and increased strength rods + rod ends – all while running increased size tires.
With that said, very few long travel kits on the market offer a complete solution all the way down to the steering rack. The Marlin Crawler RCLT kit does come with the “MarRack steering rack” which is an LC200 rack but they provide the pieces that can be challenging to source that connect the steering rack to the column.
Steering Rack (Rack & Pinion) Options:
- Solo Motorsports Modified Tundra Rack
200 Series Land Cruiser Rack Options:
Lowest to the highest price
- Ultra Power 3676N
- A-Premium 369
- AAE AA36N Steering Rack (USA inspected & tested)
- Buy Auto Parts Remanufactured 80-01660R
- Toyota OE Rack & Pinion 80-01660R (this is the steering rack I bought)
Extended-Length CV Axles

You have a handful of options when it comes to running extended-length CV (constant velocity) axles.
For the most affordable option, you can run upgraded extended-length shafts (usually Chromoly or 300M) and reuse your inner and outer CV joints. This is affordable but it’s also very time-intensive as well. In order to rebuild the inner and outer CV joints , you need the right tools and a bit of patience. It’s not hard at all, just time and energy.
The next option is to buy partially pre-assembled axles and rebuild the outer joints of a CV axle only. This is usually when you want something a bit more custom and you’re either looking for a very specific type of inner joint or you want to save a bit of money by rebuilding your outer CV joints.
The most common option is to go with a company like RCV Axles and/or CVJ axles . These companies offer fully built CV axles designed for your specific width and application. Both of these companies offer great axles but RCV is usually the go-to because they pre-package axles specifically for mainstream kits like Total Chaos, Dirt King, Marlin Crawler, and others. If you have a custom long travel kit, or it’s a new and upcoming company that makes suspension components only, you may need to ask them exactly what CV axle they recommend for that kit and from what company they have tested their kit with.
Different companies offer different joints, too. Most companies offer rebuilt axles with factory-style architecture inner tripod joints and outer ball-style joints, although some offer internal components (4340 and/or 300M) that are much stronger. Some joints are strengthened even more with an upgraded cage as opposed to factory-style housing. For example, companies like JD Fabrication offer a 934 plunging CV axle joint. The 934 offers a full 28 degrees of articulation versus the stock joint sitting 21 degrees. The factory-style joints with upgraded internals are a bit more affordable than the 934-style joints but the 934 is even stronger and provides more articulation. The 934 is a clear winner but it comes at a higher price.
Before going all-in on axles, call these companies, explain your driving habits (fast and hard or slow and abusive) and they will tell you which axle is the best fit for you.
JD Fabrication 934 Axles (stock width, 2-2.5” and 3.5-4”)
- Fully or Partially Assembled with Core Exchange (2005-2015)
- Fully or Partially Assembled with Core Exchange (2016-current)
CV Axle (assembled) Options:
- Axle sets from RCV
- CVJ +2″ 9808 LT2 axle
- CVJ +3″ 9808 LT3 axle
Shaft-Only Options:
- Call RCV and Order Length; +2″, +2.75, +3.5″, etc: (815) 877-7473
- Call CVJ Axles and Order Length: 1-800-292-2953
Inner & Outer Boots
- Inner CV Axle Boot Kit
- Outer CV Axle Boot Kit
Spring Under Vs. Spring Over

The debate between spring under axle (SUA) and spring over axle (SOA), has long been a controversial topic. Both options have their own unique pros and cons. Before you decide which option you’re going to proceed with on your build, first decide how you’re going to use your build. Are you moving fast through the desert over large whoops where lots of up-travel is needed or crawling slowly over large rocks where good, high clearance and good departure angles are needed?
It’s pretty simple at the end of the day; SUA is typically for fast guys and SOA is for guys who want more clearance – but not always. Again, this topic is one that’s debated hard on many different makes and models.
I’ve listed some bullet points below on a general consensus, however other factors can affect some of these bullets ultimately swaying them to the other side or making them a moot point. For example, some guys will claim SUA boasts better ride quality but ride quality is heavily dependent on spring weight and loaded (wet) bed weight. Can SUA provide a “better” ride quality? Yes, given you have all the other factors dialed in for that specific set-up. Other factors to fine-tune for overall ride quality and performance may include the height/drop of the front/rear shackle hangers, Deaver H70 Vs. H70HD springs, location of shocks, shock stroke, shock valving/tuning, location of perch over/under the axle, hydraulic bumps vs. progressive rubber bumps – along with other factors.
Can you achieve more travel with an SUA kit? Yes.
Does every build running LT in the front need an SUA rear? No.
Spring Over Axle (SOA):
- Better for rock crawling and higher clearance applications
- Provides more ground clearance than SUA
Spring Under Axle (SUA):
- Better suited for desert racing, fast, whoop-focused applications
- Usually provides more travel; specifically more up-travel or “Bump Travel” than SOA
- Lowers ride height
- Minimizes axle wrap
Spring Under Kits:
- Total Chaos Pre/4wd mid-travel (9.5″ travel)
- DMZ Pre/4wd (13″ travel)
- Dirt King Pre/4wd (16-18″ travel)
- JD Fabrication Pre/4wd (17-19″ travel)
- Camburg Pre/4wd (19″ travel)
Questions to Ask Before Buying

Before you run out and throw your hard-earned cash down on the first long travel kit that catches your eye we have put together a list of questions that everyone should be asking. As with most things in life people tend to gravitate towards the “bigger is always better” motto. Long travel is no different and the assumption tends to lean towards the company with the biggest travel numbers being the best. This couldn’t be further from the truth and the reality is the best product is the sum total of all of its parts/features. With that said here is the list of the top three questions you should be using when evaluating the different long travel kits.
1. How long has the company been in business?
There are a lot of fly-by-night off-road shops throughout the country and only a handful of companies have been around for 20+ years. Having the piece of mind that you are purchasing a kit from a company with a solid track record is invaluable. After all, if things fail or replacement parts are needed you want to know the company will be there to assist you.
2. How long have they manufactured long-travel IFS kits?
If the company has been in business for 20+ years but just started making long travel, you should consider that. Building an off-road IFS kit that can withstand whatever abuse you can throw at it is no small feat and refining the most optimum design can take years. The knowledge and experience a company holds are best gained from years and years of experience building long-travel IFS suspension components.
Most important of all is knowing that the company you purchased your kit from stands behind its product and is willing to assist you whenever you have questions. The older more established companies that have been producing long-travel IFS kits for decades are still in business for a reason and that’s not to be taken lightly.
3. What materials are used for the construction?
All too often this one gets glossed over but it’s important to know what materials these kits are made out of. Is the company using low-cost, low-strength mild steel or super strong, high-grade 4130 Chromoly? The strength difference between the two is dramatic and knowing what’s under that fancy powder coating is not to be overlooked!
4. What materials are used for the suspension pivots?
Is the company using poly bushings that become noisy and wear prematurely? Are they using harder Delrin bushings instead of poly? Did they do away with bushings altogether in favor of uniballs? How about sealed uniballs?
While the cost of uniball pivot arms has a greater upfront cost the performance and reduction of maintenance far outweigh the cost. Even better would be a sealed uniball design that will never squeak (like poly bushings) while remaining completely sealed from the elements. After all, the last thing you want is to drop a bunch of cash on a kit that is constantly needing maintenance to keep it from squeaking and rattling.
1. Total Chaos (+2″ and +3.5″)

Total Chaos has long been the leader of the LT segment for decades when it comes to LT Toyota applications. They offer everything from beginner kits to extremely advanced kits and for many makes and models. They are well known for their wide variety of sizes. They offer parts for both the front and rear of your Tacoma and if they don’t have a full plug-and-play option for the rear – they work with just about every company out there so they can recommend a comparable rear setup for whatever front you decide to purchase.
Kit Offerings
Total Chaos leads the race offering 4 total kits; multiple +2″ and +3.5″ kits. The +2″ expedition kit offers 2″ more ground clearance than the +2″ standard series kit. In the +3.5″ class, they offer two kits; the standard series & race series. The race series +3.5″ kit provides 2.5″ more ground clearance and is 5 pounds lighter per lower arm than the standard series +3.5″ kit. You can get any of these kits with bushing or heim pivots at the UCAs.
- +2″ Standard Series
- +2″ Expedition Series
- +3.5″ Standard Series
- +3.5″ Race Series
Find it online:
- +2″ Standard Series Kit
- +2″ Expedition Series Kit
- +3.5″ Standard Series Kit
- +3.5″ Race Series Kit
2016-Current
Trail Takeaway
Total Chaos starts at around $3100 and goes up from there. If you’re looking at the 2″ class, you might as well opt for their +2″ Expedition Series at $3600 as it gives you another 2″ of ground clearance over their standard kit. The same applies to their +3.5 Race Series kit. It’s only another $500 for less weight and more ground clearance.
The downside of Total Chaos is that they use poly bushings and not sealed uniballs or even open uniballs for the pivots. Also, the TC lowers are boxed and do not feature a slant for sliding over obstacles which you should consider if you like the rocks. Finally, you can buy the axle shafts on Total Chaos but you will need to assemble your inner and outer joints. They do not offer fully built axles at this time.
2. Camburg (+2″ and +3.5″)

Camburg is a race truck company at the core and they have been for over two decades. They build chassis, and axle housings for trophy trucks from the ground up and provide some of the most dependable parts for quite a few Ultra4 class builds. Camburg isn’t just moving the needle when it comes to quality fabrication, they also bring insane ingenuity to the table. They just released their new “slapper arm” kit which is a hydraulic bump stop connected to a lower control arm via a link. Simply put, it’s designed to vastly improve bottom-out control. If you like FOX shocks, you’re right at home with Camburg. They pair just about everything they build with FOX, however, Kings work as well.
Camburg currently offers two kits; a trail series +2″ kit with the slapper arm bump stops and a race series 3.5″ kit which can also be optioned with the slapper arm bumps. Both are available with bushing or heim pivots at the UCAs. You can add extended-length axle shafts, however, they do not come assembled. You will need to reassemble your outer and inner joints once the shafts come. For spindles, Camburg doesn’t offer a spindle gusset kit, however, they offer their fabricated performance spindle kit which works with their LT kit. If you want to option secondary bypass shocks, you need to call or order them separately. Also, if you want double-shear steering and outer/inner rod ends – you need to call.
Find it Online:
- Race Series Kit
- Rear Spring Under Kit
Camburg sells a bunch of parts for the rear as well; HD Deaver springs, a pre-fabricated bed cage, leaf perches, and a spring under kit. This company is the real deal when it comes to LT as they have been in the game for decades. The only challenge I see with the Camburg lower arms is that they sit lower than other arms due to their lower ball joint adapter kit on the LCAs. If rock crawling is important, this might be a kit you want to avoid as you will lose clearance here.
3. Dirt King (+3.5″)

Dirk King is relatively new to the long travel scene with roots back to 2011. DK got its start with Prerunner style front bumpers and custom fabrication services – with a focus on the Titan market. Then they finally entered the Toyota market with their boxed upper control arms in 2014, and then finally LT kits sometime around 2015-2016. Although Dirk King is relatively new to the scene, they have quickly become an industry leader. Right up there with Camburg and Total Chaos, Dirt King is quickly gaining market share with their high-quality kits and full-service product offering. I really like what Dirt King has to offer for LT.
They offer the +3.5″ race kit at this time boasting an impressive 13.5″ of wheel travel with the option of bushing or heim pivots at the UCAs. Their lower control arm features an aggressive slant on the forward face instead of a boxed design which will help clear obstacles in the rocks. Another notable selling point is that they use Derlin bushings, not poly bushings like TC. Finally, the DK lowers feature built-in forward positioning of about 1/2″ which pushes your wheel forward which is a plus for wheel placement for larger tires.
- +3.5″ Dirt King Kit
- Dirt King Axle Assemblies
- Dirt King Spring Under Kit
DK offers many secondary components that complement the kit both front and rear. To start, they sell fully assembled axles with the inner and outer CV joints assembled on LT shafts – shipped to your door. Not many companies other than JD Fabrication offer fully-built LT CV axles. This is a huge upsell for some who don’t want to pull apart inner and outer CV joints.
Dirt King also offers a spring under kit for the rear, a prefabricated bed cage designed for 16″ shocks, and the H70 HD Deaver springs you need for the rear. They also sell all the compatible coilovers, triple bypasses, and rear shocks for an LT kit. Dirt King carries and sells literally every part you need for a full plug-and-play LT kit for the 2nd and 3rd Gen Tacoma.
4. JD Fabrication (+2.25″ and +4″)

JD Fabrication builds desert race trucks and fabricates some pretty interesting parts that no other company makes. Their team has built long travel suspensions for well over 20+ years. These guys offer every solution the industry wants for LT, but be prepared to pay. Let’s start with their LCA pivot kit. This is the answer for larger tires. This kit removes the factory LCA mounting points and welds in a wider replacement with adjustable cams which push the lower control arm up to 1″ forward. That’s not pushing the caster (measured in degrees) forward, that’s pushing the center point of where your wheel mounts to the LCA.
This will clear a 33″ tire without any modification at all, a 35″ tire with minimal modification, and a 37″ with mild modifications (pictured above). JD Fabrication also offers one of the strongest CV axle joints on the market; the 934 Chromoly caged plunging CV joint with 300m axle shafts.
Additionally, they offer a set of inner fender replacements, a steering rack “slide rack” reinforcement, and all the other bells and whistles that most mainstream companies are producing; LT bypass shock hoops, double shear steering upgrade, Chromoly tie rods, spindle gussets, steering pump upgrades, spring under kits, and more.
They offer +2.25″ and +4″ length kits with just about everything you need to go along with them. We wrote a full overview blog post on their 2.25″ long travel kit and then another step-by-step installation guide as well. If you want to read more about the JD Fabrication offering, check out those posts for more on their kit offerings.
2nd Gen Tacoma (2005-2015)
- 2005-2015 Lower Arm Pivots $100 Off (Coupon code “trailtaco”)
- 2.25″ Long Travel Kit
- Front Skid Plate
- 934 CV Axle Upgrade Kit
3rd Gen Tacoma (2016-Current)
- 2016-Current Lower Arm Pivots $100 Off (Coupon code “trailtaco”)
Trail Takeaway
You can buy everything you need from JD Fabrication. One really important detail about JD Fabrication is that they do not use heims on their UCAs as heims that are exposed to the elements don’t hold up through extreme weather conditions. Instead, they have machined upper and lower uniball inner pivots that accept seals and are 100% weatherproof. At the time of writing, no one else offers sealed uniballs where the uppers and lowers pivot. Additionally, they use very high-quality sealed EMF uniballs for the outer pivots. This is a dependable LT kit for those that live in an area where harsh weather is consistent, or you drive on the beach with salt water, among many other scenarios.
All of their kits are constructed out of 1/8″ and 3/16” Chromoly with extensive internal ribbing. They also incorporate an integrated CV “pocket” built into the LCA so the arms can achieve more ground clearance. Finally, JD Fab kits will work with the OE style king and Fox shocks.
This is the kit we choose to run on our 2G Tacoma for a reason. It stands out from all the other companies on the market for our intended use; heavy rock crawling with trips to the beach and go-fast moments here and there. This kit really does it all – which is why I wrote this post.
5. LSK (+4.5″)

LSK makes a couple of monster long travel kits; a race kit for 2wd Tacomas pushing almost 16″ of travel, a spindle bolt-on kit for 2wd trucks pushing 14″ of travel, and a kit for 4wd rigs also pushing 14″ of wheel travel. All kits are +4.5″ wider on each side and come with the LSK signature heim pivot UCAs. And, instead of uniballs or ball joints connecting at the spindle, they feature heims boasting a full range of articulation where your only limit is how you set your limit straps and build your fender wells.
LSK is very different from every other kit on the market due to its unique a-arms, heim pivots, cam lockout plates, and supplied pre-built spindles. They also provide everything else you need for your kit; rod ends that connect double shear at their spindles, DOT extended brake lines, secondary shock hoops, the necessary shocks, and all the hardware you need to link it all together.
Even though they call their kits “bolt-on” there are still some areas that need to be welded so don’t let the product titles fool you. All in all though, if you’re going with a +4.5″ LT kit, you’re not worried about a little welding.
LSK does provide extended-length RCV axle shafts, however, you’re responsible for rebuilding the outer and inner joints when the shaft arrives. If you want prebuilt axles, just order +4.5″ LT axles direct from RCV – booted and all.
This is the kit you buy if you want to go extremely fast, maybe swap in a 2JZ, LS, or something insane that warrants some serious race travel.
6. Marlin Crawler RCLT (+2.75″ and +3.5″)

The leader in everything offroad is Marlin Crawler. They have led the race in aftermarket part fabrication for decades and their RCLT kit is no exception. It’s by far one of the most advanced long travel systems specifically designed for rock crawling, hence the name “Rock Crawling Long Travel” .
This is Marlin Crawler’s first venture into the IFS world and offers two options for the new LT kit; the +2.75″ and the +3.5″ version both pushing 12.5″ of wheel travel measured at the hub and 14.5″ at the centerline. The kit comes with horizontal ball joint linked at the spindle and bushing pivot UCAs, CAD design pre-fabricated knuckles/spindles with double shear steering points for their MarRack (200 Series Land Cruiser Rack), 1/4″ mild steel boxed lower control arms with horizontal ball joints, and finally, the kit uses FK uniball bearings and tie rod ends. The kit’s knuckles are pushed forward +2″ over the factory increasing both forward wheel positioning and approach angle.
Marlin Crawler has a few configurable options for this kit but it really breaks down into their “ Standard Installation ” which runs you about $9000 and their “ Ultimate Installation ” which sets you back almost $12,000. That’s with everything you need out the door; LT kit, shocks, axles, and steering rack.
The LT kit alone is around $7500.00. Then you have to pay for your shocks (coilovers and optional bypasses), the 200 Series Land Cruiser steering rack, and CV axles. This is a great LT option if you’re solely looking to dominate the rocks.
This kit is designed for the person that really wants this kit. Marlin Crawler has done a great job of selling this kit as the “premier option” and “leader” in rock crawling IFS, however, there are other kits that compete. Just because the slowest Tacoma on IG (owner of Marlin Crawler) is running 40s with this kit doesn’t mean you should or can. That Tacoma is also running dual cases (Marlin Crawler Taco Box) which helps to reduce the stress on many other parts and maintain control when wheeling at low and high torque. Running a reduction box is very important if you’re considering IFS on 40s for many reasons. These RCLT parts are impressive, yes. However, they do oversell some points on tire size and don’t tell the whole story of what really needs to be done to run 40s.
7. Baja Kits (+2″)

Baja Kits offers a +2″ kit pushing 11″ of travel. This kit is about as straightforward as it gets when it comes to long travel; boxed upper and lower A-arms, Delrin bushings pivot the UCAs/LCAs, uniballs, extended brake lines, and all the hardware you need to install. Baja Kits does show a photo of their “heat-treated axle shafts” that comes with the kit, however, they do not quote whether or not it’s Chromoly or 300M. We also don’t know if they use mild steel or Chromoly for the construction of the arms. At this time, no options are configurable for assembled axles, limit straps, cans/brackets for hydro bumps, spindle gussets, and/or UCA double shear gussets (although they do sell these separately), hoops for bypasses, and nothing in the steering department either. They do, however, sell King coilovers and bypasses.
The kit does not come with options for what most would consider “must-haves” when building a long-travel suspension so if you want a fully built-out LT kit with all the bells and whistles, you might want to look elsewhere.
All in all, you know the quality is there with Baja Kits because of their parent company. Brenthel Industries (a race truck build, design, and engineering company), builds and manufactures all their uppers and lowers.
8. All-Pro Off-Road (+2″)

The All-Pro Offroad kit is a +2″ kit boasting 12″ of wheel travel and 2″ of ground clearance. All-Pro Offroad actually offers a pretty robust kit for the money. For a similar price to what most kits sell just uppers and lowers for, All-Pro Offroad includes the majority of parts you need. In this +2″ long travel kit you will find tubular-style Chromoly UCAs and LCAs, limit straps with brackets, DOT brake lines, spindle gussets, rod end extensions, along with the inner and outer CV boot kit. The only items you won’t find included in the kit are shocks, bump stops and axle shafts. And, if you want secondary shocks, you will need to source the hoops and bypasses separately.
For around $3200, it’s actually a pretty good deal for a +2 kit. The uppers and lower are not boxed, but they are Chromoly so you know they’re plenty strong. The fact that it’s being manufactured and sold by All-Pro Off-Road should give you plenty of peace of mind going into the purchase.
These kits has been around for quite a while now. If you’ve been watching All-Pro recently, they’ve been slowly giving sneak peaks of their completely redesigned system. A system that is supposed to be a superior, direct competitor for the RCLT HD kit. More to come soon!
Find It Online
- 2005-2015 All-Pro Long Travel Kit
- 2016-2023 All-Pro Long Travel Kit
Final Thoughts

There is an LT option out there for everyone, however, the two most robust offerings on the market are from JD Fabrication and Marlin Crawler. Both companies offer the complete package and a quality solution for Toyota IFS.
JD Fabrication
We decided on the JD Fabrication 2.25″ kit for our Gen 2.5 Tacoma previously pictured above. JD Fab offers selling points that no other company offers, mainly found in their LCA pivot kit. The LCA pivots allow for larger tires without extensive cutting and/or tubbing of the firewall, depending on tire size. If you want to maximize tire clearance around the firewall, keep your Tacoma aligned to factory spec with the arms in the center of the adjustment range, and eliminate side load on pivot bushings all without sacrificing on-road driver comfort, then this is a kit to consider. They also paid very specific attention to ensuring that every pivot point on the suspension is fully sealed making the kit ideal for those that live in harsh climates.
This kit offers the best combination of “go fast” strength while still maintaining insane ground clearance in the rocks thanks to the integrated CV pocket. JD Fabrication has been building long travel suspensions for over two decades and on paper, their new LCA pivot kit challenges almost everything we know about Toyota IFS. The cool part about the LCA pivot kit is the pivot opening is the same as the factory which means you can run any lower arms that fit the factory all while pushing the tires forward upwards of 1″. Your options are endless with JD Fab, you can piece your own LT kit together or you can stay within the JD Fab ecosystem of products and also end up with a very custom setup.
Marlin Crawler
The Marlin Crawler 2.75″ RCLT sits at the top as another IFS LT contender and some will argue that it’s the best rock-focused LT kit out there, however, some have debated that point and the quoted travel numbers. That said, it’s made by Marlin Crawler who’s been a staple brand in the off-road community for decades so you know you can trust their quality which is why I think it’s a great option. The kit does feature quality selling points like a fully fabricated spindle and horizontal uniball pivots. These are nice, but a fully fabricated spindle doesn’t guarantee more up-and-down travel based on articulation range alone. Wheel travel is also limited by the inner fender well, fenders, bump stops/mounts, among other limiting factors.
RCLT quotes the kit as compatible with a 40″ tire as that is the tire size warranty limit of RCV axles, and the arms do push the tires forward upwards of 2″, however, a lot of work goes into running 40″ tires on Toyota IFS. You can expect more work than just upgrading your steering rack, CV axles, and connecting double shear points on the spindles. Also, keep in mind that the MarRack is simply a Land Cruiser 200 series rack. We installed one on our 2nd Gen Tacoma almost a year ago so it can be done on your own with any other kit, given you have the know-how. The benefit of buying a kit from Marlin Crawler is that you get their install kit for the rack which includes a jig and all the secondary hardware needed to connect the shaft. On the landing page of bullet points and benefits , Marlin Crawler sells the kit well, however, you need to source many extra parts on top of their kit. At the end of the day, you don’t have that many options with this kit. They offer two options and they’re both very expensive.
Other Options
LSK, like Marlin, also offers a very comprehensive kit with their fabricated spindle, although there is very little information online about their testing and performance.
If you’re looking for a bolt-on kit, Camburg, Dirt King, All-Pro Off-Road, and Total Chaos offer great entry-level to advanced options. These companies all offer straight bolt-on options along with add-ons that require fabrication as well. You can expect fabrication work anytime you add additional parts like secondary shocks, hydro bumps, and limit straps, among other items.
Within each of the company offerings, most differences come down to LCA and UCA design. Reference that section on this post again, and you’ll understand how important every aspect of the LCA and UCA design is when purchasing a kit.
It’s hard to choose one kit on this page as the “best” as there is no best in this industry, only the best for how you intend on using your truck.
Brenan Greene
Brenan is the founder of Trail4R.com, Toyota guy through and through, verified nature lover, lightweight photographer, exploration enthusiast, and certified serial blogger.

Great article… I’ve got a TC Race 2” on my 5th gen 4runner. I love the functionality but after fighting the poly bushings for years I’m ready to find a new system if I can’t find a lasting solution to their noise. They’re way too noisy! Any suggestions on managing the noise of poly bushings? (Other than lube and maintenance) If not, I’m ready to move on. Thanks!

Very very informative article, I currently have a stage 1 mid travel kit on my 3rd gen mostly used for overlanding and camping, but have been looking to upgrade to a “go-fast” LT set up and couldn’t have found a better article. Thank you lots I will rely heavily on your info as I still consider myself new to the OR community.
Great read !!

Awesome, glad you enjoyed it. Only took me 2-3 months to write. haha
Only question I have is how much of my current set up can I salvage or does it all have to b changed for a LT coming from the Mid Travel
It depends on the setup you’re running but for most kits you replace everything. You can always keep your factory spindles, steering rack along with inner and outer CV joints, but everything else is longer and wider. Those parts include coilovers, tie-rods, CV shafts, LCAs, UCAs, in addition to all the other parts and pieces you need. Things like limit straps, optional cam tab gussets, and optional double shear components if you choose to go that route.
i thought so, well seems my 2.5 kings are going on my dads 2nd gen lol thanks for the response and info

Going down the road of long travel for my 3rd gen Tacoma right now and this is by far the most helpful information online. Thanks for this.
Awesome, let me know if you have any questions.

correct me if I’m wrong, but if this adds some width to the front then what do you do to the back, like would you have to use spacers or offset wheels only in the back?
Yeah, you’re right. On our JD FAB 2.25” LT we’re running 1.25” spacers in the rear to match the front.

no mention of the Solo Motorsports XLT kit which is +4.5″ and offers 19″ of useable travel with 4wd
Yeah Solo makes some killer stuff. I’ll work on getting them integrated into this post when I have some free time. Thanks for the heads up.

Great writeup! I can’t wait to get my Total Chaos kit on my truck!

This is probably one of the most informative articles that truly adds value to the conversation of LT for Toyota.

Talk about a walk through of all of the pros and cons! LT is a very in depth subject for any vehicle, it’s nice to see a thorough dissection of the products available and why one might be better for someone over another. Bravo! I would like to see a little more general information on the maintenance that can be expected with an LT equipped truck, because there is a lot more than a stock setup 🙂

DUDE. Wow. I’ve spent a lot of time over the years doing quite a bit of research to really understand how to build my truck. Resources that go this deep are few and far between. This is definitely one you need to bookmark. This an essential post on all things long travel. I learned quite a bit too! Also, having driven your 2G, the JD Fabrication really is next level. That pivot kit is a game changer.

This was super informative, I didn’t realize that true LT started at 2″ always thought it was 3-4″+). TONS of considerations it seems if you want to do LT the right way and this is an excellent resource to get started ??
GET 20% OFF
Take up to 20% off at the 4runner store.

Long Travel Suspension System
“Turn your Hummer H1 or HMMWV into a Long Travel Monster”
Predator Inc. is excited to announce its Long Travel Coilover conversion setup for all model H1 or HMMWV Hummer trucks. With the popularity of Prerunners we wanted to offer a conversion that allows Hummer owners to easily get on the same playing field with a unique Long Travel Coilover conversion setup.

Predators Long Travel Coilover conversion is fully designed directly from manufacture specs to ensure the best fitment and geometry. The geometry of the conversion is one of the most important factors. With the use of complex r&d, Predator Inc is able to achieve the best possible combination of fitment engineering and suspension geometry.

During the engineering and design phase. Predator Inc gathered all the necessary factory diagrams from AM General which included frame, control arms, knuckle assembly, fender wells and any other parts that may need to be considered during the R&D phase for the long travel conversion.
Sheet metal is then water-jet cut, tubing is bent, and billet parts undergoing CNC machining. Predator Inc.’s quality control process is also a high priority. Each component is inspected upon completion to ensure all dimensions engineered in the custom specs are held to precise accuracy.
All the components and upgraded hardware are used to replace the factory parts. Weak ball joints throughout the suspension system are replaced with Trophy Truck grade Uni-Balls. Upper and Lower control arm are both replaced with our fully tubed and plated units to deliver maximum travel and added strength. The process transforms the complex engineering into fully custom bolt on performance.

Dampening duties are handled by custom-built 10″ King 3.0 coilovers which are fully height adjustable as well as compression adjustable. Eibach springs were used on the coilovers utilizing a combination of a 22-inch 800-pound coil.

Kings bypass valve design and superior tube flow capacity provides accurate flow control over the whole range of adjustment. Shock tubes are honed after plating to assure a tight piston seal and all bypass ports are CNC drilled and hand deburred then polished.

They are used as a primary suspension member to carry the weight of the vehicle and to maintain ride height while providing the adjustable valving and high quality ride characteristics King is famous for.

King bump stops provide an additional level of bottoming control and contain a unique piston design that offers superior flow characteristics. They also use the same quality micro polished shafts and advanced seal technology as their race shocks.

Lightweight hard anodized 6063 aluminum alloy reservoirs with high quality fittings are mated to Aeroquip high pressure hoses which resist abrasion and allow a tighter bend radius without kinking. The aluminum alloy reservoirs dissipate heat quickly and will not rust due to gas charging contamination.
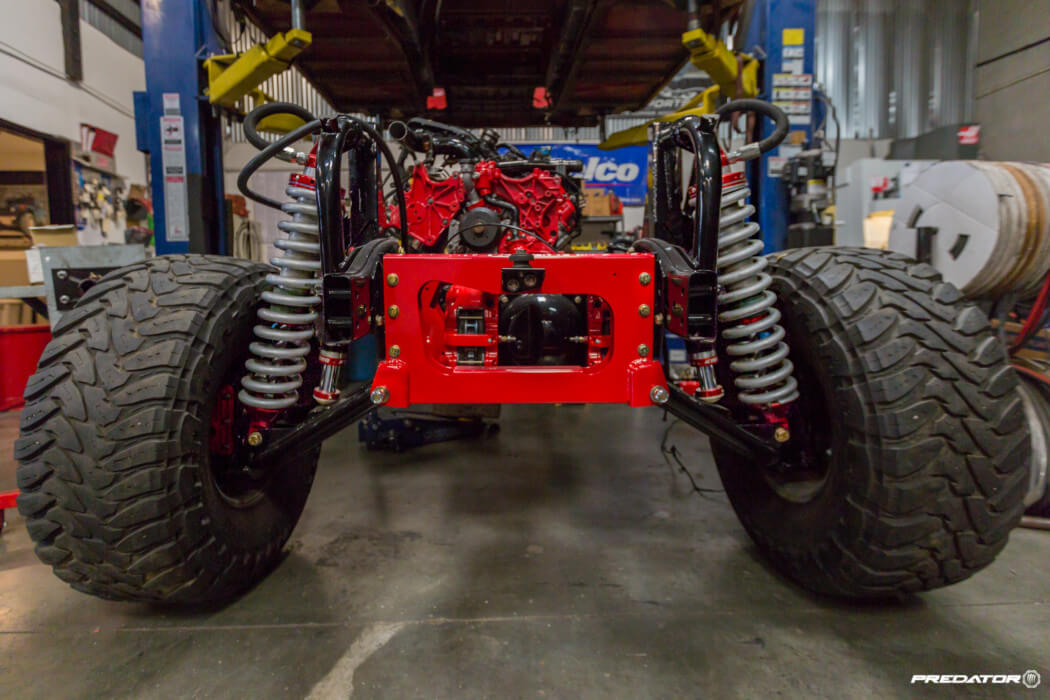
As you can see Predator Inc.’s Long Travel Coilover conversion is developed through tons of hours of engineering and R&D that are put into the design portion of the equation. All components combined offer superior ride quality and handling both on and off road.
- San Diego, CA
- USD CAD AED EUR MXN AUD
- 619.944.8913
- [email protected]
Shopping Cart
Continue Shopping
Welcome to Dirt King!
Long Travel Kit

Description
The Dirt King long travel kit was developed to drastically improve the vehicles off-road handling without compromising its day to day driving characteristics. This suspension system allows for 13.5” of travel and accepts up to a 37” tire. The kit is compatible with 2WD models and 4WD models along with the purchase of extended axle shafts. Our upper and lower arms are designed with 1” stainless steel uniballs for the outer pivots instead of ball joints for strength and increased articulation. This kit is the first of its kind, it’s a complete bolt on application with no cutting or welding to the frame on 4WD models. The suspension system was originally developed for Ram Trucks new concept vehicle, the Ram Rebel TRX which was released in mid-2016. After its amazing performance we decided to put the kit in production and make it available to the public!
Specifications
- Wheel Travel: 13.5”
- Amount of Lift: 0-4”
- Track Width: 3” wider per side
- Maximum Tire Size: 37”
- Maximum Backspacing: 4.75”
- Minimum Rim Size: 17”
- Coil over Shock Size: 2.5” x 8”
- Compatible with Sway Bar: Yes (DK-541955)
4WD Models To achieve the full amount of travel on 4WD models the inner CV’s must be machined for more articulation. We offer several services for machining CV’s and complete axle assembly. Click here to view the services we offer and additional information on CV machining.
What's Included
- Boxed plate upper control arms
- Boxed plate lower control arms
- 8" quad wrapped limit straps
- Bolt on adjustable limit strap mounts
- 17-4 stainless steel misalignment spacers
- 17-4 stainless steel tie rod extensions
- DOT approved extended brake lines
- Grade 8 mounting hardware
- Complete bolt on application, no modifications required
- Utilizes American made FK bearings
- 4130 chromoly uniball cups
- Choice of ¾” heims or delrin bushings for the UCA’s
- Delrin bushings for the LCA’s
- Zinc plated inner bushing sleeves
- Grease fittings for easy servicing
- 3/16" and 1/8” boxed plate construction
- Internally ribbed with extrusions for weight reduction
- Ability to adapt factory sway bar
- Limit strap tabbing
Compatibility
2009-2018 Ram 1500 2WD / 4WD * Please contact us if you plan on installing this kit with lift spindles or a bracket lift. * Front fiberglass required.
- Shipping Policy
- Returns & Exchange
Please view our shipping policy, exchange policy, and disclaimer information for details. If you would like more information or have any questions regarding our products, feel free to contact us for assistance by visiting our contact page.
Shipping & Delivery Dirt King ships their products within the United States and Internationally. Most products ship via UPS or USPS. Orders that exceed $500 require a signature confirmation. On bulk orders contact Dirt King for a freight quote. The customer is responsible for import taxes and fees on international shipments.
Damaged or Missing Parts In an instance where you receive a damaged package a claim must be made with Dirt King. The claim can be submitted by sending an email to [email protected] containing photos of the damaged packages and damaged products. The email must also include your order number as well. Do not discard any of the original packaging or try installing the products.
While every precaution is taken there could be a case where you are missing parts. If this happens please send an email to [email protected] with your order number, list of missing parts, photo of the package or packages, and a photo of the quality control tag located on the back of the box.
If the shipping carrier losses your package please contact Dirt King. A claim will be filled with the shipping carrier. Unfortunately, we do not have much control over this situation and must wait for the carrier to process the claim.
Freight Shipping The customer must contact Dirt King to arrange for freight shipping. Dirt King will palletize the order and the customer can deal directly with the freight carrier if preferred. The shipment can be delivered to a home or business. The customer must be present for the delivery to inspect and sign for the package. Before signing confirm that you received all items listed on the packing slip and nothing is damaged. If you receive damaged parts or are missing parts leave a note on the bill of landing and sign it. Make sure the driver is aware of the situation and signs your copy of the bill of landing with the noted damages or missing parts. Once you have taken possession of the package file a claim with Dirt King by sending an email to [email protected]. Please include your order number, copy of your bill of landing, and photos of the damaged items or list of missing parts. Do not discard any of the original packaging or try installing the products. Dirt King will do everything possible to resolve the issue as quickly as possible.
- Returns are only accepted within 30 days.
- Product must have been purchased from us and not a dealer.
- A 3% processing fee is deducted from all refunds.
- On shipped orders a 7% restocking fee and a 3% processing fee is deducted from all refunds.
- Products such as bumpers, hitches, and bed cages that have optional powder coat added are subject to a 7% restocking fee and a 3% processing fee. If the order is canceled before the product is powder coated then the 7% restocking fee can be waived.
- On shipped orders we are not responsible for return shipping or refunding the original shipping amount.
- Parts must be returned in the original package and condition as they were sent.
- No returns on items that have been damaged or installed.
- Refund will be issued once the parts have been received and inspected.
- Custom products are non refundable.
- Crypto orders will be refunded the same coin amount that was paid originally.
All products sold or manufactured by Dirt King are intended for off-road use only. Our products are strictly engineered and tested and are not to be modified from its original design in any way. Customer assumes all liability in assuring that parts are installed correctly and maintained. Dirt King is not responsible or liable for any accidents, injuries or deaths that may occur from the use of any products offered. Suspension modifications may change the dynamics and stability characteristics of the vehicle. Ensuring prompt wheel alignment and ADAS recalibration after suspension modifications is critical and the sole responsibility of the customer.

Related Products

Long Travel Race Kit
SKU: Make Selection

SKU: DK-632909

SKU: DK-542909

SKU: DK-541909

SKU: DK-631708-B

- Dealer Locator
- Become a Dealer
- Clearance Section
Help & Contact
- Refund Policy
- Privacy Policy
- Terms of Service
Keep in Touch
Special financing available with Goodyear Credit Card .
Get up to $200 back on select sets of 4 tires.
$120 Off Installation with the purchase of select tires.
Up to $100 back on select Cooper tires.
- All Services
- Repair and Replace Services
Shocks & Struts Service

Repair & Replace
Price Requires Inspection
- Add to Appointment
No matter how spectacular your favorite places are, getting to them is more fun when the road is smooth and easy to navigate. That’s the role your shocks and struts play. If you suspect you may have an issue with your car’s suspension, make an appointment and let us help ensure your suspension is working properly and in good condition.
- Your vehicle feels less stable
- It’s harder to handle your vehicle when turning
- White smoke is coming from under the hood—another sign your vehicle may be overheating
- Your tires are wearing faster than normal
- You experience excessive bouncing after driving over a bumpy surface
Looking for assistance?
What’s included in a shocks & struts repair at goodyear auto service.
During our shocks and struts service, we'll inspect the shocks, struts, and springs in your vehicle's steering and suspension systems for signs of wear or damage.
If we find any areas of concern, we'll work with you to help you decide whether a Shocks & Struts repair service is what you need to get you and your vehicle back on the road. This service typically takes 2-3 hours.
Where Can I Get My Shocks & Struts Repaired Near Me?
All Goodyear Auto Service locations offer repair services for your vehicle’s shocks and struts. If you feel your car’s suspension is less stable, find a service center near you and call us today for an appointment. Find a Service Center
What Do Shocks & Struts Do?
Working shocks and struts help provide a smooth, stable ride on the way to your destination.
Having your steering and car suspension routinely checked by our service technicians can also help you avoid premature tire wear, saving you money in the long run.
How Long Do Shocks & Struts Last Before Needing Replaced?
The good news is, shocks and struts last a long time and wear out slowly. It’s a good idea to have your shocks and struts checked after 50,000 miles (80,000 kilometers).
Find a Store
Your session has timed out and hence logged out from site. Please click below to login again.
Goodyear Auto Service - Chapel Hill Mall 1800 Buchholzer Blvd Akron, OH 44310
When is the best time to visit Moscow? | Weather, budget, events by month
- July 14, 2023

Discover when is the best time to visit Moscow. In this blog post, I will talk about weather, budget and other things to know to choose the best time when to go to Moscow for you. I cannot account the times when we went in Moscow. Here are the pros and the cons of each month taking all main criteria into account!
I will first describe the main criteria that will help you choose when to go to Moscow:
- Climate in Moscow: temperatures and weather
Special events in Moscow
- Budget and visa
Then I will talk about each season (go directly to this party if you already have an idea of the desired departure date):
- Advantages and disadvantages month by month
The weather cannot be the only criterion to decide when is the best time to visit Moscow for you. Even if the temperatures drop low, Moscow in December is just magical! This is why I advise to take into account several criteria at the same time. Also remember that it takes at least a month to get the Russian visa.
When to go to Moscow: climate and weather
The seasons are well marked. The mid-season months are not necessarily the best for the weather. However, they are not necessarily to be avoided, because, as we will see later, Moscow is a city that changes all the time and the prices can be more attractive. For example, for a lot of people winter is the best time to visit Moscow.
Weather in Moscow. Moscow is inland, making the city “more protected” from changing weather. For example, the weather is much more changeable in St. Petersburg. On the other hand, the weather in Moscow is more and more scorching in summer, we can then easily reach 30 degrees (for the Russians, it’s already the heat wave).
Moscow temperatures
As soon as you think of Russia, you want to do “Brrrr”. Let’s prepare our down jackets! Indeed, the Russian climate is not the mildest on the planet. However, it all depends on the region, because the country is very large. Moscow is almost at the same latitude as Copenhagen. As Moscow is relatively far from the coast, there is a pronounced continental climate. It is hot in summer and cold in winter.
In addition, global warming is there. For several decades, annual average temperatures have always been recorded above the past. I suggest you look at the averages over the past five years to be as close as possible to reality:
Sunshine and precipitation
Sunshine. This is surprising, but there is more sunshine in Moscow than in Paris or even in Berlin: 1,731 hours in Moscow, compared to 1661 in Paris and 1626 in Berlin.
Duration of the day in winter. We had questions about the length of the day in winter. So, here are a few things. As in Europe, the shortest days are in December. In Moscow, at the end of December, the sun rises around 9 a.m. and sets around 4 p.m. Then the day gets bigger until the end of June, when the day is the longest.
Precipitation. There is more precipitation in Moscow than in Paris (705mm against 637mm).
When is the best time to visit Moscow: interesting events
Moscow is a city that moves a lot. It is even said that this city never sleeps. So there are a lot of events, forums, exhibitions, conferences. Here I’m going to talk about the main recurring events that punctuate the year and that may help you decide when to go to Moscow.
End of year celebrations in Moscow
December 31 rather than Christmas. The Russians are eagerly awaiting the holiday season. Here on December 31 is like Christmas with us. Religion, “opium of the people” according to Marx, and, above all, its official absence marked the country during the Soviet years. This then reinforced the celebration of December 31, while Orthodox Christmas is January 7.
Russian calendar. In addition, it should be known that the first week of January is a bank holiday. Many Russians therefore do not work during this period. Europe also greatly influences the habits of Muscovites. Consequently, the Christmas markets start in early December and, for some, continue until early February!
Fairytale atmosphere. If you are wondering when to go to Moscow and you love the holiday mood, then the end of December – early January, and even February, is for you! There are many things to do during this time: for example, Christmas markets, decorations, winter games, skating rinks. In 2016, Moscow opened the largest ice rink in Europe. In short, the city is doing a lot of entertainment during this period and the general atmosphere is at the top! However, everything comes at a cost. You can see more detail below in the article, month by month.
Find our more in this blog post: Christmas and New Year in Moscow .

Visit Moscow in May
May 1 and 9 are two big festivals in Russia. Both dates are known worldwide. May 9 in Russia is May 8 with us in France. The signature that marks the end of the Second World War. The shift day is explained by … the difference in time zone.
The May 9 holiday is a very important holiday for the Russians. The Soviet human losses amounted to millions. So there are many families who have been directly affected by the war. The first big parade was organized by Stalin on June 24, 1945 in Red Square in Moscow. Later each year the USSR and then Russia organized a parade on May 9. Here is the video of the first parade dating from 1945 in color, then the last – that of 2016.
A disadvantage of the beginning of May. For the planned events, Red Square will not be completely empty. There are always installations for May 9, but also rehearsals. So, to the question “when is the best time to visit Moscow”, I would not say that May is the best one. You can find out more in the article “Moscow in autumn” below.
Throughout the year, the Moscow City Hall organizes free events (festivals, small markets, concerts, etc.) in the Red Square and in the streets of the city center. For example, there are two major interesting events:
- Festival of Lights “Around the World”: in 2019, it was from September 28 to October 4.
- Anniversary of the city of Moscow always celebrated the first weekend of September.
When is the best time to visit Moscow: budget, price seasonality, visa
Most touristy periods. Many travelers come to Moscow from May to October. This is the period when we see the most tourists in Moscow. In addition, many are also those who come at the end of December and at the beginning of January for the New Year. The beginning of May and the first week of January are also strongly requested, in particular by the Russians (school holidays, public holidays).
Accommodation. Hotel rates therefore necessarily increase during these periods of the year. But they do not go so far as to triple. To give an idea, count at least 80 euros in the city center for a double room with breakfast. You can read more about the districts of Moscow in my article: Where to stay in Moscow?
Guides and tours. Also take into account that during these periods it will be more difficult to find a guide at the last moment. It’s best to do it 2-3 months in advance. There will be more waiting or difficulty obtaining tickets during the months of high tourist influx: late December, early January, May, June, July, August.
Visa for Russia. The cost of the visa does not change depending on the month of the year. On the other hand, the deadlines can be longer if you make the request for the high tourist season (from May to October). Allow about a month. Getting the Russian visa is not complicated, there is a procedure to follow.
In Russia, the seasons are divided as follows:
- Fall: September, October, November.
- Winter: December, January, February.
- Spring: March, April, May.
- Summer: June, July, August.
Discover Moscow in autumn: when is the best time to visit Moscow in autumn?
From the beginning of September, we feel that the temperatures begin to drop gradually, especially at night.
Moscow in September
More and more travelers are choosing the month of September to go to Moscow. Because it is not cold yet and there are fewer tourists than in summer. Prices drop slightly, but remain higher than in the lean months of the year. There is also the city’s birthday on the first weekend in September, but also the “Around the World” festival towards the end of the month.
Moscow in October
You are likely to come across the colors of autumn from the beginning of October. The accommodation prices are starting to drop gradually. There is less waiting in the places to visit. Temperatures are not very low: during the day they are generally around +6 degrees. On the other hand, the only negative point can be the cost of plane tickets, if you leave during the French school holidays.
Moscow in November
It’s one of the least calm! Temperatures drop and can approach zero during the day in mid-November. Hotel rates are low, there are few tourists, and therefore less waiting in museums. It’s easier to get tickets for the Kremlin Palace of Armor, which can be very difficult in the summer. Guides also have more availability. So why not go to Moscow in November?
Discover Moscow in winter: when is the best time to visit Moscow in winter?
Winter is a very nice time to go to Moscow, because the Christmas and New Year decorations are installed from the beginning of December and are not removed until the end of February. To learn more about the different activities in winter, read this article: What to do in Moscow in winter? If winter temperatures scare you, check out Moscow in the spring (see below).
Moscow in december
Normally, negative daytime temperatures set in, although the weather can vary significantly from year to year. In general, from mid-December the snow is durable. It is from December 20 that more and more travelers come to Moscow. December 31st is celebrated like Christmas in France. Accommodation rates are higher from mid-December. It’s also more complicated to find a guide at the last moment. Furthermore, as in Europe, the days of December are the shortest of the year. But if you want to mark New Years Day, you will have lots of memories!
Moscow in january
January is also a very festive month. The first week of January is a public holiday in Russia. Besides, it’s also a week of Russian school holidays. There are more people in the streets, museums and everywhere in the city. To find out more about this time of year (Christmas markets, itineraries, etc.), read: Christmas and New Years in Moscow . Prices remain high during this week, but drop from mid-January.
Moscow in February
It’s the second quietest month of the year. In February, winter clearly takes its ease. The temperatures are the lowest, it’s a real winter! The days are longer in February than in December. So we’re enjoying the day more, and with the snow it’s really nice, because the weather in Moscow in February is pretty sunny. Accommodation rates are at their lowest, and the decorations are still there. So, if you are looking for when to go to Moscow, if the cold does not scare you and you appreciate the snowy landscapes, why not consider the month of February?
Discover Moscow in spring: when is the best time to visit Moscow in spring?
Spring is a contrasting period between March, which is still quite cold, and May, when we really feel the arrival of summer.
Moscow in March
The ice and snow begin to melt around mid-March. Winter is coming in March, but spring is not quite there yet. It’s the third quietest month of the year. It is therefore possible to visit the city more quietly. Accommodation prices are low, guides are available. The weather in Moscow in March is milder than in February. In addition, the days are longer, so you can take many walks.
Moscow in April
It is only from mid-April that we begin to feel the beginnings of sunny days. The weather in Moscow in spring and April in particular is getting milder and colder: we can expect +7 during the day. In addition, there are not many travelers yet and we fear to enjoy the places more quietly, but we feel that the start of the tourist season is approaching. Accommodation rates are lower than in May.
Moscow in May
The early May holidays attract many travelers to Moscow. There are also many Russians who come to the capital on public holidays. It is therefore advisable to plan visits in advance to avoid queuing once there. Red Square can be closed or partially closed for rehearsals for the May 9 parade, the same day and one or two days after. More info in: Moscow in May: events, budget, what to do?
Discover Moscow in summer: when is the best time to visit Moscow in summer?
All summer months are great, if you take temperatures into account. The weather in Moscow in summer is quite pleasant. However, in recent years, there have been great heat peaks or heat waves in July (30 degrees during the day).
Moscow in June
From June, you can take long walks in the city’s parks, very numerous and much appreciated by the locals. Boat trips are more enjoyable from June. On the other hand, the prices of accommodation in Moscow are higher than in the lean months. There are also more tourists. Book your hotel, tours and activities in advance.
Moscow in july
July is the hottest month, but we’re not on +40. Moscow is a city inland and therefore there is little fresh air, if it is very hot. We can do lots of walks to discover the city. We have written several complete itineraries so as not to miss anything of Moscow in our special Moscow travel guide. It also contains tips to save time and enjoy the city off the beaten track, as there are so many tourists during this time of year.
Moscow in August
Temperatures are starting to drop gradually, but there are still so many people. In order to be sure of the choice of accommodation, I advise you to book in advance. The same goes for guided tours or entrance tickets to the Kremlin. It’s also a good time to discover the city differently by going to places that are less touristy and more frequented by locals.
When is the best time to go to Moscow? In summary!
The best time to discover Moscow depends on the criteria you want to favor: the weather, the budget, the tranquility of the visits, the special events to be experienced on site.
In summary:
- The peak tourist season in Moscow begins in early May and ends in late September.
- Late December and early January is the best time to experience the holiday mood, but it comes at a cost.
- End of January, February, March, beginning of April, November are the quietest months of the year, when you can visit the city more calmly and on a reduced budget.
So, have you decided when to go to Moscow? 🙂 Do you plan to visit Moscow in spring, summer, autumn or winter?
Travel idea! As in all cases you will get a visa and there is only 4 hours by train between Moscow and Saint Petersburg, why not visit both cities? Read an example of a route here: Moscow to Saint Petersburg in one week.
If you still have doubts, take a look at what you can visit in Moscow in order to choose the best period: Things to do in Moscow in 1, 2, 3, 4 or 5 days.
For a great trip to Moscow:
- Visit Moscow and St Petersburg in one week: itinerary
- Where to stay in Moscow?
- Tourist voucher for Russian visa
Leave a Reply Cancel reply
Your email address will not be published. Required fields are marked *
Save my name, email, and website in this browser for the next time I comment.
Moscow Kremlin: skip-the-line tickets and 8 things not to miss
Bolshoi theatre moscow: how to buy tickets for bolshoi theatre ballet, you may also like.

Free Moscow map in English: Moscow metro map and city centre map
- December 12, 2023

Trains from Moscow to St Petersburg | Tickets, time, how does it work?
- December 6, 2023

Saint Basil’s Cathedral in Moscow | Tickets & things to visit inside
- March 7, 2024

Christmas and New Year in Moscow: best markets and decorations to see
- September 18, 2023

Novodevichy Convent and cemetery in Moscow: tickets, cemetery map
- August 26, 2023

Moscow transport: metro, bus & taxi in Moscow | How does it work?
- August 15, 2023
- Bahasa Indonesia
- Slovenščina
- Science & Tech
- Russian Kitchen
10 most popular cars in Russia (PHOTOS)

In Russia, every third resident has their own vehicle. At the beginning of 2021, 45 million passenger cars were registered in the country. Almost a third of these are made by the Russian car company LADA. Toyota is currently the second most popular brand, with over four million cars in the country— the RAV4 and Camry are the most popular models. Next come Hyundai and Kia with over two million cars each in the country.

Compared with the United States and most of Europe, where around two out of three residents have their own vehicle, the car market in Russia is still relatively open and continues to develop. Russia imposes rather large customs duties on imported cars in order to force international car companies to produce their vehicles inside the country. As a result, many foreign car manufactures have localized their production in Russia and in some cases even modified their car models to accommodate Russian road conditions and people's tastes.
Russians prefer low-budget crossovers and sedans. Hatchbacks and station wagons are less common, and small electric cars are generally an unusual sight (there are just 11,000 electric cars in the country, and 9,000 of them are the Nissan Leaf).
"Russians are not interested in hatchbacks because of the lack of association with a high position in society," says Alexey Kozhukhov, an automotive marketing expert. He notes that in the Soviet period, a long Volga sedan was considered a high-class car and a symbol of power, and that these associations have been passed on to subsequent generations.
Manufacturers have created economy-class sedans and SUVs that are specifically catered to the Russian market. According to the Association of European Businesses , in the first half of 2021 around 45% of new cars sold were crossovers.
Best selling cars in Russia in 2021
1. lada granta.

The simplest and cheapest car on the Russian market, the Granta is assembled at the AvtoVAZ plant in Togliatti. Some typical customer reviews state that the car is “reliable and without problems” or that “I didn’t have big illusions and got what I expected.” A sedan without air conditioning costs 560,000 rubles ($7,800), and the LUXE version with a heated windshield, cruise control and an automatic transmission costs 780,000 rubles ($11,000).
2. Lada Vesta

Lada’s latest model, the Vesta, is designed to be a sedan and crossover, although there is also a sports version. The car meets most consumers’ needs but is cheaper than foreign brands. “When I bought it, I understood that it was AvtoVAZ and there might be problems ahead, but the desire to buy this beauty simply prevailed, and I only wanted a new car in this budget,” one Russian driver writes , adding that he didn’t want to buy a used car.
The simplest model with a manual transmission, air conditioning and airbags sells for 795,000 rubles ($11,200), while the most expensive “Sport” version costs 1.2 million rubles ($17,000).
3. Hyundai Creta

This crossover is one of the most inexpensive cars in its class in Russia. Its price ranges from 1.2 million rubles ($17,000) to about 2 million rubles for the top version ($28,000). “Many Creta owners with a 1.6-liter engine complain about the sluggish dynamics. I wasn't looking for a racing car, so the car is fine for me. My priority was AWD, which fully justified itself. Now I can go to nature any time and not worry about getting stuck on a dirt road,” writes one driver from the Urals.
Hyundai also was also the first car manufacturer in Russia to offer online sales directly from the factory without the dealer.
4. Hyundai Solaris

The Solaris is a version of the Accent that was localized specifically for Russia in 2010 and is produced in St. Petersburg. Russian drivers seem quite satisfied with the model, which is a budget sedan that is resistant to temperature changes and harsh weather conditions and is generally reliable. “I wanted to use it for at least five years without looking under the hood,” wrote one driver about why he chose this model.
The Solaris ranges in price from 890,000 rubles ($12,500) to 1.3 million rubles ($18,300) for the top configuration.
5. KIA Rio

The KIA Rio has also been produced in St. Petersburg since 2011, and, like the Solaris, only comes in a sedan model, which is more popular among local customers. The design and technical characteristics of the Russian Rio are slightly different from versions sold in other countries. Many drivers note that it has good heating and the ability to start at minus 30 Celsius. As a result, the car has become one of the best-selling models in the country. It ranges in cost from 950,000 ($13,400) to 1.3 million rubles ($18,300)
6. Volkswagen Polo

All Polo models sold in Europe are hatchbacks, but in Russia Volkswagen opted to modify this legendary model to produce what has become one of the most popular sedans in Russia. “The car is a car. The trunk is huge and comfortable. There is quite a lot of space in the cabin, both in front and behind. The driving is not bad, better than other cars of this class,” writes one owner.
The Polo Sedan is assembled at a factory in Kaluga (about 200 km from Moscow). The cheapest model costs 1 million ($14,100), while the most expensive version goes for 1.9 mln rubles ($26,800).
7. Lada Niva

The first Soviet SUV is still in production and has a loyal customer base for its combination of being extremely cheap and strong for off-road driving. Many Russians use it to get to their remote dachas.
The simplest version costs 660,000 rubles ($9,300). The most expensive version is called the Niva Travel (formerly the Chevrolet Niva), costs 993,000 rubles ($14,000) and is equipped with a snorkel in case the car is overtaken by water in severe road conditions. And there is no automatic transmission! “Its passion is dirt roads, super suspension, it ‘swallows’ holes in the roads, you don't notice irregularities,” wrote a driver from the Amur Region in the Far East. However, customers note that the interior is not particularly comfortable and that the car consumes a lot of fuel.
8. Škoda Rapid PA II

This is another economy class sedan that has won the hearts of many Russian drivers. “The new Rapid is comfortable to drive, there is a lot of automation,” says one owner from St. Petersburg. They go on to write : “Turn the steering wheel and hit the gas, and switch on cruise control on a high-way, and the car will do everything else by itself.”
The Škoda Rapid is assembled at a plant in Kaluga. The simplest version costs 990,000 rubles ($14,000) and already includes a media system with a touch screen and Bluetooth. The most expensive version costs 1.4 million rubles ($19,700).
9. Renault Duster

Renault cars are assembled in Moscow. For a long time, the most popular Renault model was the Logan sedan, but this year the Duster SUV took that title. "Who can imagine a life that is no longer just being in a hurry," one driver jokes about driving the car. "The Duster is a family car. The car is enough to cheerfully stay in traffic" writes another.
The price of the simplest model with a manual transmission starts at 1 million rubles ($14,300), while the most expensive 4x4 version is twice as much.
10. Lada Largus VP

The only wagon model in this list is also produced by the Russian company AvtoVAZ. Largus is a fairly budget car that is popular not only among dacha enthusiasts, but also for commercial purposes. “The main plus is the suspension and stability on the road,” writes a driver from Tyumen (Siberia), “No need to worry about driving the highway on Largus in winter.” All versions are equipped with a manual transmission and cost from 780,000 ($11,000) to 978,000 rubles ($13,700).
If using any of Russia Beyond's content, partly or in full, always provide an active hyperlink to the original material.
to our newsletter!
Get the week's best stories straight to your inbox
- Russian driverless cars are ready to replace taxis. Watch out, hooman!
- Could a Soviet citizen buy a car?
- 5 facts about this amphibious 8-wheel Soviet monster car
This website uses cookies. Click here to find out more.

How Long Does It Take To Drive Across Russia?
Having been born and grown up in Russia, I have always wanted to explore this vast country and wondered how long it would take to drive across Russia from edge to edge.
I know that a lot of people would love to do a road trip across Russia, but when you look at the route on the map, it seems impossible to gauge how long the journey would actually take.
It will take a minimum of 11 days to drive across Russia from Saint Petersburg or Moscow to Vladivostok. The route is about 9,700 km long and the driving time has reduced considerably since the roads have been significantly improved in recent years.
Read on to find out what might affect how long it takes to drive across Russia the difference in time depending on the route you take.
Time to drive across the whole of Russia
First off, it's important to note that driving across Russia can mean a number of different things to most people.
In most cases, when people think about driving across the country, they naturally think of the route from Russia's capital Moscow to Vladivostok. Moscow is located fairly far west and Vladivostok is the best known city in the far east, located in a natural harbor in the Sea of Japan.
Driving across Russia from Moscow to Vladivostok will take at least 11 days on the road. The route is almost exactly 9,000 km and even if you spend all day on the road driving at the speed limit (mostly 90-110 km/h), you won't be able to drive much faster than this. I've seen reports of people doing it in as little as 7 days, but I am presuming this meant switching drivers, driving literally 24 hours every day, sleeping in the car and having very questionable hygiene by the time you arrive.
Starting or ending in Saint Petersburg adds another day to the time taken to drive across Russia as the route adds a further 700 km onto the journey - you'll have to drive right past Moscow along the way.
If you're wanting to do the most extreme version of driving across Russia, you might opt to start at the Latvian border (APP Ubylinka Border Crossing Station) and drive all the way to Magadan.
Magadan is located further east than Vladivostok and to get there, you'll have to drive through less developed parts of eastern Siberia through Yakutsk.

There are two Russian regions that are located even further east - Chukotka and Kamchatka. Although some expeditions have driven that far, you won't be able to do it in a regular car. Think thousands of kilometres of wilderland, volcanoes, no petrol stations and the requirement for your car to have to swim across rivers.
If you want to follow something that resembles a road, Magadan is about as far as you'll be able to go. Although the route is only marginally longer, be prepared to spend at least an extra 5 days on the road as you'll make slower progress along mud roads and dirt tracks that lead there.
Factors affecting how long it will take you to drive across Russia
There's quite a few factors that you should consider that may impact the amount of time it will take for you to drive across Russia.
First, let's bust a big myth that I hear mentioned all the time - the roads all the way from Moscow to Vladivostok are pretty decent and paved. You might find people on forums and various YouTube videos showing you mud tracks and the truth is that before 2014, a significant part of the Trans-Siberian Highway was indeed in pretty bad shape.
You could get to Novosibirsk and Krasnoyarsk in the heart of Siberia fairly quickly from Moscow along good roads and then things would get worse. Once you passed Lake Baikal, large stretches of the road near Chita were barely more than a path leading through a field.

A massive upgrade of the road network means that the entire route now lies along good quality tarmac which means your journey should be fairly smooth.
Just remember that if you decide to take detours, you're likely to encounter some very poor roads. Russians famously say that their country has two problems - fools and roads and you'll get to experience plenty of the latter if you decide to take a few scenic routes on your way.
How weather and seasons affect driving time
Russia is known for some of the most extreme weather conditions in the world. Depending on when you choose to drive across Russia, you may encounter anything from stifling 40 degree heat (104 °F) to bone chilling -40 °C (also -40 °F) winters. Although the roads are better than they were, they do pass through large swathes of wilderness , across streams and rivers.
In the spring and early summer, you may encounter more difficult conditions. Rains and fast flowing rivers can make some parts of the road network more difficult to pass and slow down your progress.
In July and August, you are likely to not want to drive long stints in one day - the weather can be incredibly hot and mosquitoes arrive in mid to late August. Your aircon may begin to struggle and you might want to make more rest stops.

Surprisingly enough, it is probably now quickest to drive the route in the winter. When the entire way the road is completely frozen, you can make progress without anything slowing you down as long as your car is equipped with proper snow tires.
You will need to prepare your car
Sure - you can technically make the drive in any car you like and given enough time and care you will get to your destination.
But Russian roads are well known for developing pot holes the size of a football field the very first winter after they have been constructed. The intense freezing conditions mean that water will find the cracks it needs to do the damage.
So be prepared to encounter a few jaw crunching pot holes along the way and make sure that your car's suspension is in good shape if you don't want it to give up a few hundred kilometres outside Blagoveshchensk.
A 4x4/SUV will be a much better option - especially if you plan on taking your time and making stops along the way to see more than just the highway.
Fastest route between furthest points east and west in Russia
For those who take the meaning of words literally, driving across Russia may really mean driving across the entire width of the country from the furthest point west to the furthest point east (or the other way round).
Kaliningrad is technically the westernmost point of Russia, but it's separated from the rest of the country by 2 countries, so let's assume that the border between Russia and Latvia is where you'l start.
The APP Ubylinka or APP Burachki are both popular border crossings and I've crossed in and out of Russia through both myself. Before anyone points it out, yes - the crossing between Russia and Estonia at Narva is slightly further west but unless you live in Estonia, you're unlikely to ever use it so your trip probably won't be starting there.
As I mentioned further above, the furthest east you can go is Magadan. This remote city is further north than Vladivostok and to get there, you'll need to come off the Trans-Siberian Highway at Never (yes - it's a real place even if that phrase sounds funny). You'll find the turning a few hundred kilometres after you've gone past Chita.
The route will then head north, deep into Siberia towards the Lena River and Yakutsk before heading east to Magadan. This road is not quite as new or well maintained as the Trans-Siberian Highway so you're likely to drive much more slowly taking at least 16 or 17 days to make the drive.
Driving Route across Russia
Although Russia is vast, there is only one real road that goes along the length of the country and this is the road you will have to follow if you want to make the journey.
Although it consists of many different highways, it is collectively known as the Trans-Siberian Highway all the way from Moscow to Vladivostok.
The first leg will take you from Moscow to southern Ural mountains that separate geographical Europe and Asia. You'll pass through the historic cities of Nizhniy Novogorod, Kazan and Ufa before arriving in Chelyabinsk.
Once you're over the Urals, the highway runs along southern Russia to Omsk before continuing to Novosibirsk and Krasnoyarsk right in the middle of Siberia.

The next major city is Irkutsk that sits just off the largest freshwater lake in the world - Lake Baikal and some 400-500 km later you will arrive in Chita.
If you thought you'd seen wilderness before you got to Chita, you will learn what real wilderness is fast enough. For hundreds of kilometres after Chita you will see no signs of civilization except the odd truck coming the other way. The majority of goods and people move across Russia by plane or train because of the huge distances, so you won't be seeing too much traffic en route.
The road follows close to the border with China eventually reaching the city of Khabarovsk before heading south to Vladivostok, just a few kilometres away from the border with North Korea.
How long to allow for a road trip across Russia
Although it can take as little as 11 or 12 days to drive across Russia, unless you are transporting a car imported from Japan or really need to get from one side the other as fast as possible without getting on the train or flying, you'll want to take a lot more time.
There's some great cities to explore along the way and although you may not want to stop in each one, it's worth taking some time along your way to explore different parts of Russia's rich history.
Kazan and Nizhniy Novgorod in the European part of Russia are amazing destinations for a city break so I'd highly recommend taking at least a day or two to stop there.
The big industrial Siberian cities are less historic, but offer a fascinating insight into the "real" Russia and it's worth stopping in at least one of Omsk, Novosibirsk or Krasnoyarsk.
If you love nature, the Altai mountains are located at the point where Russia, Kazakhstan, China and Mongolia meet and are one of the most beautiful mountain ranges in the world. You'll need to take a detour south off the Trans-Siberian Highway from Novosibirsk.
Lake Baikal is also a unique place that is right along your route and worth a few days of exploring - there's unique plants and animals that live in the area and lots of activities on the lake which is so vast it looks and feels like a sea.
To make the most of all these opportunities and to stop you from spending too much time sat in the car on continuous days, you'll want to allow at least 3 weeks to make the journey comfortably. 4 weeks will give you plenty of time to see most of the sights along the way and will allow you to spend less time driving on the days you're spending in the car.
Join our email list!
By joining our email list, you give LazyTrips permission to use your email for sending you newsletters, emails and updates including for marketing purposes. Your email will not be provided to third parties.
Related posts

IMAGES
COMMENTS
Titanium. I was wondering what everybody thought the best full size truck to stick long travel under out of f150, silverado, titan, tundra and the ram. i looking to build a sweet daily driver. Selling 2 of my vehicles to build one gnarrly a ss D.D. i was thinkin the Silverado was probably my best bet. looking to be able to compete in this ...
Prerunner is a truck modified for high-speed off-road racing on a rough desert terrain. Tips and tricks on how to build a capable and reliable prerunner truck. For sale listings and an in-depth look at the long travel suspension, bumper, fiberglass fenders, baja tires, roll cage, and other pre runner parts. Pictures.
By Mike Ingalsbee June 20, 2018. Editor's Update June 2022: As part of Off Road Xtreme's super popular PreRunner Building article series, we wanted to link the collection here for your convenience. You can find all the articles linked as part of this update. PreRunner Building 101: The Basics, PreRunner Building 102: Beginner Vs.
Most mid travel systems for this platform will net around 10 inches of suspension travel with just an aftermarket UCA and coilover. Most long travel systems for this platform will net 13 inches or more of suspension travel. And depending on the components, some can attain as much as 18 inches of travel, all while retaining four wheel drive.
Long-travel shocks can give you up to 20 inches of shock travel. Choose shocks with or without a remote reservoir for the off-road performance you've been expecting. Be sure to measure the physical length of travel that your shocks will need. These shocks are designed for professional tuning, whether in a pre-runner or your dedicated race truck.
This truck's platform has so much potential and I'm still putting all the pieces together. 7. Nathan Krig - 2021 TRD Pro. Long Travel Suspension Details. Front: Total Chaos 3.5" Race Long Travel Kit; King 2.5" Long Travel Coilovers w/ 700lb springs ... Long Travel Suspension Details. Front: ...
The truck is equipped with the Dirt King 4WD long travel kit with spec coilovers and bypasses to provide maximum wheel travel on desert terrain. The rear end has the Dirt King prefab bed cage, spec bypasses, long travel shackles, and Deaver R81 springs. The truck also features Dirt King prerunner front and rear bumpers.
Let's talk Long Travel Suspension. Suspension is the separation and connection to the ground below us, and (like most things overlanding) can be upgraded. These upgrades provide more lift and more ground clearance, and give us more adjustability and comfortability on the road and trail. Suspension upgrades run the gamut of simple spacer lifts ...
2021-2022 Ram 1500 TRX. Ram designed its top-trim 1500 pickup truck-the TRX-for blasting across the desert. With a supercharged Hellcat V8, the TRX is the fastest internal-combustion-powered pickup-ever. "The supercharged 6.2-liter 702-horsepower engine in the Ram 1500 TRX is a beast, far surpassing the Ford Raptor's 450.".
KORE Off-Road Dodge Ram 1500. KORE Off-Road's long-travel suspension system for '09-13 Dodge Ram 1500 4x4 trucks delivers 14 inches of wheel travel. The Baja racing inspired suspension system ...
2wd: $1,600+ | 4wd: $2,200+ | +$185 align. Make. Model. Year. Toyota. Tundra. 2007-2021. Our off-the-shelf long-travel kit for the 2007-2021 Toyota Tundra's has been raced down in Baja, Mexico, stateside in the Best in the Desert race series and all the way to the Dakar Rally. No other long-travel kit for these trucks has been pushed and used ...
In this high end Camburg Long Travel kit you will find nothing but the very best in A-Arm performance. Starting with our lower arm, uni-balls in the lower frame pivots, uni-ball lower ball joint replacement, and a stout boxed race arm. The upper arm pivots on urethane bushings with zerk fitting and 1.25″ uniballs replace Read More "Camburg Toyota Tacoma 2wd/4wd 16-23 Race Series Long Travel Kit"
This suspension system allows for 12" of travel and accepts up to a 37" tire. Description The Dirt King long travel kit was developed to drastically improve the vehicles off-road handling without compromising its day to day driving characteristics. ... . \u003c\/p\u003e\n\u003chr\u003e\n\u003cp\u003e\u003cstrong\u003eShocks\u003c\/strong ...
The Dirt King Fabrication Ford F-150 long travel kit was developed to drastically improve the vehicles off-road handling without compromising its day to day driving characteristics. This suspension system allows for 12" of travel and accepts up to a 37" tire. The kit is compatible with 2WD models and 4WD models along with the purchase of extended axle shafts. Our upper and lower arms are ...
A long travel leaf spring setup can handle substantially more weight with fewer problems than other designs. This is why we see solid axles under most SUVs and every sized truck. However, suspension systems for solid axles are many, and they all have their own strengths and weaknesses, as well as their individual ways of modifying them for the ...
Complete high performance long travel kits with 2.5 King coilovers for your off-road truck, prerunner, or SUV. Boxed and tubular kits range from 2 to 3.5 inches wider per side and offer up to 13 inches of wheel travel depending on the kit. King coilovers with remote reservoirs and compression adjusters complete the front end kit.
5. LSK (+4.5″) LSK makes a couple of monster long travel kits; a race kit for 2wd Tacomas pushing almost 16″ of travel, a spindle bolt-on kit for 2wd trucks pushing 14″ of travel, and a kit for 4wd rigs also pushing 14″ of wheel travel.
Predators Long Travel Coilover conversion is fully designed directly from manufacture specs to ensure the best fitment and geometry. The geometry of the conversion is one of the most important factors. With the use of complex r&d, Predator Inc is able to achieve the best possible combination of fitment engineering and suspension geometry.
Dirt King Fabrication Ram 1500 long travel kit was developed to drastically improve the vehicles off-road handling without compromising its day to day driving characteristics. This suspension system allows for 13.5" of travel and accepts up to a 37" tire. ... The suspension system was originally developed for Ram Trucks new concept vehicle ...
Shocks & Struts Service. The components of a vehicle's suspension system, such as the shocks and struts, need inspected, repaired, and even replaced over time. Our service technicians will inspect your vehicle's suspension systems to identify any potential issues with the shocks, struts, and springs, then we'll replace them as needed.
Moscow in december. Normally, negative daytime temperatures set in, although the weather can vary significantly from year to year. In general, from mid-December the snow is durable. It is from December 20 that more and more travelers come to Moscow. December 31st is celebrated like Christmas in France.
The simplest model with a manual transmission, air conditioning and airbags sells for 795,000 rubles ($11,200), while the most expensive "Sport" version costs 1.2 million rubles ($17,000). 3 ...
It will take a minimum of 11 days to drive across Russia from Saint Petersburg or Moscow to Vladivostok. The route is about 9,700 km long and the driving time has reduced considerably since the roads have been significantly improved in recent years. Read on to find out what might affect how long it takes to drive across Russia the difference in ...